Showing posts with label Quakertown. Show all posts

Thursday, August 1, 2013

Come Quilt!

 
It seems that just when you are getting control of your time, life happens!  That has certainly happened to me... with lots of either happy or aggravating interruptions.  But life does go on. 
 
One of this blog's readers asked about how I go about goal setting and organizing my quilting.  It's pretty simple!  Most importantly, I am a list-maker.  I keep a running list of things I want to start, work on, or finish.  It keeps me focused.  Sometimes it even keeps me from adding more things to my list (yes, occasionally I say the NO word...).  I keep the lists on little index cards that I carry with me -- I cross things off the list when I've accomplished them or had a change or heart, and add more things as they arise during the day.  I pull the lists out each morning and decide what I'm going to get done... and I estimate how much time it will take, so I can organize my day accordingly.  Then I re-make the list and I'm ready to start the day.  When I have longer-term projects that have deadlines, I add notes to my Outlook calendar (the one tied to my email).  I will put items on my calendar just as reminders of what I plan to get done on a particular day - like "prep eagle block" on Tuesday or "bind raffle quilt" on Wednesday.  And I sometimes code them in colors, so I know how important the action is.  All of this keeps me from falling too far behind.  So far, it has worked for me.  The biggest problem is still - as always - how to invent 24 more hours in a day.  Where is Albert Einstein when I really need him?! 
 
But let's move on to some quilt pictures!  You've seen this quilt before, but I thought I'd show it again.  It was juried into the International Quilters Association (IQA) quilt show in Houston this Fall.  I'm honored to be included!  The quilt is based on a block in a red and green antique wedding quilt made in 1853 by Serena Tucker.  I had always wanted an old-fashioned-looking blue and cheddar quilt and this was my choice for using those colors.  When I finished the quilt, it was the gaudiest thing I'd ever seen...
 ... until I quilted it.  Adding some very formal quilting totally changed the look of the quilt; it was an amazing transformation.  Those 36-inch ugly blocks suddenly became glorious.  If you're in Houston this Fall for the show, hunt down Tucker's Tulips!  I want to point out, too:  the vases are actually built out of three different fabrics.  I couldn't find one fabric that had enough "depth" to the design to carry such large vases.


And if you see that quilt, you might also see this quilt, Twirly Balls and Pinwheels.  It was also juried into the IQA show in Houston this Fall.  I was very excited because I really like this quilt!  It is also based on an antique quilt -- one made in the 1800s by Fanny Tod.  Her quilt had a different block in the layout, but what I loved about her design was the pinwheel sashing that extended out into the border.  I thought it was pure genius in terms of design.  Those pinwheels have 1-inch half-square triangles in them.

Here's a detail shot -- I had so much fun choosing the colors in this quilt.  I used lots of dark brown, light brown, gold, rust, cheddar, and red fabrics.  Despite not using bright fabrics in that pallet, the quilt pops with color!


Some of you remember my Lily Rosenberry quilt, with its 1,003 berries.  My friend Georgann W also had a quilt juried into the Houston show, Little Lily.  It's a small 4-block version of Lily Roseberry, with Georgann's unique border addition.  It's going to be a great show this year, if you can make it to Houston!


I've started doing an occasional lecture and workshop around the country -- a few weeks ago, I spent a couple of days in Kerrville, Texas.  Kerrville is a beautiful little town out in the hill country of Texas.  The gals in the Hill Country Quilt Guild were delightful to be with.  The workshop they had me lead was on making feathered star blocks; here are two of the finished blocks from the workshop.  The first one was made by Donna S; she chose a variety of wonderful batik fabrics that just made her star sing!


And this feathered star, made by Barbara W, has some of my favorite cheddar fabrics in it.  Her star made me want to pull out my cheddars and start sewing!  Look at that precision piecing, too.  Wow!


After the Kerrville workshop, I drove home and my monthly UFO (Unfinished Object) bee met.  This bee was started years ago because many of us have a ton of UFOs in our closets.  We found that most bees tend to meet and eat... with not a lot of time left to sew, and certainly not enough to bother hauling a machine out.  In theory, at least, this bee starts earlier and lasts longer than most others.  And one of the things we do is share what we've been working on... and finishing.  Becky S brought this quilt to a recent bee - she used up a ton of plaids, just sewing Roman Coin strips together.  I love how the variation in light, medium, and dark plaids, along with the variation of the strip width and length, make this quilt so pretty.

 
Here's a close-up of the quilt.

 
Becky also showed us a scrappy quilt made using tons of half-square triangles (I think they were 2" finished size).  She loves cheddar as much as I do, so her choice of the cheddar floater border immediately caught my eye.  We had talked a month earlier about how to "finish" the blocks and decided that extending them out into that cheddar floater would give the quilt a very consistent but unique look.


Here's a close-up of the quilt - it is such a great way to use scraps.  What makes it so special is how Becky chose those lights and mediums and darks when she laid out the blocks.


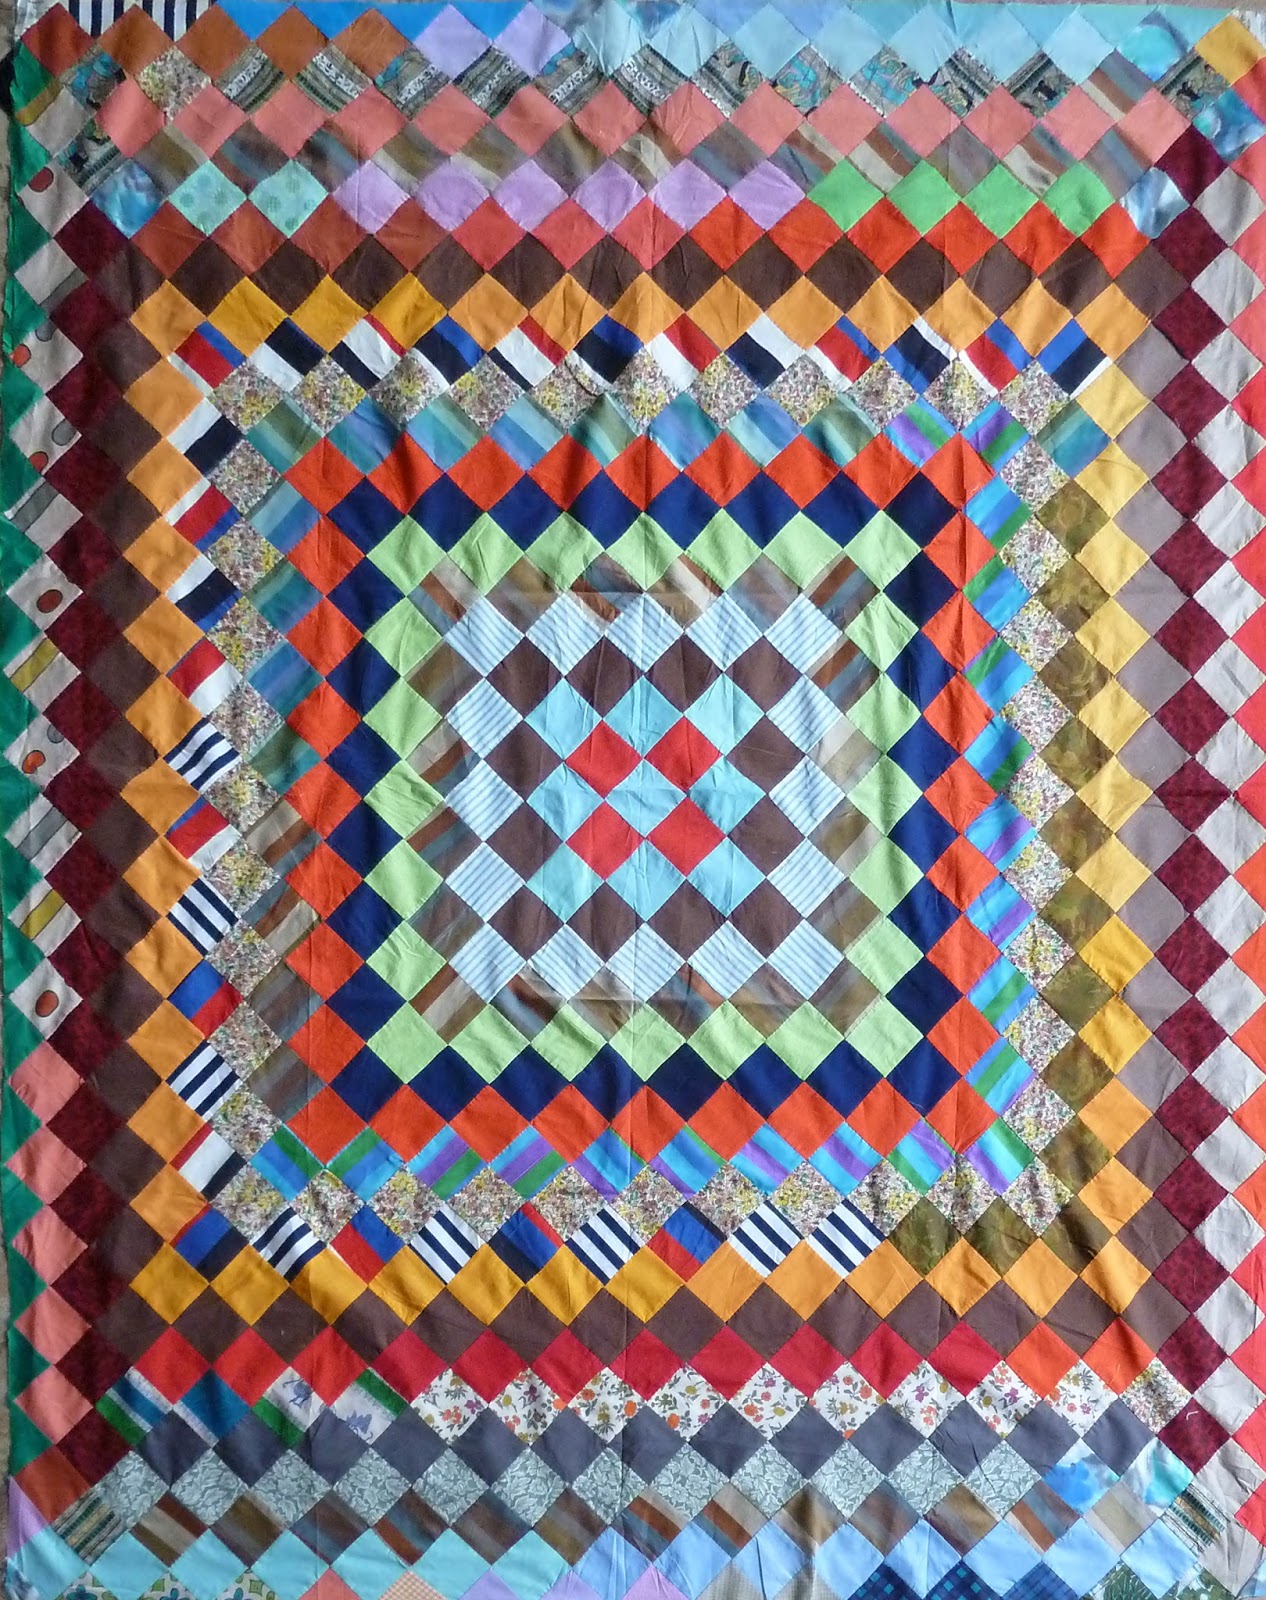
At another bee, my friend Marsha F showed her scrappy quilt -- you can see a quarter of the quilt here.  I love how quilters can find uses for the tiniest fabrics!  This quilt was made using 9-patches from a big exchange Marsha was in; they exchanged 3" (finished size) 9-patch squares with a black background fabric.  When I see this quilt, my mind starts thinking, already, about how many different ways 9-patches can be set, and how many different fabric combinations could be used -- from civil war reproduction fabrics and shirtings... to all red prints with white-on-white backgrounds -- it's so much fun to have your mind working overtime like this!
 
 
Jean C also showed us all a quilt she's been working on for a while.  This is a wonderful design; I believe Jean got this from Common Threads Quilting in Waxahachie, Texas; it's a great quilt shop. 

 
Jean also got this quilt back from her longarm quilter, Cynthia.  Jean created this design after seeing an antique quilt belonging to her friend Sharon. The original quilt had more Princess Feather blocks in it, but Jean stopped at four and added the center block, border, and tiny piping between and around all of the blocks.  It was a visual gift for us!

 
Here is a close-up of the princess feather block, with its tiny reverse-appliqued spine within the princess feathers, which is filled with an even tinier stem within the spine.

 
Check it out...

 
And the block center is just as detailed.

 
The border has fussy-cut flower centers.

 
And the quilting is gorgeous.  These are very large blocks - well over 20 inches in size, leaving a large square for quilting in the "open" or empty blocks.  I would never have thought about putting four feathered wreaths in the open blocks; I would likely have put in a triple feathered wreath - but I like the look of these wreaths, with cross-hatching in the background.  That idea will likely show up in a future quilt of mine!

 
Kenneth P gave gave a dozen or so quilt tops to one of our guild members; they were made by his stepmother.  The guild member (Jerrianne) donated several to our guild for its annual auction.  Here was one of the quilt tops that came to the guild - a Trip Around the World design.

 
It was pretty flat... which was a blessing, as some of the quilts weren't as well made.  Here's a close-up of the center - the piecing is actually very well done.  Check out some of the fabrics this quilter used -- she really took "waste not, want not" to heart.

 
And to make it even more amazing -- it's all hand pieced!  We don't see a lot of quilts like this any more.

 
I quilted this quilt; if you want it, it is going to be in our guild's annual auction on August 19 (you can go to www.lakeviewquiltersguild.org for details). 

 
So what else have I been quilting and working on?  I quilted another quilt for my guild's auction; it'll also go home to the high bidder on August 19.  This quilt is an oak leaf reel, with each of the blocks made by a different member, using my block design.  I'll show you a bit about my quilting process.  Here's the quilt, loaded and ready to quilt.

 
Here, you can see that I've started doing all of the cross-hatching of the blocks.  Knowing that the applique would be lightly quilted, I didn't want to have overly dense quilting around the blocks, so I chose to do a 2-inch cross hatch pattern in the background.  Rather than do a ton of stops and starts in the area between the hoop and the oak leaves, I used "pebbles" - they are easy and made the block stand out a bit.


In the 4-inch sashing between the blocks (which I specifically asked the group to use because I wanted "air space" between the blocks), I added a feathered vine.  I love feathers - love, love, love them!


Here's another shot.

 
And then... the border.  I said I loved feathers and I meant it.  I chose to do a meandering feather border on this quilt. 

 
Here's another look at that border.  Rather than fill the entire border with feathers, I sometimes like to throw in what I call "pearls" in the open areas of the border.  I think it adds a bit of variation to an otherwise quite repetitive "fluffy" border design.  Since I free-hand these feathers, those puddles of pearls give me some "fill" options between the feathers. 

 
So now, here is a view of the sashing and blocks... finished.

 
And a look at the finished quilt.  For the right bid, you could take this sweetheart home on August 19!

 
A friend dropped by my house a while back and brought along a quilt that she'd just purchased on a trip.  I was so glad to see it -- I love red and green quilts and this one was no exception.  I can't help but think about the quilters of a hundred years ago who had none of the tools and notions that we have -- no rotary cutters, no bias press bars, no mylar circle templates... and yet their quilts are still beautiful today. 

 
Here's a close-up of one of the blocks.  You can see a bit of the red fabric has started to shatter - but the quilt is still in amazing shape and relatively clean.

 
The quilting in this quilt is great - feathered wreaths with flowers in them.

 
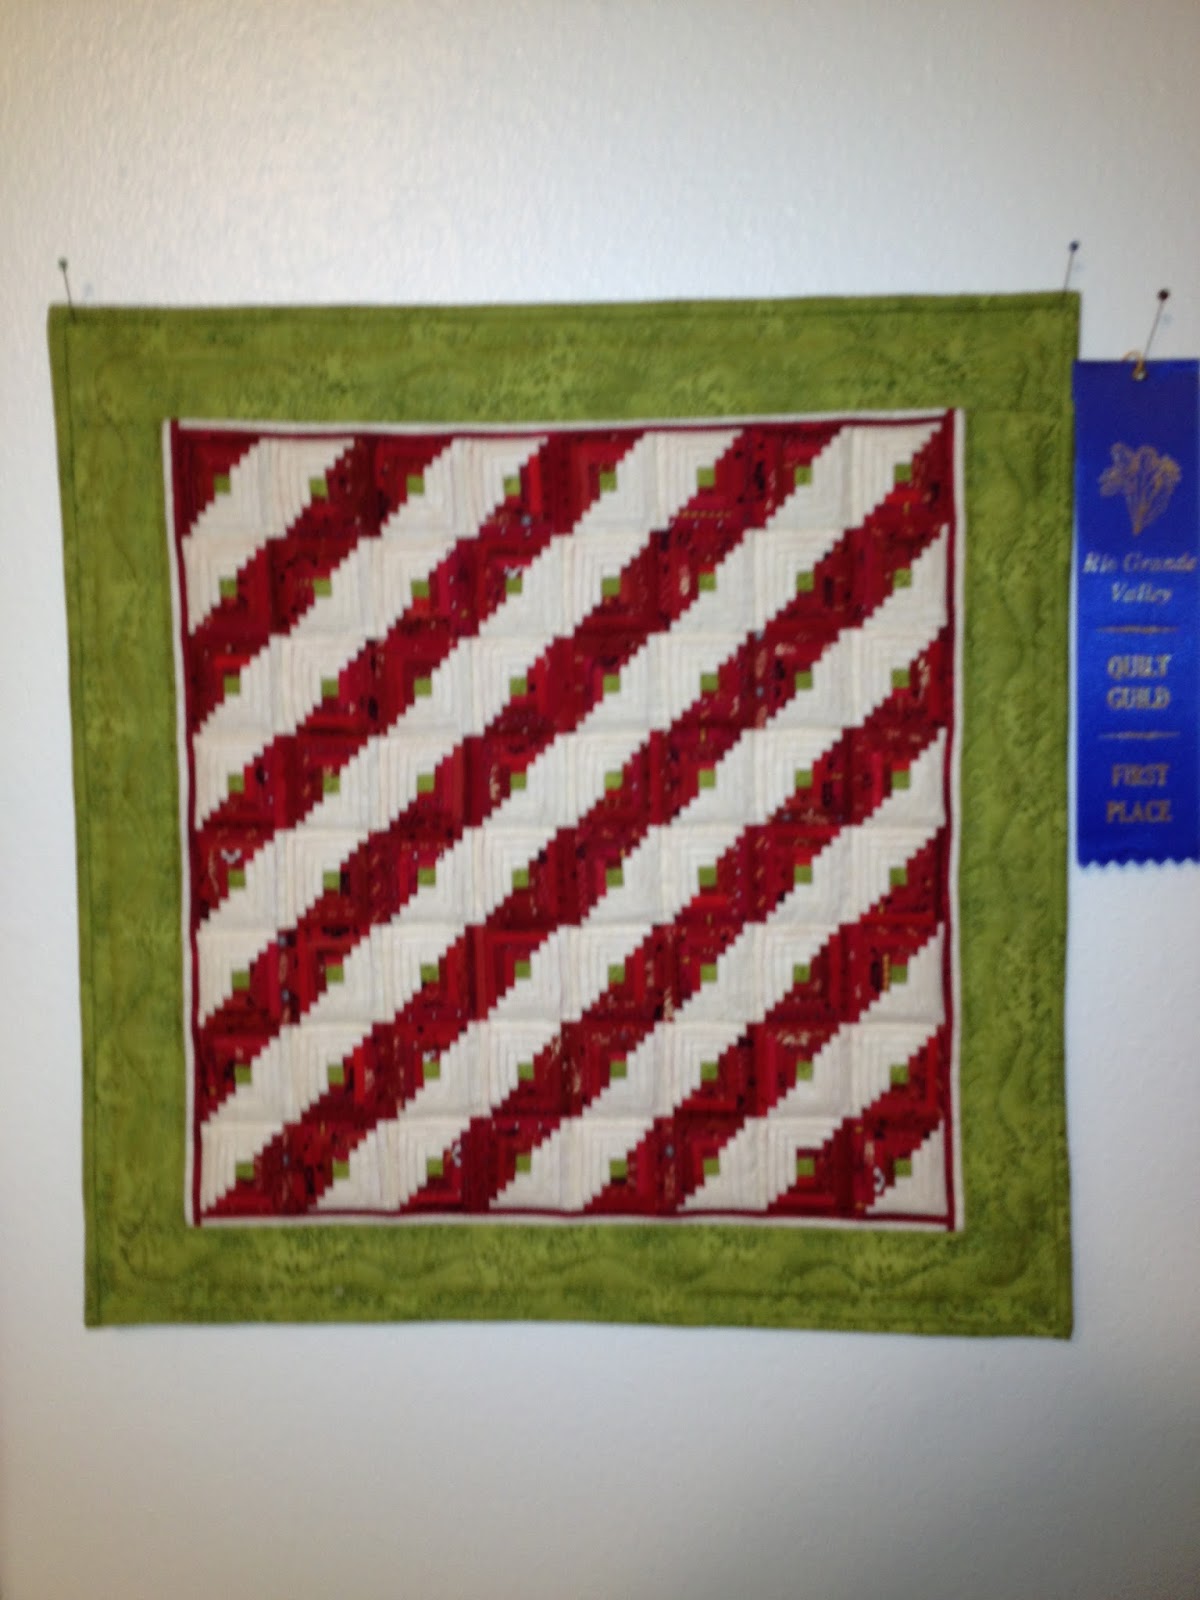
Here is a lovely quilt that a reader sent me - it is a tiny... and I mean tiny little log cabin quilt... made by Kathleen D.  Kathleen's quilt won first place in this year's Rio Grade Valley Quilt Guild.  This sixteen inch square quilt was made using all of the leftover red fabrics from Kathleen's Sarah's Revival quilt.  There are 64 one-and-a-half inch blocks with seventeen 1/8th inch pieces in each block.  She says she loved working on this quilt as much as Sarah's Revival, which she finished and is going to hand-quilt.  Congrats to Kathleen!

 
Last, but not least, I have some news to share.  Some of you know that Quakertown Quilts made the precipitous decision to close, giving me little notice to put processes in place to handle getting patterns to the wonderful quilters who are in the middle of a block of the month.  Having said that, YOU don't have to worry about getting my patterns.  If you'll send me an email at suegarman at comcast dot net (and I have to spell this out like this so that email harvesting programs can't pull my email out and spam me to pieces), and tell me what you want, I will reply by email with the cost and ask for confirmation if you still wish to get the pattern(s).  I can do a very rapid turnaround on orders, so you should not have any problems getting what you need. 

I am in the process of setting up my own website at www.comequilt.com -- it's not up and running YET, but here's my new logo:

 
I have to work out all the glitches of getting a website provider, populating the site with products, figuring out all the ins and outs of credit cards, etc. -- none of which I have any experience doing.  The website should "go live" in a month or so.  For at least the near-term, I will not be kitting patterns (i.e., providing fabric); there's so much else I have to take care of, including continuing to design new patterns. 

Nonetheless, I'm really excited about this!  Despite the angst of being caught in the lurch, this may end up being a blessing, as I hope to provide the kind of service and support we all expect, and offer some creative new options to everyone. It goes without saying, but I'll say it anyway, though:  if you already have a favorite quilt shop that you go to for my patterns, they will still get them - so stay with your favorite shops! 

Until next month --
Happy quilting!

Sue

(c)2013 Susan H. Garman

Friday, February 1, 2013

Creativity!

 
Happy February to everyone - a month full of holidays with Groundhog Day, Valentine's Day, Mardi Gras, President's Day, and more.  For me, it's a time to catch my breath after January, and see if my goal setting is on track or if I've already fallen behind.  In truth, I'm behind because it was only today that I finally sat down and figured out what I want to accomplish for the year!  I have lots of ideas... lots of projects... lots of hopes... and I plan to have fun doing all of it.  Life is good!

This month I will share how many of my ideas flow from one quilt into the next -- it's an exercise in creativity for me:  to take something I like and use it again in a fresh way.  At the same time, you can view some of my quilting; I do believe that quilting can help bring a quilt to life.  And finally, I'll close with some comments about your comments and various emails I've gotten.  Let's get started!
 
Mama Said was a quilt I made several years ago.  I wanted to make a quilt that would honor my parents, and this was the result.  The nine blocks celebrate what I was taught to do - and those living verbs remain with me today.  You cannot see it in the picture below, but each block is surrounded with embroidered phrases that also "taught" me something.


Here's a close-up of one of the blocks; in it you can read some of the phrases that are embroidered around the block.  I had so much fun creating this quilt!

 
After I finished Mama Said, I took several of the blocks and used them to "play" with various border options.  I wanted to explore how to create different borders and how to let one idea flow into another creation.  In this first one, Share, you can see that I used the same border motifs but changed the overall color scheme - and the quilt block was enlarged quite a bit.  Sometimes creativity does not have to be more complicated than changing sizes and colors.

 
Here's another large wall hanging using one of the Mama Said blocks, Trust.  I loved this quilt because it was the first time I tried making quarter-square triangles and using them in a border.  Those quarter-square triangles are 3-inches in size.  I chose to explore letting applique overlap the pieced borders behind it.  It gives a quilt another dimension and sense of depth to do that. 

 
Here's a close-up of the word at the top of this quilt -- I loved adding different motifs as I created this quilt. 

 
And here, in Laugh, is one more of the "child of Mama Said" quilts.  This is smaller - about 2 feet by 3 feet - but I love its simplicity.  In this quilt, I took the Laugh block and added borders and then quilted it with a delicate cross-hatching.  The colors are different than the other colors, too - I like seeing how different colors give a different feel to a quilt. 

 
Here's a close-up of the quilting in Laugh - it was so much fun to see this quilt come to life with the quilting!

 
I hear complaints all the time about people who love my quilts but don't applique.  I have an answer for them.  You don't have to know how to applique to do an applique quilt!  No - I have yet to meet a quilt (other than, perhaps, a complex Baltimore album style quilt) that I can't turn into an embroidered quilt.  Below, Redwork Mama Said accomplishes the same thing that the appliqued Mama Said did, with its words and motifs.

 
Even the phrases that were appliqued around each of the original Mama Said blocks are included in this redwork version; take a look at the close-up, below.

 
So... can you see how you can take just about any pattern and turn it into a variety of different-looking quilts?  I see it all the time when people send me pictures of their quilts (and thank you, to those of you that do!) -- I love seeing how quilters take my ideas and add different motifs, use different colors, enlarge or shrink blocks... it's great to know that creativity is alive and well!  Further down in this post, you will see how someone took one of my designs and did something amazingly different with it. 

But first!  Here is an old pattern of mine:  Classic Santas.  This quilt is what I have always called a "jumble" quilt -- lots of blocks, various sizes, all laid out in a totally non-symmetrical arrangement.  I loved making all those different Santas, and the pattern tells the source of the Santa; each is from a different country and is associated with the customs of that country. 

 
Here's a close-up of one of the Santas -- the Swiss Samichlaus who rides in from the wintry forests on a little donkey.  Announced by the gentle tinkle of bells at the door, he is invited in and gives gifts after asking the children in the house about their behavior and their prayers.  He leaves after shaking hands with everyone.  You can see, in this close-up, some of the quilting that adds to the quilt, with curls in the flowing beard.  When I hand quilt, I always echo around every bit of applique - and in this case, I echo quilted around the applique.

 
I liked Classic Santas a lot... so much so that I decided to re-make it, but with an entirely different look and feel to it.  Below is my Classic Santas done entirely in white, off-white, creams, tans, and taupe colors.  The setting - there is no "jumble" here - is very symmetrical.  I love this quilt because the warm colors remind me of Christmas baking:  melted butter, brown sugar, cookies, graham crackers and marshmallows...  I can just smell Christmas when I see this quilt!  I will point out that the large 8 inch open white border gave me a large space in which to quilt a meandering feathered vine.  I love spaces like this; they give us a place to rest our eyes, and also pull our vision toward the center of the quilt.

 
And here is the same Samichlaus block -- doesn't he look different?  But it's the same pattern as the red and green Santa above.  Take a look at the fabrics here -- to make this quilt even more warm-looking, I used quite a few metallic (gold) fabrics that added to the overall richness of the quilt.


Here's another example of taking a block and using it again.  First, a green feathered star quilt:


Here's a close-up of that feathered star block.  Feathered stars are classic blocks.  They are often viewed as difficult to make, but I find them fun.  I said fun, not fast!  There are a lot of pieces in a feathered star - which is what makes them take so much time to make.  I often teach feathered star workshops because people want to make this block but need to know how to do it with ease.

 
Here's another quilt - Stars for a New Day - that uses the same feathered star as the center block.  In this quilt, I made the center of the feathered star plain; the rest of the quilt carries the complexity of the overall quilt.

 
And here is another medallion-style quilt with a central feathered star.  In this quilt, Washington Medallion, I used another feathered star, but because the rest of the quilt was not as detailed and complicated (meaning the blocks were larger and had fewer pieces), I simplified the feathered star.  See how you can take the same block and use it in a different way in a different quilt?  Sweet!

 
But don't think for a second that the simpler feathered star makes the quilt less interesting.  Oh, no.  In this case, I let the quilting carry the interest forward in the quilt.  Check out the quilting in the detail shot, below.

 
Here is another of my favorite blocks:  The Coxcomb and Currants block.  I love it and have used it over and over again.  Note that I used a busy print for the background; some quilts can handle prints like this as the background fabric.  It keeps the quilt from being boring!

 
Here's the first quilt I used it in.  I haven't quilted it yet -- that's on my list of things to do this year!  But I just love how this quilt looks and already have a picture in my head of double feathered wreaths in the open blocks and a feathered vine in the border.  I just need a few more hours every day to get started on all these projects.   Ha!

 
That very same block was used again in this quilt...  Coxcomb Medallion.  Note that the currants in the center block are in a color gradation, to add interest.  And the corners of the interior swag border have the coxcomb flower in them.  Repetition pulls a quilt together.

 
When I made the quilt above, I made a double set of all of the pieced blocks.  I took them and added a pinwheel border.  Again, can you see how one quilt begets another?  It's not hard; you just have to be intentional about it. 

 
And here, again is another of my same coxcomb and current blocks.  When a group of friends all decided to do a round robin, I decided that my starting block would be a coxcomb and currants block.  Here it is (it also includes some of the next rounds of the round robin additions).  Again, the berries in this block were done using a gradation of medium to dark red fabrics.  I like doing that when it makes sense; it adds interest to a block.

 
And here is how the quilt looked when it was done -- note that the center of the block (the flower) was repeated as cornerstones in the center white border.  Yes, repetition helps pull a quilt together.


Here is another quilt from that round robin - my friend Marsha F started with the center block... and when it was my turn to add a border, I added that border of red semi-circles with green circles in each, just outside of the star border.

 
I had a lot of fun creating that border... and when I made Bed of Roses, below, I used that same design as the final border.  I think it's interesting how designs tumble forward from one quilt into the next.  Maybe that's part of why we see so many blocks in the old Baltimore album quilts that are duplicated... before copy machines were ever invented!

 
Here's another example of tumbling one idea forward from one quilt to another.  At one point in the past, I was enthralled with four-block quilts.  I made this quilt, called The Washingtonian because I made it while I was living in DC and working for NASA for an extended period of time.

 
Here are two close-ups of that quilt - first, of a pineapple block and second, of the border.  Check out the quilting in these blocks; they add to the quilt's look.


That pineapple block was about 22 inches square.  I decided to use it, set on point, to demonstrate how one block, when set on point, can "grow" a quilt quite quickly.  In this quilt, called The Houstonian because by the time I made this quilt, I'd moved back to Houston to serve as the Johnson Space Center's Associate Director.  In this quilt, a 22 inch block set on point becomes a 31 inch block, and with added borders, it easily makes a 45 inch lap quilt.  Not bad, eh?

 
What I love about setting blocks on point is not only that they quickly enlarge a quilt; they also give me very nice area for adding hand quilting.  Check out the picture below....

 
I hope you notice, in the picture above, that there is not a single border motif... rather, I used several different quilting stencils to add borders to the setting triangle.  Sometimes, to make a stencil fit, you have to be creative!

Now... remember earlier when I said I'd show you how someone sent me a picture of a quilt they'd designed using one of my patterns?  First, here is the quilt I made - Sleeping Beauty.  It was based on a quilt made in the 1800s by a 17-year old girl.  I loved her notion of using black prints with a sprinkling of other colors.  Look closely, and then...


take a look at this quilt, ShapeShifter, made by Nancy Arseneault of Tucson, Arizona.  In this award-winning quilt, Nancy broke with all historical precedents and set her New York Beauty blocks on point.  She said that left her with some difficult choices:  how would she fill in the large corners?  She began by extending the sashing and added more of those little stars at the end, like exclamation points.  She then added the outer dogtooth border.  When she went to quilt Shapeshifter, Nancy did lots of quilting in the ditch before quilting feathers in the open spaces.  But that's not all Nancy did.


Look at the detail picture below.  Aside from the lovely ribbon she received, she bound the quilt and then added felted balls, attached with little beads.  Nancy said she chose the name of her quilt because "as it developed on my design wall, a friend said that every time she saw it, she noticed different shapes in the patchwork."  Congrats go to Nancy for a well-designed quilt, incorporating exquisite technical merit!

 
One more thing... go back and look at the original Sleeping Beauty quilt.  See how one pattern can be deftly changed and become an entirely different quilt?  That's what I love seeing -- send pictures if you make my quilts, whether they follow the pattern to the letter or divert substantially.  Your pictures inspire me to keep on designing new quilts!

So what have I been working on lately?  WAY TOO MANY NEW THINGS!  If I could settle myself down and work on just one project at a time, I'd probably make much more progress...  at least on that one item.  Instead, I'm working on seven or eight different projects at a time, switching back and forth at a whim.  I HOPE that next month I will have more to show you, but for now, I'll just give you a little clue:
 

That's right.... that's at least forty different pinwheel sashing strips for one of the quilts I'm working on.  I have another twenty done... and another forty to go.  I'm hot on the trail!  And then the other projects... well, I'll just wait and see how far I get.  I might even surprise myself!

Now... a few comments.  This past month I've gotten a couple of heart-felt emails through the COMMENTS you have made.  I love your comments and read them as soon as they appear.  I learn a lot about what you like and what you want to see.  Here's the problem, though:  sometimes, you ask me a question that needs to be answered.  Unless your profile includes your email address, I can't answer you!  I can add another comment to my own blog post... but sometimes the question I am asked is far too personal... or asks for detailed instructions on some facet of a pattern... or... well, you get the idea.  If you want me to answer you in these cases, I MUST have your email address!  Either add it to your profile, or email me off-line (I DO read my emails and I answer 99.9 percent of them).  My email address is included in my profile and I've now added it to the sidebar (though I may remove it from the sidebar if I start getting weird spam...).  Please.... please...  I don't want any of you to think that I am ignoring you!

Someone else asked if I might consider posting more often than once a month.  I would LOVE to do that!  Really!  The only problem is... well, I just think that you wouldn't be as happy with a short little post every few days... versus a long post with lots of information in it.  And the bigger issue is that it takes time to prepare these focused entries; today I started preparing the photos just after noon and when you take out a three hour break to have dinner out with my sweetie, it's now past ten, which means this post took almost 7 hours.  Phew!  No wonder I only do this once a month!  So for now, just look me up on the first of the month or a day or two later.  I'll keep updating... and once somebody (please!) invents those extra few hours in each day, I'll start posting a lot and a lot more often!  Also... if you'd like to see me post or write about something in particular, zap me a note or make a comment.  I'm always looking for something new to think about and write about.

In the meantime... my sewing machine is crying for attention, my quilt frame is begging to be tended to, and yes, my vacuum says it needs a little aerobic activity in my sewing room.  I guess I'd better answer their calls.

Happy quilting!
Sue
(c)2013 Susan H. Garman