Sunday, May 1, 2011

Spring Has Sprung!

I love this time of year in my little corner of the world -- when the flowers start blooming, the weather is lovely, and it's pleasant to be outside. Despite the fact that many of you believe I am extremely productive, this month I have proven to be quite the opposite: I have nothing new to show you! I spent most of my quilting hours in front of myBaltimore quilt - I've finished hand-quilting 12 of 16 blocks and most of one whole border - but I have nothing else to show you. Never fear, however, I have a stash of old photos to share! The first one is an old pictoral quilt of mine: The Garden Lady. I have fun making "thematic" quilts, where I choose a theme and then flesh it out with all the accoutrements that go with that theme. This month's whole blog is devoted to the theme of "flowers." Enjoy!


The Garden Lady, Susan H. Garman

This next quilt, "Spring Beauties," was made by Terry Aske of New Westminster, British Columbia, Canada. In describing her quilt, Terry says, "Every spring, I eagerly await the first tuplis poking through the hard ground. Aftera along, dark winter, I marvel at the incredible range of colors that these spring blooms display." Terry'sgreatest challenge was deciding which colors to include or omit in her quilt.

I loved seeing Roxane Lessa's "Angel's Trumpets" at the quilt show in Houston last year. She hails from Raleigh, North Carolina, and angel's trumpets bloom in many of the neighbors' gardens. The flowers are very large and droop down - presenting waht Roxane calls, "a bewitchingplant!"


The quilt below, "Sunflower I" by Patricia Schumacher of Lawrenceville, Georgia, is part of a sunflower series that Patricia has done. She says that her rheumatoid osteoarthritis causes severe joint pain, so the time that she spends with her flower quilt garden replaces time she might otherwise spend in a garden - and relieves the pain as she becomes involved in making the quilts. I'm sure that many of us find comfort and "therapy" in quilt making!


Lest you think that Patricia's sunflower quilt is simple... look again! Patricia's quilts have an enormous amount of embellishment, with the sunflower center composed of dozens of different colors and shapes of tiny beads. See the close-up, below....


Pat Kroth's "Florilegium II" uses hand-dyed, raw-edge fused applique. This Verona, Wisconsin quilter has created the "glorious perennial garden in my mind's eye." But she confesses, " my intentions are always grand in the spring, but with art-making and sewing as priorities, somtimes by late summer, the weedsmake a better showing." We can probably all identify with that statement!


"Still Standin'" by Pamela Druhen of Northfield, Vermont, gives us a view of the cottonwood treesthat line the west shore of Isle LaMotte on Lake Champlain. A violent storm wiped out many of these trees in 2008 - but these two are still standing. Pamela's techniques included dye painting, heavy threadwork, and heavy machine quilting.


Melinda Bula's "Rain Drops," below, is full of detail. Her choice of color - and added color - is amazing. Try taking your camera out into the garden and photographing a few flowers. Transfer the outlines of the flowers onto paper and develop a pattern for your own realistic pictoral flower!


The small quilt below - smaller than a handkerchief - is the third in Houstonian Kumiko Frydl's "Mission" series. She traveled extensively for a number of months and had little time for quilting - so she made it her mission to create and completel a project in a limited amount of time. Wouldn't you love to see her other miniature quilts?


Hallie O'Kelley's "Tropical Beauties," below, was inspired by her husband's striking photo of a brillian tropical flower. Hallie dyed the fabrics - and screen printed the border fabirc.


"Jill's Geranium," by Jean K. Smith, was designed when her daughter asked her to make a quilt of her favorite flower, the geranium. Jean resorted to buying a live geranium and with freezer ppaer on her design wall and an overhead projector, she had all of the ingredients for her quilt.


Barbara McKie's "Under the Sunflowers," below, started with a photo transfer. These exuberant sunflowers grew in a neighbor's garden in Lyme, Connecticutand inspired the quilt . They seem to want to reach out and touch the gorgeous sky!


And here is another set of flowers - daffodils - by Barbara Holtzman. Inspired by a photo by Desirae Nelson (who gave permission for its use), Barbara says she gets new energy every spring when she sees the daffodils popping up.


Last, but far from least, here is a quilt by Andrea Brokenshire of Round Rock, Texas. Her "A Great Garden Discovered," was based on the discovery of a garden of irises growing along a stream that cascaded down to a creek below, near Laek Georgetown, Texas. This quilt is a wonderful example of the artistrythat can be created when painting on silk.


I hope you've enjoyed this snapshot tour of spring quilts - and I hope that your garden overflows with the brightness that the season brings into our lives.


Until next month... happy sewing --


Sue Garman

(c) 2011 Susan H. Garman

Thursday, March 31, 2011

Knocking Out UFOs -- Whee!!!

Oh my, but it is SO much fun to knock out a bunch of UFOs -- as in finish them! This past weekend I had the pleasure of going to a 4-day guild retreat on nearby Galveston Island. I find quilt retreats to be wonderful because I am inspired by everyone else's projects, I learn by watching and listening to other quilters, I get to sew as much as I want, and I have the joy of friendship - all at once! So let's take a look at a few of the things I've been working on this month.

First of all, my "Borrowed Roses" quilt top was nearly finished when I left for the retreat. I just needed to assemble all of the blocks and then stitch down the corner ribbons and tassels. I don't like the corner ribbon design, so ignore what you see below; I'm going to revise the ribbons and tassels and you'll see the revision next month. I've been asked if this will ever be a pattern. Yes -- but I never publish a pattern until the quilt is finished, including the quilting, so the pattern availability is still a couple months or more off into the future. In the meantime, take a peek, below. Except for the corner ribbons, I love the look of this quilt - and the feathered swag border was amazingly simple to make! It is made in rectangular sections; the sections are sewn together into border strips - and then the ribbons and tassels are added. Getting all of those swags to line up may seem like a tough trick... but I'll show you how I did it in the next photos.

The swag border is made of three 12 by 22-1/2 inch rectangles (unfinished size). I always applique on a piece of background fabric that is larger than necessary and then I trim it down to size. But how do I trim that rectangle so that the swags line up and meet in the right place? Here's how...

  • Trace the outline of the swag onto a piece of plastic (I happened to use Sharpie markers on old ziplock bags that I taped together).

  • Tape together a bunch of rulers so that the set measure 22-1/2 inches wide -- and more than 12 inches deep. Note, in the photo, that I used the painter's blue tape because it is easy to remove when I'm done.

  • Tape the plastic with the design on it across the rulers, placing it so that the top and the left and right sides of the pattern match the top, left, and right sides of the ruler set.

  • Lay the ruler set across the appliqued swag... matching the applique to the pattern outlined on the plastic...

  • Now you are ready to cut the top, left, and right sides of the swag rectangle.

  • Once you're cut those three sides, turn the ruler set around and cut the bottom side of the rectangle, such that the rectangle measures 12 by 22-1/2 inches.

This works like magic! The last half-inch or so of each swag is left un-appliqued. In this way, the swag fabric can be folded back out of the way when the rectangles are sewn together into border strips. If there is any gap, don't worry; it will be covered up by the ribbon when it is appliqued across the intersection of the swags.


Honestly, I love this swag so much that you'll probably see it again in another quilt some day -- but my vision for the next swag is something done in color gradations, with the "feathers" each getting darker as they splay out away from the center feather.


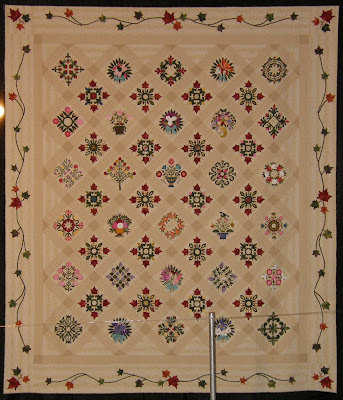
Another quilt I'm obviously still working on is my Friends of Baltimore -- here it is, in its current state, with 9 of the blocks quilted. All these other projects got in the way this month or more would be done!


This block has a little fleur-de-lis kind of design in the open area of the bottom corners; I like little oddities in quilting.

And here is the 9th block, not quite finished -- the cross-hatching is all done, but not quilting in the ditch around all of the fruit. That will be done in the next couple of days.


The next quilt that I worked on this past weekend was an assembly job -- I had already finished all of the stars and chain blocks; my friend Cynthia and I have been exchanging sets of star blocks for the past couple of years. Each block uses a civil war fabric and an assortment of shirtings. Did I mention that these blocks are 4-1/2 inches (FINISHED size)? Oh yes! That's so that they would "fit" with the nine-patch blocks that I made to go with them.

So here is what the stars and double 9-patch blocks look like together. I love using varieties of shirtings with civil war fabrics. They remind me of my grandpa's old pajamas.

And then... when you get enough of them made, the stars and chains begin to take on a life of their own. I like how those litlte HALF-INCH SQUARES just sparkle like blinking lights in a quilt like this. Did I tell you how many star blocks and Irish chain blocks there are in this quilt? Well... Take a look! This quilt has 374 blocks in it -- that's 188 star blocks and 187 chain blocks. I paper pieced all of the stars so that I could make them 4-1/2" finished size. The Irish chain blocks were time-hogs -- they seemed to take forever, even though they were strip-pieced, because there are a LOT of pieces in each block! But the result was worth the time. The quilt measures 76-1/2 by 99 inches -- perfect for a twin bed.


The final project that I worked on at the retreat was a quilt top made using triple four-patch blocks. These blocks were from various exchanges I was involved in over the last several years. I just never got around to sewing them together until this weekend. The photo below shows only the bottom half of the quilt... the top is hanging on my sewing machine, ready to stitch onto this set. Aaahhh.... we'll just wait and see if it takes another retreat next year to get around to putting that last line of stitching in place!


I hope you are finding some great sewing time... and finishing up some things here and there. Until next month's posting...


Happy sewing!


Sue Garman


(c)2011 Susan H. Garman

Monday, February 28, 2011

Finishing Up!

This month has been a month of “finishing” – I’ve been working on finishing various projects. Of course, make no mistake… I have made progress… but I still haven’t finished a quilt this month!
The first one, below, shows the progress I have made on my new “Borrowed Roses” quilt. The block is based on a traditional block called Prairie Flower, Missouri Rose, or Rose Tree. The border and use of the blocks is based on an old late 1920s Rose Kretsinger quilt called “New Rose Tree.” So far, I have finished four of the planned nine blocks and five of twelve border units. There will eventually be ribbons and tassels between all of the border units. The unfinished blocks are all basted, so they are easy to take along and work on at bees, meetings, doctor appointments, etc. – so hopefully, next month you will see the quilt top assembled… but don’t hold your breath!


The next photos, below, shows another old project that I started on well over a year ago. My friend Cynthia and I exchanged 4-1/2 inch (finished size) star blocks which used civil war reproduction fabrics and shirtings – a favorite combination of mine. Together, we both have quite a stack of little star blocks – and I really love Sawtooth Stars.


I’m going to use those star blocks in combination with some 4-1/2 inch (finished size) double nine-patch blocks that I finished making this month – all 175 of them! The little squares in the nine-patches are each 1/2 inch in size, so it took a while to get them all sewn.


Now that those blocks are all finished, I’m ready to assemble the quilt top. In the photo below, you can get an idea of how the blocks will be set together. When it is finished, this quilt will be twin-sized, with the blocks extending edge-to-edge – and no border. Naturally, an antique quilt that I saw at the Houston quilt show many years ago inspired this quilt. Doing block exchanges with a friend is a great way to keep me on schedule – Cynthia and I set deadlines for swapping blocks every two weeks, and we met nearly all the deadlines! I can’t wait to sew these blocks together – hopefully you’ll see the quilt top when I post an update at the beginning of April.

In between other projects, I have also been working on doing the last bit of touch-up quilting on a project that my friend Denise Green and I started ages ago. It was interrupted with a family illness, and I am just now getting back to working on this quilt. Denise and I collaborated on this quilt from start to finish – I did most of the applique, she did a ton of machine quilting, and I did a bunch of hand-quilting. We both helped each other a ton, along the way. This quilt is based on my “Lily Rosenberry” pattern and, finally, I will have my very own Lily Rosenberry quilt – I’m excited about that! Many thanks go to Denise –for her friendship and our teamwork on this quilt!


Last but certainly not least, I have been doing more hand quilting on my Friends of Baltimore quilt. So far, 7 blocks have been quilted. These are 15 inch blocks, and I am quilting in the ditch around every appliqued piece, and cross-hatch quilting the background in each block. My goal is to finish the quilting in June (of this year). This is another quilt that excites me every time I work on it – I can’t wait to finish it! Below are pictures of two of the blocks, so you can see how the quilting is turning out on them.


Finally, since spring is on its way, I’ll give you a peak at another project that I’m working on. It’s the center block of a medallion quilt; I haven’t figured out what sort of borders I am going to add to the medallion – but I want to finish the quilt by April. Ha! That will be a trick, but setting a goal is a way for me to finish projects.

Until next month, enjoy the Spring! Check out my Yahoo group if you get a chance (see last month's posting for the link) – folks are starting to work on their own Friends of Baltimore (and other quilts) and one gal has already posted two finished blocks. Go Marian! You'll also find plenty of tips in that group - hopefully, they will help all of us finish more quilts!

Happy sewing --
Sue Garman
(c)2010 Susan H. Garman

Tuesday, February 1, 2011

Stay Warm...

With the icy waves of cold that are racing across the Nation, I want to start with the premise that we should all be making more quilts in order to stay warm! My outdoor thermometer shows that it is a chilly 32 degrees at 10 pm tonight... which is balmy compared to elsewhere.

This month there is not much to show, because I've been too busy to make much progress on anything. First of all, my "Friends of Baltimore" quilt is now on the market. I basted it right before Christmas and have already been quilting away like crazy on it -- check it out in the picture below; I have finished quilting 5 blocks. Yes, I'm a slowpoke, but this quilt is being heavily quilted!

Next, I have been working on my "Borrowed Roses" quilt. I have basted all of the blocks and have finished appliquing one block and one border unit. I love working on quilts that I can't wait to finish -- imagining what it will look like after it is quilted helps me keep my nose to the grindstone. The inspiration for this quilt was a quilt made by Rose Kretsinger -- if you check out my January post, you will see a draft of the pattern. Below is a picture of one block and one border unit-- I'm making progress!


Back on August 31, 2010, I posted several pictures of old cheddar quilt tops that I've collected. I found another one late last year and I'll share it below -- I just love all those bright 9-patches with cheddar setting squares and triangles. This is definitely on my list of quilts to "re-make" in the future. I've already purchased my cheddar fabric.

I have been asked by Emmy in Bemidji, Minnesota, to comment on how to select, prepare, and choose a non-bleeding red fabric good for applique - as well as other strong colors like green and purple - and whatever else I want to say about shades, brands, solids, etc. First of all, I like a very rich, rich red. Those are difficult to find -- there are lots of pinky, purplish, bluish, blackish, and gray reds... but a really good, strong, rich red is hard to find. So... the first rule of thumb is: when you find a good red, BUY it! Buy LOTS of it! Look at it against other reds and other colors (e.g., gold, green) to make sure that it is a true red. Sometimes when you place a red print against other colors, you'll find that it is a different shade than you thought.
I prepare my red fabrics just like I do all my other fabrics: it walks in the door and goes for a swim in warm water, then gets dried. It is not allowed to enter my sewing room until it has bathed -- therefore, I am always certain that all the fabric in my sewing room has been washed. I do not ever use washout markers, disappearing ink markers, starch, or fabric finish (sizing) on my fabrics, and particularly not on reds, navies, or blacks -- those items may cause your fabric to bleed, despite having been washed. Ask me how I know... and being the compulsive person that I am, I even tested these products on a variety of fabrics to prove that they may cause fabrics to bleed. If you do use these products, make sure that you thoroughly wash them out at some point.
As for brands... I have an inherent trust in all the major fabric manufacturers; they are in the business of satisfying their customers, and they work hard at putting out fabrics that make us happy. All of that is to say that you are probably safe with fabrics you find in your local quilt shop. As for shades of colors... there are tons of beautiful shades of reds, greens, purples, blues, golds, and so on. Which ones do you use? Choose your fabrics by laying them out to see if they work well together. While a pinky red may not go well with one green, it might go beautifully with another. It's a matter of trial and error -- just do not expect to be able to choose fabrics in 5 minutes. I have always believed that it takes 3 times as long to choose fabric as you think it should.

Finally, I have been asked to start a Yahoo Group for people working on my Friends of Baltimore quilt. I was reluctant to do so, as there is a certain amount of overhead attached to moderating a Yahoo Group, and there are plenty of other Yahoo groups on the web where discussions might occur. However, I have succumbed to the wishes of those of you whose persuasive powers overwhelmed my ability to say no... so I have now started a new Yahoo Group called SueGarmanQuilts. You can find it at http://groups.yahoo.com/group/suegarmanquilts/ -- don't be in a huge rush to check it out... I haven't posted anything there yet! Eventually I will post pictures of my Baltimore quilt so that those of you who want to see closeups of the blocks can easily do so. If there are other things you want me to include there, holler at me!

Okay - that's enough for tonight. It's 10:30... and now it's 30 degrees outside. I need to make more quilts!

Happy sewing -
Sue
(c) 2011 Susan H. Garman

Sunday, January 2, 2011

Happy New Year!

Happy New Year, everyone -- let's all hope that this year brings a treasure trove of good health, good fortune, good friendship... and lots of quiltmaking for all of us. Let's see... shall I also hope that the price of cotton falls sometime soon? I may not always be optimistic, but I am never without hope!
So what am I working on now? Several things... but here's one. I agreed to create a new design for my quilt guild's annual raffle quilt. After talking to Jerrianne and Georgann -- two of my quilt buddies who are always offering a ton of both ideas and inspiration -- we decided it would be wonderful to use Rose Kretsinger's 1929 red and green "New Rose Tree Quilt" as an inspiration. It's a wonderful structured rose tree design with a swag border that has red and gold feathers appliqued along its length. I love red and green quilts, and this one is breath-taking. My version will be an 86 by 86 inch quilt, so the blocks are very large: 22 inches square, with a 10-inch wide border. After drafting the design (see my first drafts, below), I got so excited that I've already scavenged through my stash and decided I need to break my New Year's resolution to not buy more fabric for at least three months as I don't have what I want to use for this quilt. So much for a resolution! It must not have been a good one if I'm already backing down on it. You will likely be seeing updates on this quilt over the next few months.
Partial pattern for "Borrowed Roses" - a remake of an old Rose Kretsinger quilt
Another project I've been working on is a Tulip Challenge Quilt. A group of my quilt friends all agreed to choose an antique quilt, use a block from it, and update it in whatever way we see fit -- a challenge -- that we each hope to finish and enter in our guild's quilt show in 2012. We chose a mid-1800s red and green quilt that had a block with tulips in a vase. I drafted the pattern as a 12" block... and the gang is all working on their versions of the block... and how it will be set into a quilt. Two of the group are enlarging and setting the block on point - one with reproduction fabrics, another with batiks. One of the group is making the block smaller -- a set of 6" blocks using reproduction fabrics. Some of the group have revised the vase - making it more complex. I've enlarged the block and am making a 4-block quilt; my blocks are each 36" square! Check out the block, below -- and check out the colors I'm using to make my challenge quilt. If you've read my blog, you know that I love cheddar!
The Tulip Challenge Quilt


Another project I've been working on is my Baltimore quilt. I finished adding the final border of 1-inch half-square triangles, and nearly threw my back out of joint by getting on my hands and basting the quilt. So here's a close-up of the outer border...
And here's a picture of the whole quilt with the final half-square triangle border on it... And finally... here's a picture of the first block I've quilted on it. I had almost forgotten how much I enjoy hand-quilting. I do my share of machine quilting, but there is no comparison between longarm and hand-quilting: hand quilting is so relaxing to me. I just love sitting down and quilting for a few hours at a time once or twice a day. With any luck, I will have this quilt finished in 3-4 months. Whee!!! Did you know that I do all of my hand-quilting using a stab-stitch? I can quilt as fast as anyone else - and can "quilt through concrete" with the stab-stitch method! Several people have asked me when the patterns for my Baltimore quilt will be available. Quakertown Quilts should begin offering them for sale in mid-January -- check with them (www.quakertownquilts.com), or with your local quilt shop and see if they are ordering the patterns if you wish to get them. Now for a little visual treat. A friend of mine was given permission to take photos of the Baltimore album quilts on display at the International Quilt Association display in November in Houston (aka "the Houston Festival" or "the Houston Quilt Show"). What follows is a small selection of some of those quilts. My apologies to those whose quilts are not included in the selection - it does not mean I didn't like yours! To begin with, the venue for this Baltimore extravaganza could not have been more wonderful -- lots of room, great lighting, plenty of white-glove folks to help show the backs of the quilts or answer questions - and plenty of quilts!
George R. Brown Convention Center, Houston - Nov. 2010
The first quilt is "Friendship's Offering" by Fabric Cottage class members and others, spectacularly hand-quilted by Diane Kirkhart (Vienna, Virginia). For a complete list of the needle artists who worked on this quilt, please purchase a copy of Elly Sienkiewicz's 2010 Beloved Baltimore Album Quilts. It's a lovely retrospective of new and old Baltimore quilts.
The quilt below is called "Miss Refrigeradorable's Album Quilt" and was made by Judy Laval Morton (Newburgh, Indiana). The design source includes Elly's books and patterns, Nadine Thompson, and the crowning of the 1956 Miss Refrigeradorble.
This next quilt, by Marjorie A. Nelson (Frankfort, MI), is called "Baltimore Album on the Shores of Lake Michigan." Marjorie's borders are her own design and contain an eagle, 13 stars, and piping set by the binding. The richness of color in this quilt make it exquisite!
Meg Zimmerman's (Winchester, TN) "The Time Traveler," below, is based on an 1847 quilt by Mary West -- but the borders, quilting, and two blocks are Meg's original designs. It took Meg 8 years to applique the quilt and 8 months to hand-quilt it, making it a "true time traveler" as it accompanied Meg through retreats, bees, and family trips. As with many of us, our quilts carry our history within them. If only they could talk - what stories they could tell us...
Connie Teplitsky (Scarborough, Ontario, Canada) made "Threads of Inspiration." While inspired by Elly's books, several blocks and the setting for her quilt are original. I love that each of these Baltimore quilts, while inspired by the quilts of yesteryear -- and Elly -- are examples of how all quiltmakers interpret designs to suit their own sense of beauty.
I love Karen Pessia's (Medford, MA) "My Baltimore Journey." Karen's quilt speaks of the inspiration from her teachers, history, and the discovery of untapped skills. Karen's scrappy-leafed border is lovely -- as well as her choice of outer borders and the intricate sashing. Below the quilt show is a close-up of one of the quilt blocks and the phenomenal quilting.

"Vases, Birds and Other Things" by Kim McLean (Lindfield, New South Wales, Australia) takes advantage of some bright, colorful Kaffe Fassett fabrics -- Kim says this "is a happy quilt." And it is, indeed.
Rita Verroca's (Westlake Village, CA) "Big Parade" is built around a center block picturing two horses pulling a carriage called the "Big Parade," a vision to the quilter's world -- a land of imagination and inspiration. Rita has done a wonderful job of blending traditional blocks into her Baltimore Album blocks to create her own style of album quilt. Her sashing is incredible!
This next quilt is in the grand style of exuberant applique found in some of the old Baltimore Album quilts. Hong Sook Ro, its' maker, worked on this quilt for 5 years; her loving husband helped her by doing all of the household chores so she could work on the quilt. On a sad note, he was diagnosed with leukemia in 2009 but asked Hong Sook to finish the quilt before he died. She finished the quilt for him, and dedicated it to him after he died. This is the first quilt she ever entered in a show. The complexity of the blocks is stunning -- there is a closeup of the center block below the photo of the whole quilt.


Here is yet another quilt by Marjorie Nelson - "Marjorie's Album - The Beauty of One Common Thread." One cannot help but be inspired by the beauty found in all of these album quilts. A closeup of one block is also shown below.

In "Let us Be Friends," many of Elly's former students worked together to make this quilt, quilted by Sue Nickels. A complete list of needle artists can again be found in Elly Sienkiewicz's Beloved Baltimore Album Quilts (2010). I love how the blocks in this quilt are set on point with some wonderful sashing.
That's all for this month - I hope that seeing a few of the Baltimore Album quilts on display have provided you with some inspiration -- to tackle a new project, to design your own block, to create a unique border, to pick up where you left off on an old project. I find that seeing groups of quilts that have a common inspiration but end up being so unique when finished, reminds me of why I love quilting. We each have the opportunity to express ourselves in the beauty of our creativity -- take that gift, now, and go finish a quilt!


See you next month...

Sue

(c)2011 Susan H. Garman