Sunday, May 2, 2010

And Even More Antique Quilts!

Hello again -- it's amazing how quickly a month can fly by. Last month I said that I would show you some of the things that I'm working on. I will... but only one quilt this month; hopefully next month you will see a lot of Baltimore album blocks that I have been working on. They're not quite ready for prime time yet, though! Instead... I'll start with a bunch of antique quilts and comments - and then you can take a look at my latest medallion quilt, "Coxcomb Medallion."

First, here is a lovely Carolina Lily quilt. In viewing many antique quilts, I am continually astonished by the creativity of yesteryear's quilters. Look at the borders on this quilt: opposite sides match; adjacent sides do not. And why do you think this quilter chose to put a little block motif (other than the Carolina Lilies) in the top and bottom left corners? Would you have imagined doing something like that? Not me - but then I really like absolute symmetry in quilts like this. do you think she "owed" putting these blocks into this quilt? Who knows?!

Carolina Lily, 19th century with vine border (89 x 94")


At first glance, this next quilt is a four-block quilt. It's actually a 16-block quilt - set to look like a four-block quilt. Setting blocks like this makes for interesting secondary patterns. Think about that, the next time you are making sets of blocks: can you build another pattern out of the way you set the blocks?

Tulip Quilt, 19th century (77 x 77")


This next quilt is definitely a four-block quilt -- what a delightful motif each block uses! The trailing vine is very primitive and not nearly as complex as the center blocks. Do you think that the quilter was just tired of all that detail and wanted to get the quilt done? I know there are times when I've opted for a simple, plain border just so I could move on to the next new quilt project.
Floral Spray quilt with Trailing Vine, 19th century (78 x 79")

This 9-block quilt looks like it started out as a set of Rose of Sharon blocks but the quilter turned them into peppermint tulips. Don't you just love this kind of creative spirit? It teaches me not to be afraid to try something different.
Decorative tulip quilt, 19th century (95 x 99")

Here is another quilt where the quilter went a little wild with her desire to be creative -- look at the different borders she used on each side of the quilt. Interesting, to say the least!
Rose quilt, 19th century (98 x 96")

This Baltimore album quilt was probably a treasured gift for a minister or a bride and groom. Made in 1873, it represented the highest form of quilt art at the time. This quilt sold a year or two ago for around $25,000.
Baltimore Album, 1873 (104 x 101")

I love berries, so I could not resist including this quilt in this set of old quilts. Somebody had a lot of patience -- this quilt was made well before the advent of mylar templates, which have revolutionized berry-making.
Berry Wreaths, 19th century (89 x 94")

Here is an old log cabin quilt -- I love log cabin quilts that are a bit whimsical -- and this one is, with its use of high-contrast fabrics in the border and in the "light" logs.
Courthouse Steps log cabin quilt, circa 1900 (77 x 77")

And now here is another log cabin quilt -- it's a bit different because it was done in silk fabrics and includes a ruffled border. It was made for a youth -- what a delight!
Youth log cabin quilt, 1893 (65 x 54")

This next quilt is one that I have always wanted to reproduce -- a simple alphabet quilt. It was made in Pennsylvania in 1917 by Addie Heipler Allen. This era saw quite a few alphabet quilts - I particularly love the use of cheddar in these quilts.
Alphabet Quilt, 1917 (90 x 78")

The next two quilts are whimsical folk art renditions. I liked putting them together because they both contain animal motifs -- the first one has roosters and cats, and the second one has cats. Cute, aren't they?
Crib quilt, 1900 (32.5 x 34")
Trapunto quilt, 19th century (90 x 90")

Last but not least, here is my "Coxcomb Medallion" quilt. I decided early on in the design process that I wanted to have a double swag border -- but I wanted to put it in the interior of the quilt, rather than as an outer border. I like how it breaks the path of the eye and highlights the central portion of the quilt. This is a block-of-the-month that will be sold (retail and wholesale) through Quakertown Quilts in my hometown of Friendswood, Texas.

Coxcomb Medallion, 2010 (94 x 94")


That's all for this month -- I hope to see you again in another month. Until then, happy sewing!

Sue
(c)2010 Susan H. Garman

Wednesday, March 31, 2010

Lessons from Early Quilts...

This month, I thought I would just show a few of my very early quilts -- quilts from 20 to 50 years ago! We sometimes forget that those early quilts, while not necessarily stunning, taught us much that we can carry into today's quiltmaking.

Lesson One: Use your scraps. This quilt was made over 50 years ago; it is a utility quilt made entirely from scraps sewn to squares of muslin. Try making these blocks in color sets (e.g., red/green, blue/peach, or purple/yellow scraps) - or make them totally scrappy. Before you know it, you'll have enough squares for a full-sized bed quilt.


Lesson Two: Don't expect to make a perfect quilt the first time you make one... or every time. When I do lectures for quilt guilds, I always bring along one of my earliest quilts. The point I make with it is that we all have to start somewhere. And that first quilt is not always going to be a blue ribbon prize-winning quilt. Don't be too hard on yourself; learn as you go - and remember that experience is the best teacher of all, so keep on sewing. One of my earliest (remaining in my possession) quilts was inspired by a 1972 Family Circle magazine -- when I saw the cover photo, I wanted to make that quilt!


Of course, little did I know that the "instructions included" were limited to one page of thumbnail-sized drawings - and a lot of imagination. Quilt books were in short supply in 1972... along with instructions.


I had to use the teachings of my grandmother, plus what my Mom had taught me about hemming skirts, to make and design my quilt. You can get pretty ingenious with that kind of experience. But the resulting twin-sized quilt was not so bad.

Lesson Three: Don't forget to use solid-colored fabrics. I continued quilt-making -- including some classic patterns such as the Amish bars quilt. Today, many quilt shops are just beginning to return to carrying solid-colored bolts; I nearly always try and use at least one solid fabric in my quilts -- they can add zip to a quilt that otherwise is "busy" with prints.


Lesson Four: Scrappy quilts delight the eye -- and block exchanges are delightful ways to make scrappy quilts. The quilt below was done as a scrappy block exchange between Cynthia England and me back in the early 90s. We were neighbors and decided to make a bunch of 8" blocks of red and white/off-white fabrics and then swap sets with each other. Using a ton of different fabrics makes your eye dance across the face of a quilt. And to get variety in the scraps, it's easier if you find one or more friends to exchange blocks with. Just make sure that everyone agrees on the rules of the exchange so that nobody's expectations are dashed.


Lesson Five: Establish resource files. I have a bookshelf full of books that I peruse when looking for patterns - as well as plenty of patterns, photos, etc. I can skim through these and find endless sources of inspiration. Go to your local bookstore and look through the Dover Press art books -- they have lots of lots of drawings and pictures that can be converted into quilt designs - and many of them are copyright free. This cartouche book (below) served as the inspiration for...

this quilt (below) -- I enlarged a cartouche, refined it as a quilt design, and then inserted drawings I found from other sources. Had I not maintained files full of inspiration pictures and drawings and patterns, I would never have made this 1992 quilt, celebrating Columbus' journey across the Atlantic.

Lesson Six: If you don't try, you won't learn. In the early 90s, I decided to try my hand at hand-quilting. I started with a full-sized quilt. Two months later, I had fully hand-quilted this quilt - which was made in a mystery class.


Here's a close-up that shows the quilting. I learned a lot... just by practicing, stitch by stitch. After a while, what is a struggle in the beginning becomes therapeutic, mindless, and relaxing!


Now... here's a lesson within a lesson. Each one of those stars had a feathered rosette in the middle of it that took 45 minutes to quilt. Guess what? You can't see all that work. Put your time into what really counts.


Before closing, I thought I would share a little bit of humor. My grand daughter, when she was around 2-1/2, was being potty-trained. She came running into my sewing room saying she needed to use the bathroom. I pointed to the bathroom door and said, "Hurry! Go!" She ran to the door... and came to a screeching halt. She had glanced in and seen a bath tub that was being temporarily used to hold three large bolts of batting for my longarm machine.


She stared at them and gingerly turned, saying, "Grandma -- you sure do have BIG toilet paper!"

Next month, I hope to show you some of the projects that I've been working on since the beginning of the year. In particular, you will see a new block-of-the-month and several new Baltimore album blocks. Family matters have kept me tied down for a while, but work has continued.

Until we meet again, happy sewing!

Sue
(c)2010 Susan H. Garman
Photos and text are not to be used without permission

Wednesday, February 10, 2010

More Antique Quilts

Help! Where did January go and when did February sneak in the door? This month I am posting more photos of old quilts; they remain my primary inspiration for new designs. If I see an old quilt that I really love, there is a good chance that I'll snap a picture of it, which will go into one of my files. Later, when I'm ready to start designing a new quilt, I look through my files and see what strikes my fancy. So here are some photos from my files -- I hope you they inspire YOU!

The quilt below (and the following close-up of a block in it) is a quirky looking Princess Feather quilt. Its chunky design is unusual -- along with the flying geese (or is it a squatty dogtooth?) border on only two sides of the quilt. Another unusual aspect of this quilt is that it was done in navy and off-white -- most princess feather quilts are done in red and green. I've been working on my own Princess Feather quilt, but it has tons of little "fingers" on each plume, so the perimeter of the quilt seems inifinite as I applique.

Below is another unusual antique quilt. Log cabin quilts are not unusual in and of themselves, but this one was done in the mid-thirties with fabric from that era. Have you ever seen an Aunt Grace log cabin? And what makes it equally unusual is the use of the black Thirties fabric.


I saw the quilt below at a Christmas tour of the homes in Sam Houston Park (in downtown Houston, along Buffalo Bayou). I liked the unusual block in it -- as well as the use of cheddar fabrics.


Another quilt in the Sam Houston Park display was the basket of roses quilt, below. I love red and green quilts -- and this shade of green, especially, is a favorite of mine. The basket design this quilter used must have been original; I've not seen other quilts with this pattern.


Again, here is another Sam Houston Park quilt. The Princess Feather design is a classic one, although each motif in the quilt below lacks the traditional "star" in the center of the princess feather design. Another unusual aspect of this quilt is the leafy border. Early Texas quilters were certainly original!


The quilt below, in the same park display, uses several traditional Coxcomb and Currants blocks. That's a favorite block of mine, and has inspired several of my designs. And, again, I LOVE the use of red and green fabrics. What is it about red and green that makes them such popular colors in quilts? Perhaps it's the sense of cheer that the colors often bring to mind.

This next photo is not a picture of a quilt, but a crocheted bedcover from the Sam Houston Park collection. I include it here just because it is another breathtaking example of how women in the mid- to late 1800s (and still today!) created incredibly complex and wonderful works of art that welcome people into their homes and their lives. Wouldn't you just love to have this on a guest bed in your home?
That's all for this month -- until March, happy sewing!
Sue Garman
(c)2010 Susan H. Garman

Sunday, January 10, 2010

The New Year Has Begun!

Many of you are aware of the fact that family issues have caused me to step back from most of my commitments during the coming year. The one thing that I can still manage to do, in the evenings, is design work - so those efforts will continue to the extent possible. Because time is at a premium in my life right now, I have no new quilts to show. Still, there are some old quilts that I am pleased to post on my blog this month. These quilts are antique quilts that hung in a special exhibition at the International Quilt Associations's 2009 Show in Houston. Every year, the IQA quilt show has inspired me to create several new designs. This past year was no exception - and once my calendar is more flexible, you'll be seeing several old quilts made new. For now, however, below are a few of the quilts that I dearly loved seeing. Thank you to IQA for giving us such wonderful exhibitions!
The exception to the antique quilts is the very first one; Winnie F is the proud owner of this quilt, which she started as part of a round robin. It has inspired me tremendously and is truly a fresh and innovative medallion quilt. Winnie is well-known in the Houston area for her medallion quilts; they are all exquisite.


With best wishes to everyone for a grand New Year -- happy sewing!
Sue Garman

(c)2010 Susan H. Garman
Winnie Fleming's round robin quilt

The remainder of this quilts are, I'm sorry to say, not identified as to the maker or year. My first New Year's resolution should have been "take better notes!"


The above photo is a close-up of the quilt below.


Don't you just love the bright colors and the whimsical play of the half-square triangles in the above quilt? It is so delightful!

Happy quilting in 2010!

Sunday, November 29, 2009

More Quilts!


I wish to thank everyone who commented on what you would like to see in a blog. I heard you loud and clear: pictures, techniques, and tips! With that in mind, I am sharing several things I have been working on and have completed in the last few weeks. November has been a wonderful month for quiltmaking -- and I have been working on being focused on completing things. I have way too many unfinished projects.


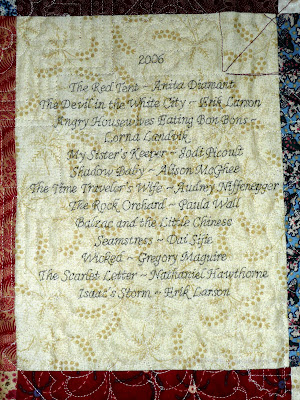
First of all, I am nearly finished with a quilt for a dear friend who has hosted a dinner for our book club for the past 5 years. In appreciation for her generosity, we are surprising her with a quilt that has 1) a favorite quote of each club member inked in the tiny outer border, 2) a list of each book we've read since our inception in 2004, and 3) quotes from The Thought Gang, which was the first book we read as a group -- it was painful to read but had some of the funniest quotes in it -- the story involves a professor and a one-armed crook who team up to rob banks. The recipient is not a quilter, but three of us teamed to make the quilt; here is the front of "The Thought Gang" quilt.

"The Thought Gang Quilt"67 by 67"

Here are several close-ups of the quilt - first the border. I am tickled at how it turned out - I quilted a piano key border (1" parallel lines), but inserted a feathered vine in each corner. It adds a softness, which I like, to an otherwise very geometrical quilt. Here is a closeup of the quilting in the interior of the quilt. Notice that in the 2" wide border, I did "ribbon candy" quilting. Sometimes it is hard to design something to fit into those narrow little borders, but this works well and is fairly easy to do. The double feathered wreaths in the "open" block areas also soften the look of this quilt. I love double feathered wreaths and do them quite often when I quilt open areas. Note that I ran the geometric echoing lines around those wreaths -- I've seen too many wreaths where the "triangles" at each corner are left unquilted and bubble up. I like filling that area with something.


And here is the back of this quilt. The quilting shows through very clearly. I pieced the back from leftover fabrics from the front. My friend Jerrianne E made the blocks for the front, and when she gave them to me for the quilt, she also gave me a lot of leftover fabrics. Interspersed inbetween all of the rectangles are some "open" rectangles, where I inked a list of all the books we have read -- along with some of the funniest quotes in the world from The Thought Gang book. This quilt will certainly carry memories for Dot, our glorious dinner hostess.


And here is a close-up of one of those rectangles on the back of the quilt. There are a lot of great things about being in a book club: seeing friends every month, having very interesting exchanges about the book we've read, and "upgrading" the level of reading that I would otherwise do. Without a push, I tend to read nothing but thriller detective novels.


Next: I am a strong believer in supporting community events and activities. And so when a friend called me and asked if I would mind "hemming up some sort of puzzle piece" that would then fly on the next NASA Space Shuttle mission, I jumped and said yes. You see, their son was diagnosed with autism, and they have struggled with appropriate therapies that give him the best chances for an improved quality of life. Autism is a mysterious disorder, and as with so many disorders, research funding is critical. Funding for the Autism Research Institute is being aided through "The Million Dollar Puzzle" initiative. By selling puzzle pieces, researchers can continue their work in solving the puzzle of autism. While I was only asked to "sew something that looks like a puzzle piece," I replicated the logo of the Autism Research Institute; after it flies on the Space Shuttle, it will be gifted to the institute.
Autism Research Institute logo(www.autismwebsite.com/autismpuzzlepieces/)
Next are two quilts that I made for Ricky Tims' and Alex Anderson's The Quilt Show. They are the featured block-of-the-month quilts that are being offered online, at no cost other than "joining" The Quilt Show (www.thequiltshow.com). It's a bargain -- a $42.95 one-year membership brings you featured artist videos every 2 weeks, two block-of-the-month projects, free classes, an online quilt guild with blogs and forums, and lots of additional show-and-tell, articles, and information. And the very best part of all of this is... you can do it all in your jammies! So here are the quilts. The first one is an applique quilt called "Hugs and Kisses." I named it that because of the X's and O's that traditionally represent hugs and kisses.


"Hugs and Kisses"71 by 87"

Here is a close-up photo of the quilting on this quilt -- each of the "X" leaf sprays have a feathered wreath quilted behind them. The "O" shaped wreaths are quilted with diagonal cross-hatching. There is also a 4-inch sashing strip between all of the blocks; you can see it in the above photo. It is quilted with a meandering feathered vine. The ruffled swag border is quilted with feathers, while the background behind it is quilted with "bead-board" slats (Yes... I listened to all of you when you said you wanted more information on techniques, quilting, etcetera. Let me know if you want more (or less or different) information!).
The next Quilt Show block-of-the-month is called "Star Crazy" - because it is filled with stars. This quilt is a fairly simple one to make -- with the exception of only a few star-interiors, all of the blocks use either 1-1/2" or 2" (finished size) units. I wanted to give everyone a break from making my usual 1" (finished size) units. Or maybe I was just giving myself a break from the complaints (just kidding!). I have long believed that you don't improve if you don't push yourself to do more difficult things. I wear a bracelet that my friend Cynthia gave me that says "Always do the hardest thing." It's become my mantra - it keeps me focused on learning and growing.

"Star Crazy"84 by 84"


And here is a picture of the quilting in this quilt -- again, I used double feathered wreaths in the border, and inserted a feathered wreath "behind" each of the star blocks in the central part of the quilt. The area around the border of smaller stars is quilted with just fill-feathers, while the outer border has a meandering feathered vine.


I hope you're still with me - I still have more quilt photos to post. My latest quilt is a Coxcomb and Currants quilt. Below is a photo of my rendition of the traditional coxcomb and currants block. Many of the older versions of the block are a bit too "chunky" for my likes. My version strikes me as being almost being "lacy."

And here is the quilt; it still needs to be quilted. My friend Margo has suggested that I "echo" the coxcomb design in the open areas through quilting. I'm not sure that I am skilled enough to tackle that, but wouldn't it be wonderful? I'll give it some thought. I am using this quilt to teach applique at a retreat in Utah in January 2010. Yes, I do quite a few lectures and workshops across the country. If I ever get my act together, I'll rebuild my website (which currently just points to this blog) and list all of the workshops that I teach, along with dates and sites. Teaching is FUN for me! But I digress... here's the quilt:


Phew -- I'm worn out! I hope you all still have plenty of energy to quilt some more today and all of your tomorrows. Until we meet again...

Happy sewing -
Sue

(c)2009 Susan H. Garman
All Rights Reserved
"Coxcomb and Currants"56 by 56"
Last, but certainly not least, is a Princess Feather block from an antique quilt I saw last month. This really is a chunky version of the block -- but that's what makes it so delightful! I have had a red and green Princess Feather quilt in process for over two years -- it has all the ins and outs in each feathery plume - which means that it has a lot of perimeter that needs to be appliqued. I have only about an eighth of a final feather to be appliqued, so there is a chance that you will be seeing my own version of a Princess Feather quilt in the near future (I can only hope!). In the meantime, I plan on drafting this chunky princess feather design into a new pattern - I just love how chunky it is -- and that it is done in an unusual color; I've never seen a navy princess feather!