I had hoped to finish a lot more than I finished this month, but it seems that once again, life got in the way. How does that always seem to happen?! I think it's just that my expectations for what I can finish might just be a tad higher than is realistic. This month I will show you some of the things I did to finish my Baltimore Glory quilt, along with my Good Golly and my Addie's Cheddar Alphabet... and I'll also show you some old Sunbonnet Sue quilts. And I'll show you a fantastic Baltimore quilt. And I'm going to do all that in reverse order!
First of all, Sally Magee sent me a picture of her Friends of Baltimore quilt (I'm sure she had her own name for the quilt, but my pattern was called Friends of Baltimore). I am SO glad she sent me the picture because nothing inspires me more than seeing a beautiful quilt and hers was phenomenal!

Sally chose to use a different layout and set of sashings than I used in my pattern, and her quilt looks spectacular! It is no surprise: Sally's quilt won Best of Show at the quilt show up in Plano, Texas in August. I can't stop looking at this picture. The colors, the quilting, everything is simply exceptional. Congrats, Sally!!!
On an entirely different spectrum of vintage quilts are Sunbonnet Sue quilts. The Painted Pony 'n Quilts quilt shop in La Porte, Texas had a Sunbonnet Sue trunk show last year. If you've never had the chance to go to "The Pony" as the locals call it, you have missed a treat -- the shop is about 30 minutes outside of Houston and worth the drive. The trunk show was loaned to the shop by Esther White, whose collection of Sunbonnet Sue quilts was remarkable in variety.

Nearly all of the quilts were small in size. Sometimes, small quilts are prized; they are easy to make, easy to collect, and easy to store.

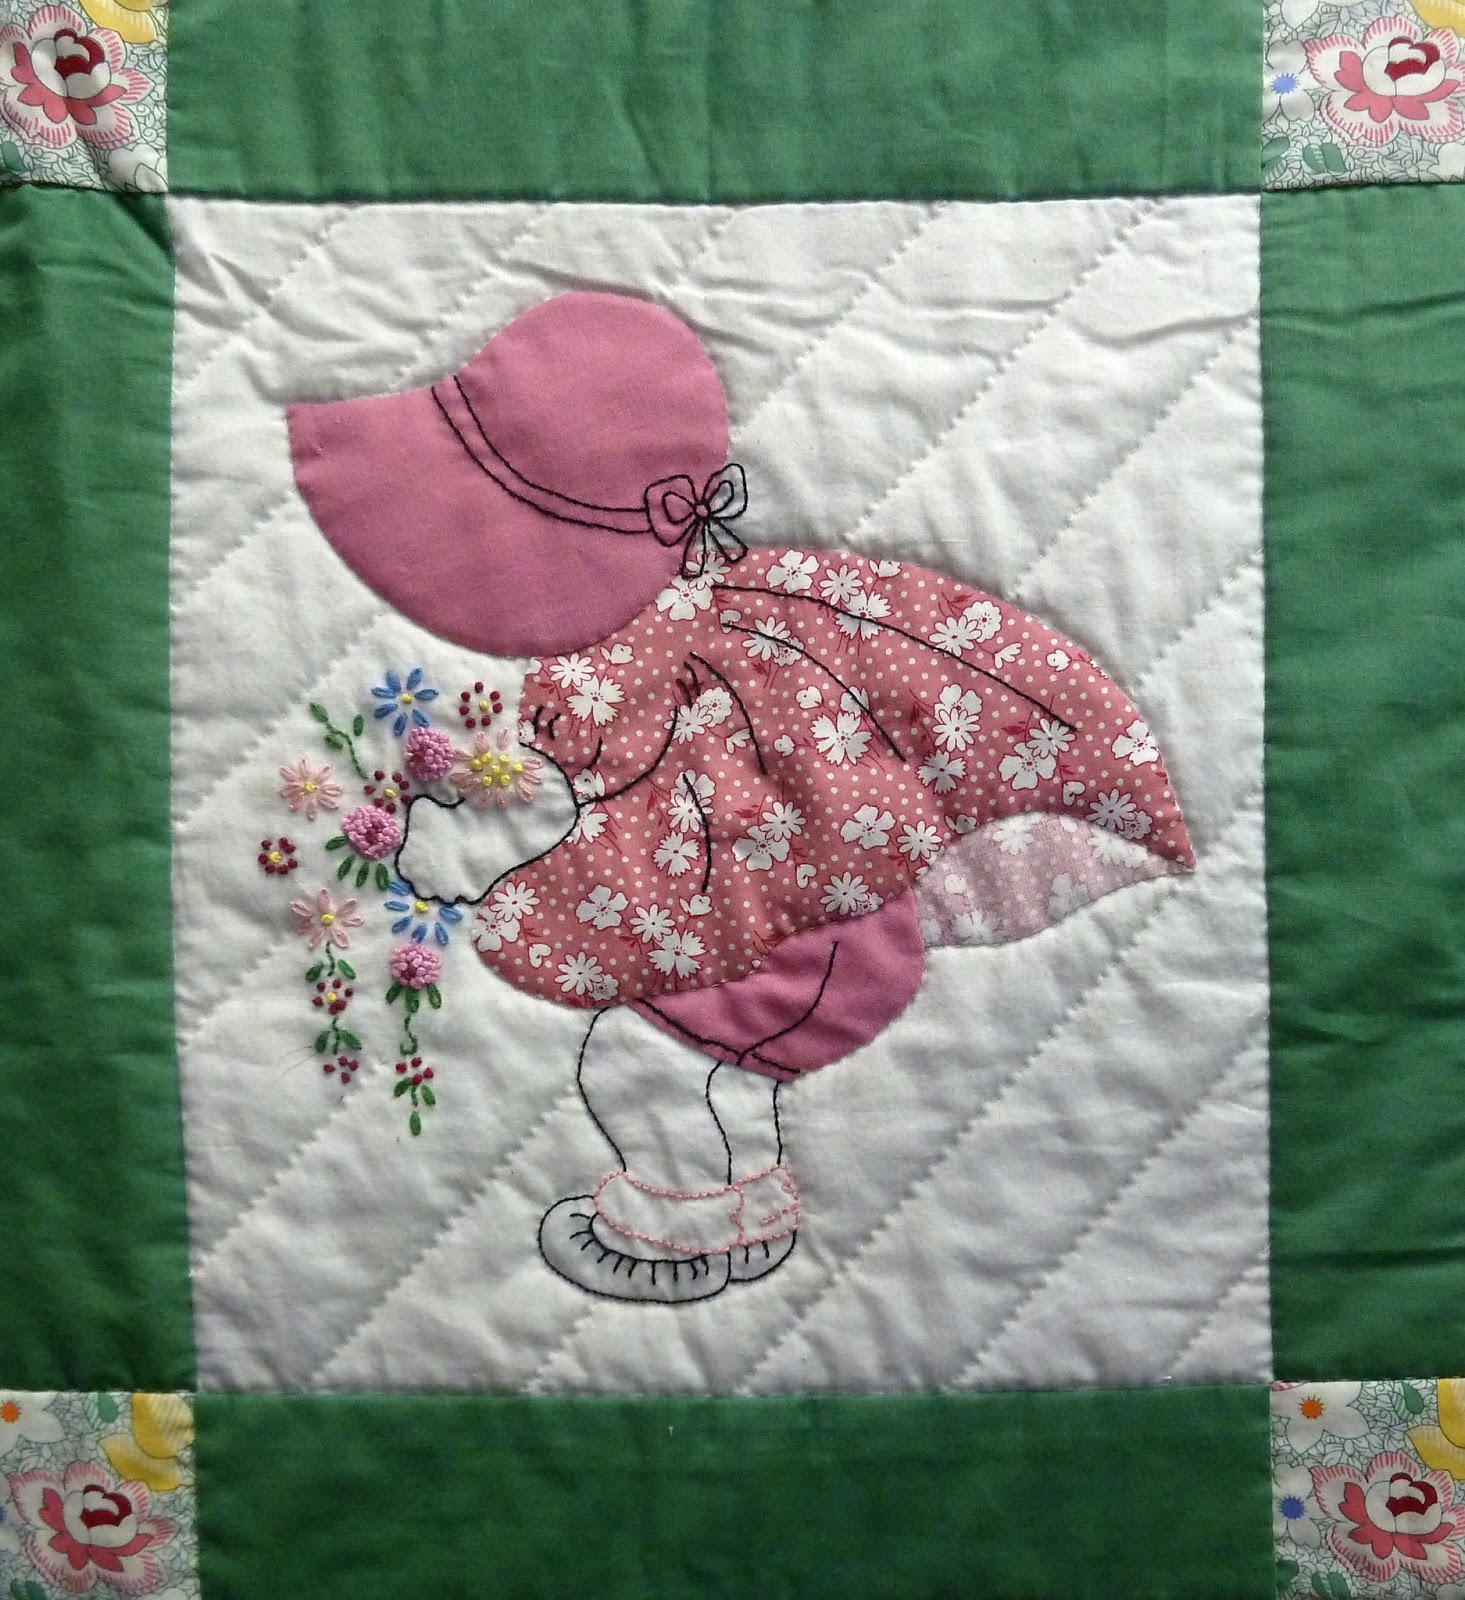
What I found interesting in the collection was the variety of Sues. Below is probably one of the more common Sunbonnet Sue designs. Each Sue has a big floppy hat on her head, hiding her face, one visible arm, and one shoe. The fabrics are often solids combined with 1930s prints or calicos. You may not be able to see the detail in the photo below but these Sues are appliqued in place and they have a running stitch of black floss around the edge of the applique -- with a blanket stitch around the brim of Sue's hat. There are three small embroidered flowers on Sue's hat, too. That is another thing about many Sunbonnet Sue quilts: embroidery.

In the quilt below, these Sunbonnet Sues must have lived in another town... each of their bonnets has a "flat" back on it. The embroidered flowers are on the ground this time, not on Sue's hat. As with the Sunbonnet Sues above, these gals have a hat that matches the sleeve and the shoes. That isn't always the case, as you'll see.

Here is a close-up of the above Sunbonnet Sue, and you can see the same black floss running stitch outlining the edge of the applique, but no blanket stitch anywhere in sight.

On the Sunbonnet Sues below, you can see the blanket stitch on the edge of the hat brim and the girls' shows... but no flowers anywhere! Instead, each Sunbonnet Sue seems to have suddenly donned a little apron or pinafore. Furthermore, these Sunbonnet Sues have a sleeve that matches the dress... and the hat and shoes are made of matching fabric.

And on the Sunbonnet Sue below, the hat is actually made of two pieces of fabric and Sue is holding her arms behind her back, where she holds a heart. This set of Sunbonnet Sues are also wearing the apron or pinafore. And everything Sue is wearing is made of a different fabric - her dress, hat, pinafore, and shoes. Did you ever think that there were so many variations of Sunbonnet Sue?

Here is another picture of the Sunbonnet Sue gals with the hearts behind them. The sum of the embroidery on these gals are the five buttons on their pinafores -- and the black outline around the hearts!

So what makes the Sunbonnet Sues below different? Well... it appears that we are back to square one with two fabrics: a dress fabric and a hat/sleeve/shoe fabric. The difference is that each Sunbonnet Sue is surrounded by her own sashing strips.

Here is a close-up of one of the above Sues and you can see again that this gal has a blanket stitch around the brim of her hat, the wrist portion of her sleeve, and her shoes. Interesting!

Here is one more Sunbonnet Sue... and what is different about her? First, she has a ribbon on her hat. She has different fabrics for her hat, sleeve, dress, and shoes. And she's facing to the left!

She isn't the only one facing to the left, though - here's a whole set of gals looking that direction. With these Sues, every bit of applique is blanket-stitched with black embroidery floss.

Here's another set of left-facing Sunbonnet Sues - with each of them holding an embroidered flower. Although there are many differences between Sunbonnet Sue quilts, there are also many similarities. But there is still something else different about these Sues....

Here is a close-up of one of the gals in the quilt above. Note that this is the first Sunbonnet Sue with TWO hands!

And here's a close-up from one of the earlier quilts you saw. She's the more typical Sue, with only one hand. There is such variety!

These gals have a bit more variation in their clothes... take a look at their clunky shoes! I love these gals!

Here is a close-up of one of those clog-wearing Sues. These gals have the blanket stitch on their hat and hand this time.

Here is another of the clogged Sue. You might notice that each of the gals in this quilt have the same dress fabric, but each dress comes in a different color!


Here is a close-up of one of the windblown Sues. See what I mean about the sleeve/earmuff?!!

This Sunbonnet Sue is apparently a bit older... you might notice that she has developed a bustline! At first I thought she was pregnant, but I think busty is the right answer....

Here is a close-up of "mama" Sue. Her profile is quite unique - and you may notice that her dress is bedecked with buttons!

Here are two more Sunbonnet Sue gals caught in the breeze. These are so cute with each of the gals holding a bouquet of flowers, wearing some cute socks, and having her panties handing out! Those bouquets are quite detailed.

So one might ask: have I ever made a Sunbonnet Sue quilt? The answer is no. The closest I ever came to including Sunbonnet Sue anywhere in any of my quilts was in my Trick or Treat quilt, below. You might look for a while before you find where she is, thinking that she must be one of the costumed characters.

But you would be wasting your time. Sunbonnet Sue did not make it into my Trick or Treat quilt; she is not a favorite character for me, after all these years. Instead of putting her in my quilt... I put her tombstone up in the graveyard on the applique panel that runs across the top of the quilt. Rest in Peace, Sunbonnet Sue!

Enough of Sunbonnet Sue for now, though. I want to show you a sampling of the quilts one of the bees I am in has made for our quilt guild's annual auction. Our guild has an auction every August. Like many guilds, members donate or make items for the auction - some are put into a boutique, some are put into a silent auction, and the best things are put into a live auction. It is a riot of fun and one of the biggest money-makers our guild does all year long. Our guild asks that each of its bees contribute a quilt or a set of blocks to be put in the auction. The applique bee that I've been in for a number of years has made the following quilts (one a year).
The Fern Rose quilt (52 y 64 inches) was one of our earlier quilts - it was made in 2002. The blocks were hand appliqued, along with the ruffled inner border. I love the soft pink and green fabrics in this quilt.

In 2003, the bee made this album-style quilt based on designs from Jane Townswick's Artful Album book. It is hand appliqued using richly colored batiks on a chocolate batik background.

In 2004, the bee made a Perfect Union quilt top based on designs from Darlene Christopherson's A Perfect Union. Twenty-five hand appliqued, hand pieced, and machine-pieced blocks were assembled and a hand-appliqued swag border was added to the layout. The quilt measured 68 inches square.

Made in 2005, this Oak Leaf Reel was based on a pattern I drew up, combined with a border we found in a book. This was the first oak leaf reel quilt our bee made... and the bidding was fast and furious when it went on the auction block!

In 2006, the bee made a Monsters quilt based on one of my old patterns, and in 2007, the bee made another oak leaf reel but changed the look entirely by using autumn shades of Bali batik fabrics.
In 2008, the bee made a Whig Rose quilt (69 by 87 inches) using a variety of red and green fabrics on a very pale green background. We began to recognize that red and green quilts are like magic in a guild auction: people start opening up their pocketbooks!

I quilted this quilt for the guild's auction. In the open areas between the blocks, I quilted double feathered wreaths.

And in the border, I quilted flowing meandering feathered vines.


This Oak Leaf and Cherries quilt (75 by 94 inches) was made by bee members in 2010 and put into the auction. I asked if the bee would let me quilt it and then I asked if they would leave 4-inch wide sashing strips between the blocks. It was the perfect place to put meandering feathered vines. The border has a wide meandering feathered vine also.

By now for sure, we have learned that red and green quilts are highly prized by bidders in our auctions, so our bee spends little time deciding what to make for the next auction. In 2012, this red, green, and cheddar quilt (80 by 96 inches) was appliqued and I quilted it with iconic feathers. I just love how feathers can enrich any quilt! I cross-hatched the applique blocks and put double feathered wreaths in the open blocks, all surrounded by a meandering feathered vine.

If this quilt looks familiar, it's because 2013 was a great year to repeat of what we made back in 2005... but with this quilt, we omitted the appliqued border. The bee made the 68 by 87 inch quilt and I volunteered to quilt it, as I love to quilt in big open areas.

Here's a close-up of the sashing and blocks...

And a close-up of the sashing strips...

And a close-up of the border. I don't use a computer on my longarm; I much prefer the fun of hand-guiding the machine and making it do what is in my head. I love these big, graceful feathers with "puddles of pearls,"as I call them, nestled amongst them. This picture shows that the binding had yet to be added to the quilt.

This year, we repeated the quilt we made five years earlier: an oak leaf reel, as shown below. Again, I volunteered to do the quilting as long as they gave me room to do some more feathers -- can you tell that I just love making them?!

Here's a close-up of the block and the border and sashing...

And here is a close-up of the border.

That finishes the quilts our bee has made for our guild's annual donation. I don't know what we will make next year, but I am guessing that it will be (surprise!) red and green. Perhaps we've done enough oak leaf reel quilts for a while, but I'm sure everyone will come up with something spectacular!
* * * * * * *
Now I want to show you one of the new quilts that I've finished making a pattern for: Addie's Cheddar Alphabet. I showed it to you last month but THIS month, it's on my www.comequilt.com website so you can go and buy the pattern if you are so inclined. I have always loved the old vintage alphabet quilts for some odd reason, and felt inclined to make a quilt for myself, based on one I saw that had been made in 1917 by Addie Heipler Allen. The original quilt is pictured below, followed by my renovation quilt; the original quilt measured 90 by 78 inches and sold at auction in 2010 for $5,382.

And here is my rendition, below. The pattern includes all of the paper foundations for each letter and the four Lemoyne Star blocks; the quilt measures 69-1/2 by 80 inches. The quilt is a breeze to make - and the pattern even includes a table of all of the sizes and shapes of fabric required to make the blocks. You could have one done in no time at all!

Here are two more pictures of the quilt. Below, you can see that I used very geometric echo quilting around each letter and the stars.

And here, you can get a feeling for the size of this quilt. It's a nice bed-sized quilt!

In addition to Addie's Cheddar Alphabet, I also finished another quilt... and finally finished writing up the instructions for it! That quilt is Good Golly -- an intricately pieced scrap quilt that has been in the works for months now. Every time I thought I had figured out the perfect way to finish the borders on it... I changed my mind and added another border that I hadn't planned on adding. Even the very last border was a challenge because I did not have enough of the fabric I wanted to use. I ended up heading to the store and getting an entirely new fabric and adding two more little borders. Eek! It was like a monster that was out of control! I had been trying to make this quilt out of my stash, but it was not to be. I think, though, that there must have been some magic in my continual hesitations and additions, because here is Good Golly. It needs a bit of pressing... and a lot of quilting... and that will all happen in good time.

At least for now, though, I can celebrate that Good Golly is ready to quilt. Yay!!! The pattern is now available on my website, too. I'm sorry if it sounds like this blog has turned into a sales pitch for my new patterns, because I really just like sharing designs and techniques (which I'll get to, below), but I've had so many people email me asking when the patterns will be available.
Now, I'd like to show you my Baltimore Glory - the fourth Baltimore album quilt that I've finished this year. I'm ready for a departure from red and green, for sure! I want to show you a few things about this quilt: how I square up each block, how I square up the whole quilt, how I remove unruly threads that sneak inside a quilt when I'm quilting it, and how I quilt the quilt. Consider this a set of mini-tutorials!
I'll start with how I trim my blocks to size once they are finished. I always cut my background fabric at least one inch bigger than required, on ALL sides. This gives me room to square it up, allows for shrinkage, and allows for fraying without creating any issues. Sometimes, trimming a block to size merely involves pulling out the right size of square ruler, and you just trim along the outside of the ruler. But what if you don't have the right size of ruler? That was the case with a block I wanted to cut 15-1/2 by 15-1/2 inches. I only have a 15 by 15 inch ruler.
First of all, whenever I make a large applique block, I make small "registration marks" at each corner. I do this by putting the background fabric on top of the pattern and putting a tiny little pencil dot at each corner. If necessary, I use a lightbox to mark the corners. In the picture below, I have marked the dots with big black spots so you can see them - but in reality, the pencil dot is barely visible but allows me to line up my block on the pattern quickly and easily.

Those registration marks allow me to put my 15-inch ruler on top of the block and know quickly where the sides of the block are. Below, you can see the ruler (and note that the pencil dots are NOT visible) on top of the block. I may need to adjust the ruler to the right or left or up or down to actually put the applique in the center of the block where I want it, as applique often distorts the block just a tiny bit.

The only problem is this: I now know where the outer edges of the block will be once it is sewn... but I still need to add in the quarter-inch seam allowance to each side of the 15-inch square. How do I do that? I start by taking a longer ruler and setting it beside the 15-inch ruler, as shown below.
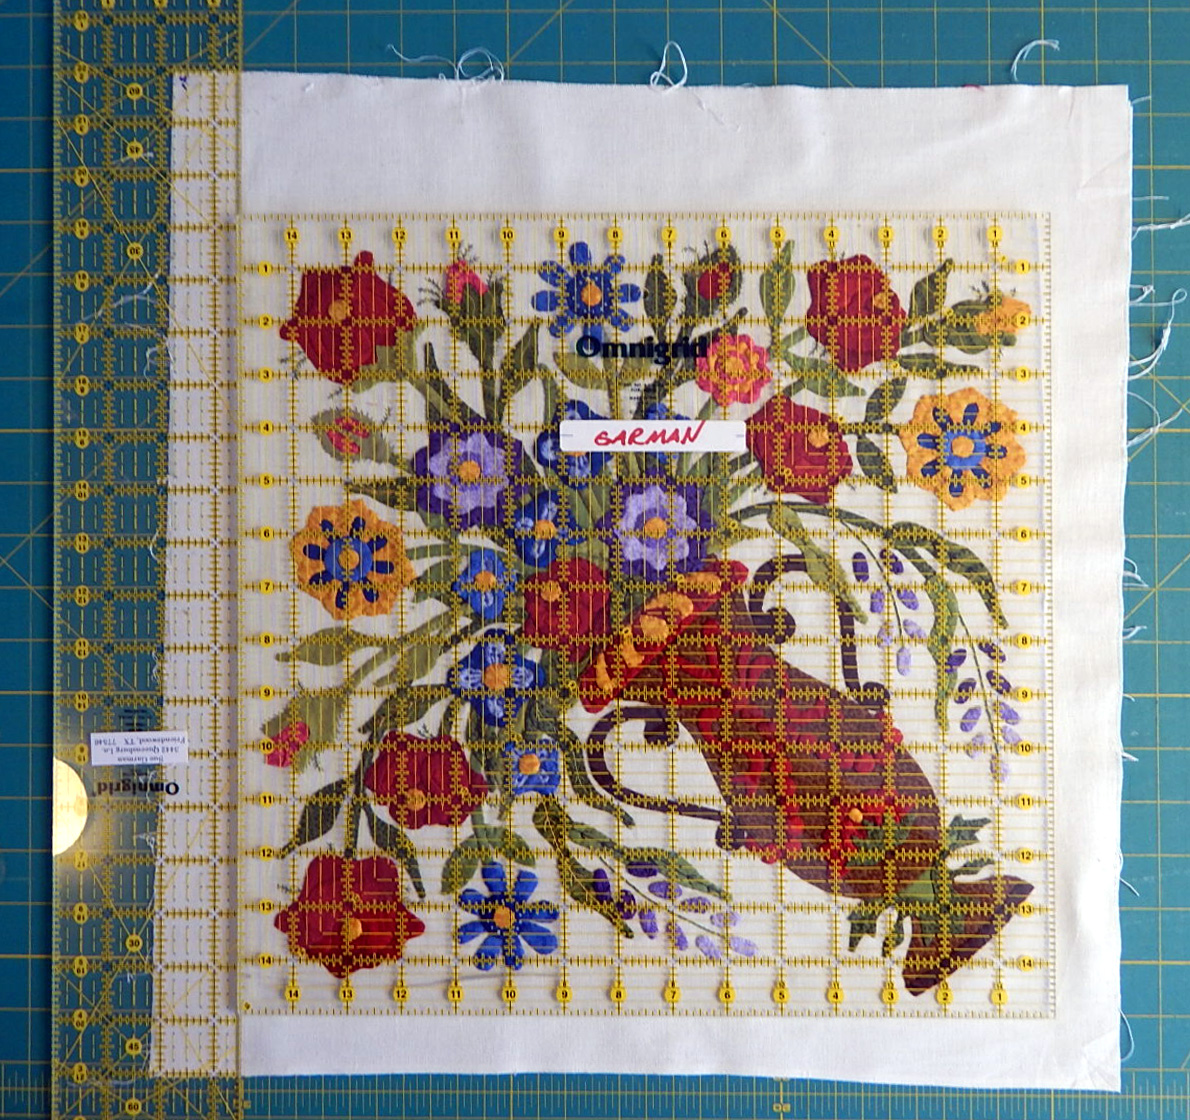
This is all done on top of my big gridded mat, as I intend to use the lines on the mat to help me add those quarter-inch seam allowances. I move the block such that the longer ruler is ON a grid line, as indicated by the arrows below.

And I make sure that the ruler extends across and that the other end is on the same grid line, as shown below.

Now, to add that quarter-inch seam allowance, it is just a matter of scooting the ruler down, 1/4-inch lower on the gridded mat... and using my rotary cutter to cut the first side. Then, I repeat on the next side -- I would already have aligned the ruler vertically along a grid line before I made the first cut... but now with the ruler lined up on a vertical grid line, as shown below, it's just a matter of scooting that long ruler to the left one-quarter inch, and trimming the left side.


Once I've repeated this on the remaining side, the block is trimmed to 15-1/2 inches square, and is ready to be stitched into my quilt (the photo below omits your view of the seam allowance).

But what happens when I have finished all of the blocks and assembled the quilt top. How do I make sure that the quilt is squared up properly? If I 'm a great piecer, that should not even be a decent question... but I'm not a perfect quilter, so I need to adjust things accordingly. Here is how I do that.
First, I lay my quilt out on the floor of my entry because it's a big, open, clear, flat area. I have beveled glass in my front doors, so you are seeing some strange reflections on my quilt, below. What you can see, though is that I have taken my old mats, which I save, and slipped them beneath the right and lower side of the quilt top.

You can also see in the picture above that I have begged and borrowed and gathered up a bunch of long, long rulers. I lay these out, end to end, on the right and lower side of the quilt top, with the mats beneath everything. I ensure that the corner rulers are very carefully butted up against each other, making a perfect 90-degree angle. This is important - it is how I ensure that the quilt is going to have four straight edges and four 90-degree corners.

As I line up the rulers, I also make sure that my quarter-inch seam allowance line (indicated by the black arrow, below) is exactly where I want it - so that the seam line will split the outer-edge nine-patches in my sashing strips. Now, when I cut along the edge of the rulers with my rotary cutter (remember - the mats are below all these rulers and the quilt top!), I will have a perfect quarter-inch seam allowance and a seam line that is exactly where I want it.

I go ahead and cut the right and lower seam allowances/edges of the quilt, and then I move the mats and rulers to the left side of the quilt and repeat the process: but the rulers tightly up against each other in the corner, to form a perfect 90-degree angle, and line up the seam allowances/seam lines perfectly so that the seam line, when stitched, will split the nine-patches in half.

In the above picture, I had not yet lined up that 90-degree angle at the corner, but I do that before I do my cutting. Then I'm ready to trim away with my rotary cutter. Note the roll of packing tape shown in the picture below. I use it to tape the rulers together, to make sure that they do not slip and slide away or apart as I'm lining them up.

Once the cut on the left has been made, I repeat the process across the top of the quilt....

And then... the quilt is perfectly squared up and I can add the final outer border! I'm not worried a bit about the wrinkles you see in the quilt below; those will all disappear when I quilt the quilt.

So now... it's time to quilt the quilt! This is when I get really excited -- for me, the quilt starts to take on a life of its own as it gets quilted; it comes alive! Okay - I'm not a zombie quilter with living and dead quilts - but you know what I mean. Quilts just look better after they are quilted!
The first thing I do after I load a quilt on my longarm is to start loading a bunch of bobbins with the thread I will use for the background. In general, for a bed-sized quilt, it takes 8-10 bobbins of thread for me to quilt a quilt. Of course, with thinner thread (e.g., silk), fewer bobbins are required, or with heavier quilting, more bobbins are required. I started out by filling 10 bobbins for Baltimore Glory. Little did I know that I would be quilting for many days, not my usual one to three days of quilting on a quilt. I ended up using EIGHTEEN bobbins of thread to quilt this quilt. Eek!

Below, you can see the quilt on my longarm. I start at the top of the quilt and quilt all the way down to the bottom of it, quilting all the main "stabilizing" lines, such as along all the sashing seams and around all of the applique. Next, I quilt from the bottom up, filling in the empty blocks. In this case, I chose to quilt double-feathered wreaths in the open blocks and setting triangles -- and I used cross-hatching to fill any remaining "empty" areas in the blocks (both the open alternate blocks and the applique blocks). Below, I've quilted all the applique blocks and sashing strips and am rolling back up and quilting the double feathered wreaths.

Here's another picture of the quilting - as I roll back toward the top of the quilt and fill in those empty alternate blocks.

And here are two pictures of the blocks, fully quilted. After I have finished doing ALL of the background quilting using the white thread, I go back and applique around ALL of the layered applique, matching the thread color of whatever I am quilting through so that it is not noticeable.


Where I have a block that leaves a lot of open space, I can just fill in the open space with more cross-hatching, but in the case of the cherry wreath block, I chose to quilt in a little feathered heart. To me, it is just another way to add visual interest to a quilt.

I still had not decided, as I was quilting this quilt, what I was going to quilt in the borders. I was waiting for an inspiration and none came. The borders were quickly getting to the point where they needed to be quilted... Below, you can see that I'm working on a double feathered wreath in a setting triangle... and the empty border is staring me in the face.

Those double feathered wreaths are fun to make and so elegant.

But what about those borders?!!! Inspiration finally came in the form of realizing I could "test" or audition various options by drawing the out on paper. Below, I tried out a meandering, straight-edged feathered vine. I just drew it out on paper, taped together, using a Sharpie marker, and then laid the paper on top of that empty old border. Not too bad... but is this what I want? I'm not sure yet....

What about a meandering feathered vine where the feathers do not extend out to make a "straight" line? This border idea definitely did not work for me -- I thought it was too wiggly for this quilt. Also, it would have meant a lot more work to fill in the empty area beside the feathered vine. Nope... not this option. What else can I try?

Every year for the past 25-plus years, I have gone to the Houston quilt show and bought a bunch of different quilt stencils. I have a box full of stencils. When I need to, I go and pull out that box and search through it until I find something that I think might work. In this case, I found an interesting cable stencil... and it occurred to me that I could make the cable... but use feathers instead of a "rope" look. I drew it out... and guess what? It worked! I liked it... a lot. Shall I use this one or the other straight-edged meandering feather vine? Hmmm....

The cabled feathers win!!!

Here is how they look when the fill (slats) is put on each side of the cabled feather line.

But what do you do when you have to make those cables meet at the corners? I didn't have a stencil on hand that would give me a clue as to how to make them turn a corner. I decided that a circle of feathers would be the best thing to put in each corner... and I'd just start and stop the cabled feathers at that feathered wreath.

Here's how the cables met at the corner:

And here is the back of the quilt after it was quilted. Nice! Mostly, it was just nice to have finished the quilt after a week of quilting.

Here's the finished quilt. I am so glad I chose to make the sashings and nine-patch cornerstones out of three strips of fabric instead of my original plan to use sashing strips made of flying geese. I think these sashing strips are much more delicate and more attuned to the open alternate blocks.

There is one more thing I wanted to mention when it comes to quilting. What happens when you find that there are stray threads between the layers and they show through to the top? I have a solution!
There is one thing I do before I ever load a quilt and start stitching....

I pull the top back and check the back of it. I want to remove all of the stray threads that will show through to the top of the quilt. You can see in the quilt below that there are quite a few red threads hanging out across the back of the quilt. Eek! These will show through to the top after I quilt the quilt.

Sometimes the threads are loose ones; sometimes they are just fraying threads that hang out of the seams. They all need to be removed or clipped so that they don't show on the top of the quilt.

See how nicely you can clean up a top by removing the threads before you start?!

This quilt had a ton of stray threads -- all of which would have shown through to the top. Here's the pile I pulled or trimmed off of the back of the quilt top. It will save me some time and headache later to have these out of the way!

But oops... every once in a while, there is a thread that remains between the layers. See this one, below? Gads - where did it come from? Not to worry though...

I insert a size 000 crochet hook between the layers and grab that thread... and pull gently.

Once I have it pulled out a bit with the hook, I grab it and gently pull out the whole thread. It is now gone and no longer a problem!

So here, again, is a picture of Baltimore Glory. This quilt is now on my www.comequilt.com website and is available for sale if you are interested. You can also choose to only buy individual blocks.

My friend, Sharon Meyer, has made three blocks for her own Baltimore album quilt. Here is one - the eagle from Friends of Baltimore. I love Sharon's choice of fabrics and color - especially the blue fabric for the eagle. You may also notice that she made her own tassels for the eagle. In a future blog post, I will show you how to make those tassels. They are relatively easy and fun to make!

Here is Sharon's ship - also from Friends of Baltimore. She is a meticulous and expert applique-er.

And here is Sharon's blue basket block, again from Friends of Baltimore. I especially love the red fabric she chose for the bottom of the basket. Nobody is certain why the old Baltimore album quilt blocks had a sort of "scarf" or decorated bottom of the vases or baskets. There is one train of thought that says that those quilters were enamored of decorative items, as it was a time of rich excess in the age of the Baltimore album quilts, and they designed these blocks so that you could see the bottom of the decorative baskets or vases. It kind of makes sense... as much as you can make of a strange but common design motif from the 1850s! I obviously liked it enough to replicate it, in any case.

I just completed another travel gig to Bryan/College Station (home of Texas A&M Univeristy - gig 'em Aggies!), where I taught workshops on two different album blocks as well as how to hand quilt using a stab stitch. Terry Skrabanek of Lone Star Quiltworks had engaged me to come; she is a wonderful shop owner and super smart! She has been in charge of the Texas Row By Row Experience and is very organized. If you're ever in the neighborhood, stop in - you'll find the friendliest staff in the world there! Terry has ordered some Spool Swings and also some metal bias press bars that she is going to carry in her shop; if you want either, call before they sell out! Below is a picture of me teaching stab stitching - behind me, you can see my Happy Daze quilt - a fun and happy quilt to make in 30s reproduction fabrics!

The only other set of workshops I'm teaching this year are at Baltimore on the Prairie. Sorry, everyone, but the workshops I am teaching there have been full for months.
 But you can still sign up with Applique Away on Galveston Bay for a couple of workshops with me. Those workshop are on February 21-25 on beautiful Galveston Island. The organizers of Applique Away always make sure that everyone has the best time in the world with fun surprises all day long! Pearl Pereira, Margaret Willingham, and Gretchen Gibbons are the teachers and each has their own special area of expertise. I do needle turn applique; Pearl does prepared-edge applique with starch and freezer paper (and she's a joy to meet!), Margaret will perfect your needle turn with reverse-appliqued medallion quilts, and Gretchen will have you appreciating the finer aspects of appliqued wool. Sign up while there is still space available -- the bonus is that the best secret of Galveston is a winter-time visit!
Later next year, I will also be teaching a week-long workshop at the Empty Spools Seminars in Pacific Grove, California on April 10-15. These workshops are held at the scenic Asilomar Conference Grounds right by the sea, so you can walk along the beach when you're not stitching or eating the wonderful fresh local produce they serve with the meals in their dining hall! Think about coming to Galveston or Asilomar -- I'm pulling back on travel next year so, sadly, I will have fewer opportunities to meet you.
I hope you are having a wonderful summer and that if you need it, some rain falls your way. We have had plenty in Texas, but it has all come in huge gully-washers instead of being spread evenly across the year. I love quilting when it is raining outside. But golly -- I love quilting all the time! In fact, I think I'll close this month's blog post and go quilt some more....
Until next month... happy quilting!
Sue

(c)2015 Susan H. Garman


Your work, and that of your bee, is simply astounding.
ReplyDeleteThank you so much for sharing your process.
Thank you for the walks with Sunbonnet Sue. I love those little girls -- and I especially adore the windblown girls -- but like it, I'll probably never make a Sue. Bit I know I'll continue to notice the differences in patterns whenever I see them.
ReplyDeleteThank you, too, for the tour through the rest of the quilts. There aren't words to describe how gorgeous and exquisite they are!
Sue, again, thank you for the wonderful Blog post. I read it several times in the month you post, but make notes to go back for references too. You put a lot of effort into your Blog and it shows!!!
ReplyDeleteOnce again this is an entry not to be missed: history, how-to, and dazzling photos. I hope I can attend one of your seminars and the Houston Quilt Show some year. Thanks for all the work you put into these blog entries. I am grateful for the detailed instructions and the ability to view exquisite work you do! Ruth (Michigan)
ReplyDeleteA couple of questions. How long have you been quilting and how long did it take to get where you liked what you did when you quilted. I have been considering buying a machine but wondered if it would be worth it because of the learning curve. After all the work put into a quilt top, you don't want to ruin it.
ReplyDeleteGreat blog as usual. Thanks for all your time and sharing, and your great patterns with great hints and directions.
Avon
Hi Avon -
DeleteI bought my long arm about 10 years ago. The learning curve is MUCH faster than you might imagine. I had NO experience with machine quilting at all, and was even afraid to use the machine for the first two weeks after I got it -- I just walked in the room and stared at it. Finally, I bought some cheap, cheap muslin and batting and loaded it on the machine... and started practicing quilting on that. It was not pretty for about 3 months and then it was like a light bulb turned on and it got easier. I did a bunch of "practice" quilts that were what I'd call utility quilts - it didn't matter if I made a mess on them; it just mattered that I got to keep on learning. Nowadays, there are YouTube videos that you can watch to learn different techniques... but mostly it is a matter of deciding what YOU want to put on your quilts -- too many videos have simple "fill" work on them that I would never want on my quilt to begin with... so study pictures (Pinterest is great!) and then just start trying and you'll start recognizing both what you want, how it will look, how to achieve that look, and how to make it better the next time. I am SO glad that I can do my own quilts now. What pushed me over the edge into getting a machine was exactly what your fear is: you don't want to put all that work into a top and have it ruined... and I had sent two different quilts out to be quilted by someone else and when they came back I was sorely disappointed. I decided at that point that I needed to quilt my own quilts. It's been a joy!
Sue
Yowza, Sally's quilt is incredible! I see that she has used a lot of hot pink, which I am a big fan of too. I spent several minutes looking for Sunbonnet Sue in that quilt, btw, before I cracked and read the answer. No one ever seems to like their namesake characters, or songs, I've found. Thanks very much again, Sue, lots of great stuff to see this month. :D
ReplyDeleteAnother breathtaking blog post, Sue! In looking at your Baltimore Glory on the longarm frame, I can't see any marking for quilting - what do you mark with?
ReplyDeleteAnd Good Golly will be a lovely complement to Oh My Gosh, adding another to my list!
Hi Janet -
DeleteOn my Baltimore Glory quilt, I marked the quilting with a simple Papermate mechanical pencil, using a very light hand. If you enlarge the picture right before the "here's how the cables met at the corner", where I have not yet finished quilting the feathered cable, you can see very faint pencil lines for the SPINE and the CONTAINMENT lines for the feathers. I freehand the feathers within the confines of the containment lines, and along the spine line. As for cross-hatching, I do that one of two ways: I draw the lines very lightly, using a long ruler, or I just use a ruler and keep moving it over 3/4 inches for each cross-hatch line. Either way works well, but the pencil is actually more accurate for me.
Thanks for asking!
Sue
Thanks, Sue! I've never marked for my midarm, and REALLY need to spend more time practicing!
DeleteWhere can I get the pattern for the cute sun bonnet girl picking flowers with her panties showing?
ReplyDelete