Late breaking news! I forgot to mention... My "Sarah's Revival" quilt won Best of Show, Best of Division, and Judge's Choice at the Houston Livestock Show and Rodeo. The rodeo is close to my heart -- the "win" means that another $18,000 college scholarship will be awarded to a student that lives in the same rodeo committee area that I live in. Yehaw!!! Here's a picture of the quilt at the rodeo, taken by "roaming rodeo quilt reporter" Rhonda (http://andsewitbegan.com/2014/03/08/rodeo-roaming-quilt-reporter/):

My apologies go out to everyone for not being timely in posting something for March. I know, I know, I'm the one who set the deadline, so why am I apologizing? Because I set expectations up for some of you -- AND for myself. In fact, I am going to give a great big SHOUT out to a few of you who emailed me, wanting to make sure that everything was okay. Thank you for your thoughtfulness; it means a lot to me.
This past month (plus the past week) has been very busy, which explains my tardiness. I had a lot of deadlines to meet (like getting a quilt finished and shipped to The Quilt Life for publication at the end of the year, and preparing for three back-to-back workshops) and tons of family matters to tend to. Still... I am doing, right now, my favorite thing of all: anything related to quilting, including sharing my thoughts and experience with you. So I'll get started!
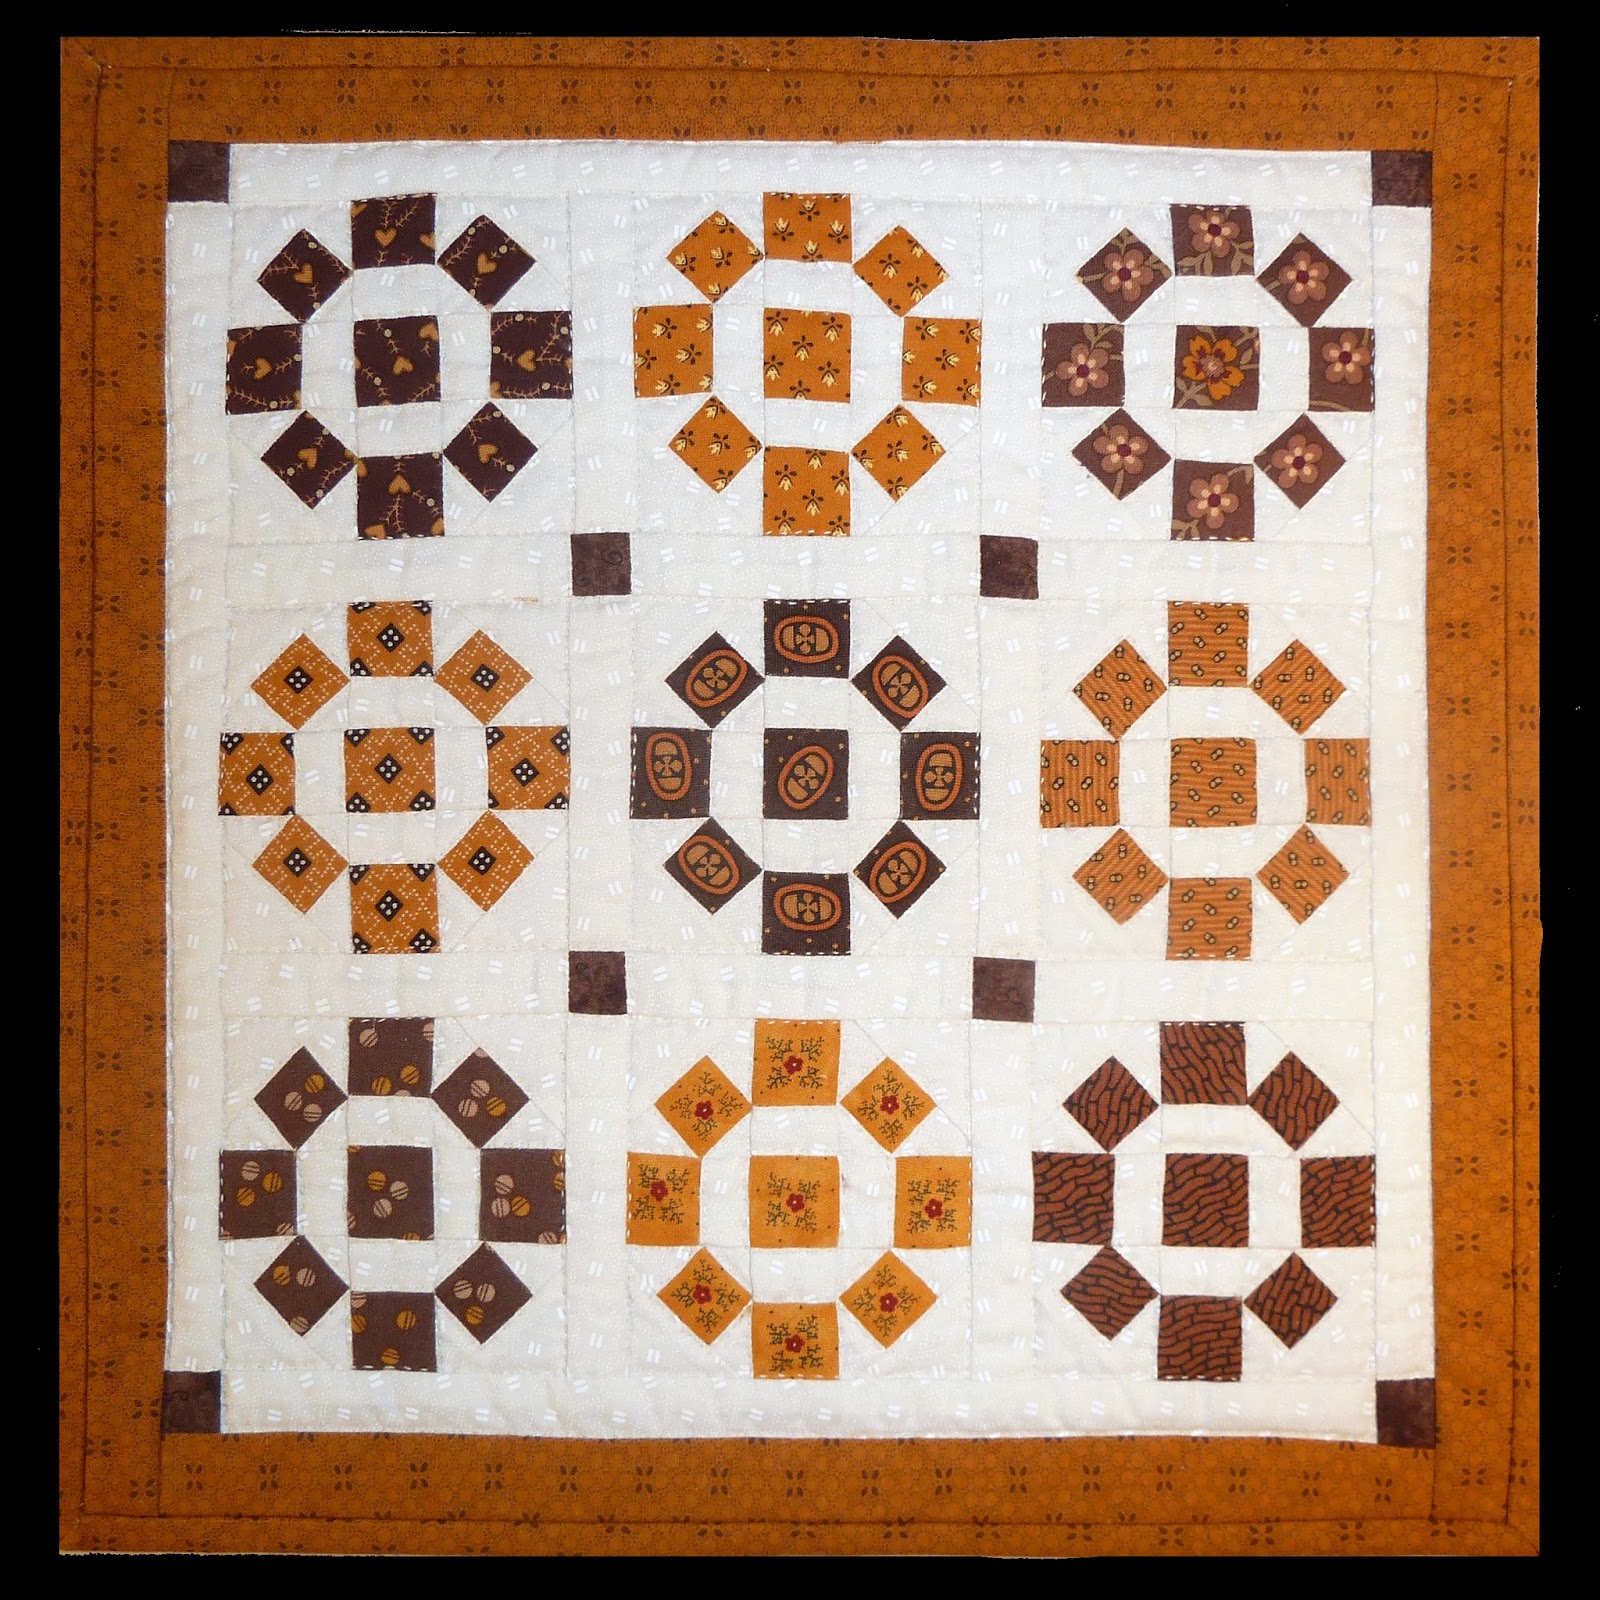
One of my quilt guild bees poses a challenge several months before our biannual quilt show. We were all feeling rather pressed for time and opted, this year, to do a small quilt. A very small quilt. In fact, just a 12-inch square quilt! That's the only rule: it must be "approximately" 12 inches square. We decided, since 12 inches is a foot, to call these "footsies." My footsie is made with cheddar and brown fabrics, and I decided to use the Rolling Stone block as the foundation for my footsie. The first thing I did was to... create paper piecing foundations that I could cut apart and use to paper piece what would end up being nine 3-inch blocks. Yikes! But paper piecing makes the job easy. I use the "draw" function in Word to make paper foundations. It's pretty simple - someday, if you'd like, I could easily give instructions for creating your own paper foundations in Word. Let me know if there is any interest....
So here are my paper foundations. I haven't separated the units for each block yet -- but I did that before I started sewing.

I knew that I wanted to do some fussy cutting for each of the units of my Rolling Stone block - and the easiest way to do that was to take one of the paper foundations and cut out a "window" so that I could see what would fit in each little unit. Here's one of the window templates I used.

Next, I decided that I would use brown and cheddar prints for my Rolling Stone blocks. I needed to test the motifs to see if they would fit in the windows. It's pretty simple -- first, the center window...

and it looks pretty good. And then a side unit; it looks good too!

Here are some close-ups of the three-inch blocks. It was a lot of fun to see these come to life with the fussy cutting. Those threads you see are the basting threads I used when I was getting ready to quilt my footsie.

Here's another block (you can even see some of the quilting stitches in this one). This was probably the most dramatic of the tiny blocks, so I ended up putting it in the center of my footsie.

And another - I used different motifs in the outer pieces and the central one, since the fabric had a variety of flowers in it.

And yet another...

Here are the blocks, all sewn together and in my little plastic-pipe frame, awaiting quilting. Since this was such a small little quilt, I decided it would be best to hand quilt it.

And... ta-da!!!! Here's the finished footsie - a nice, neat foot-square quilt. I'll share everyone else's once they are done - our quilt show is in May, so it'll be a few weeks.
Over the past two months, I was really feeling stymied with my applique. I had been working on the block below (and the one below it, also) for two solid months... and making little to no progress at all (and you can see below that the blocks were still not finished when I snapped these pictures). They are basically both the same block - one is intended to be used in a Baltimore-style quilt that has straight-set blocks while the other is intended to be used in a Baltimore-style quilt that uses an on-point setting. I had to force myself to pick these up over the past two months, and I could barely put a stitch or a leaf in place whenever I worked on them. I finally realized: I was not in love with these blocks. It's really hard for me to work on something I don't enjoy doing. I'm not sure why these blocks didn't appeal to me - but it's probably because they don't look very Baltimore-ish to me.

This one was more appealing... but still didn't get much attention....

One day about two weeks ago, after I realized that I simply did not like these blocks and I did not have to use them in my next Baltimore quilt... I quit fighting with myself and finished them each in a day. Here's the finished straight-set block, which I may use in a medallion-style quilt (but not my Baltimore quilt).

And here's the on-point block, finished. I don't know where I'll use it -- maybe in a lap quilt of some sort. The lesson to me was this: if I'm struggling with something and keep setting it aside, I either need to stop a lot sooner or I need to rework it until I figure out how to make it a block I like. Both these blocks took a lot of time, but it was sort of "wasted time" if I'm not going to use them. Sigh.... another lesson learned for me.

Once I finished those two blocks, I was ready to start on designing some more. Below is an antique quilt that was for sale in an auction last year. It is a quilt top made in the 19th century and I found it to be very appealing. It sold for $527, which was probably a bargain. I kept this picture because I thought I might like to make one of these blocks - or even the whole quilt - someday. I keep lots of my "someday..." quilt/block photos in files (digital and paper) so that I don't forget they are options at some point.


Seeing these quilts, though, inspired me to make my own holly and berries block. Here it is -- though I have not had time to stitch the stems on all of the berries (just three are embroidered in the picture below). It's a wonderfully simple block - and quite attractive when done. This may go in my Baltimore quilt in place of those rose and tulip blocks above that I disliked so much!

Well... I got on a roll and had a couple of free hours one night and I knew that my friend Jerrianne had always wanted to make this block (below). This picture came from one of my favorite quilt books, Quilts of Virginia 1607-1899: The Birth of America Through the Eye of a Needle by the Virginia Consortium of Quilters. The block is part of a quilt made in Virginia circa 1850 by friends of Sarah Marshall Chandlee Pidgeon (1825-1885). I sat down that night and gave myself a little treat: some design time!

Below you will see how I go about my designs. First of all, I use freezer paper for most of my designs. It's large and easy to erase (using my favorite eraser for both paper and fabric, the Mars Plastic eraser by Staedtler). I also use a cheap papermate mechanical pencil, a Sharpie marker to mark final lines, circle templates, and some scissors for cutting out shapes when I want to "test" how they look without committing to drawing them onto the freezer paper. Below, you'll see that I've already marked the center scalloped ring in Sharpie-marker ink, so it's been finalized. After I put something in ink, it keeps me from playing with it too much more. I've also, you can see, drawn two flowers -- the block is symmetrical, so each of these flowers are repeated on the opposite side of the scalloped ring. That means I don't have to design two more flowers; I just have to trace them when they're done and put them on the other side of the block.

If you look at the picture above, you can see that I had planned to put a slit in the middle of the bottom leaves. Well... after I thought about it, I decided that I wanted to keep this block simple and not overdo the design. Below, you can see that I've redrawn the leaves slightly and cupped the base of those leaves a bit.

Then, if you'll look at the picture below, you can see that I wasn't finished testing ideas... those leaves got a big "dip" instead of a "cup" at their base. Next, I looked at the little bud (lower right, above) and decided that it was not to my liking. It looked a little silly, even. I redrew it and flared the calyx beneath it; it gives the block just the right amount of complexity (which adds visual interest). Check it out, below.

Now... I was ready to commit to this flower. I inked it with my Sharpie marker... which also allows me to easily clean up the paper and erase all the other marks using my Staedtler eraser.

And now, below, you can see the entire design, all inked. I decided to add berries to the flowers/stems, as the block looked... well... a bit boring! I think berries add a sweetness to almost any block, and this block was no exception. In addition, think how the block would look without those berries. I thought there was too much "white space" (meaning empty background) and my solution was to put berries here and there, which adds some visual complexity without making the block become a complex block. Now, I just need to trace it onto quadrants that I use for making my patterns... and then I can put it in my next Baltimore quilt! Oh... and I also have to make the block, myself... right?!!

First, I knew I wanted to use fussy-cut motifs in the berries on this block. I use my circle templates and find the motif on the reverse side and mark where the fabric circles are to be cut. You can see some of those here:

And now... the finished block! I'm hoping that seeing my design process may give you some ideas and some confidence to try some of your own designing. It is fun and rewarding... and I continually evaluate and learn from the iterations I make with each block. The first drawing rarely survives; it nearly always takes several different attempts before I get a block to look like I want it to look. Go back and compare this block to the original Sarah Pidgeon block... and see how the design changed; just remember that your block can be different than an antique block (or any block where you're trying to follow a pattern!); you never have to make exact replicas of blocks when you have a picture or pattern as a guide.

Another thing that kept me busy this past month was getting ready to teach two workshops at the Applique Away on Galveston Bay retreat on Galveston Island last month. The organizers of that retreat put together an exceptional treat for everyone with plenty of time for friendship, surprises, learning, and great eating on the coast. Below are some of the quilts shown during one of the several show-and-tell sessions. I cannot recall who made this first one but the next two were both made by Sally Coble.
This is Sally's rendition of the famous "Mary Mannakee" quilt; she made her own swag border for this quilt and it was lovely. That's Sally on the right.

And here's Sally with her broderie perse quilt -- it's a unique version of broderie perse, where the motifs are shaped to make a nice medallion.

One of my workshops at the retreat was a Baltimore eagle block -- and the other was my Papercut Delight quilt. It's a simple quilt but perfect for teaching some basic applique techniques.

I love red and white quilts - and I loved hand-quilting this one, in particular.

I like surprises (well.... maybe giving them; I'm not always sure I like to be surprised!), so I decided at the last minute to give the students in my class an extra pattern - one with flowers, birds, and berries. After I make as many class samples as I do, I often have to figure out what to do with them, so I am constantly making adaptations of the original quilt. In this case, I decided to make red blocks on a tan background.... and then when I decided to make the quilt into a nine-block quilt, I decided to make soft brown blocks on the same tan background and combine those.... with this "surprise" block:

I figured that it would be a perfect center block if someone wanted a larger quilt. They could use the four blocks from the class and make a nine-patch with the above block being the center block of the 9-patch and "open" blocks in the four side blocks of the 9-patch. Here, I've already ironed the freezer paper template to my fabric choice for the brown papercut blocks that will sit on the same tan fabric I used above. Sometimes you just have to have a bit of imagination.... I decided, since I didn't have enough red or brown to make 8 blocks to surround the flower-bird-berry center block above, to make four red papercut blocks and four brown papercut blocks to go around the center block.

Now... this is NOT the finished product, or even close to it. But through the magic of Adobe Photoshop, I an "sort of" showing you the layout that I would use for my brown/red/tan blocks. I think it is kind of nifty! Don't look close - the mockup below uses white, not off-white, for the background and if you enlarge the block, you can see that I did not "knit" the blocks together very well. But at least you can get an idea of where I'm headed with the next set of class samples I end up taking home with me!

Another workshop that I taught was over in Missouri City for the Coastal Prairie Quilt Guild. What a great bunch of quilters they have there! This quilt was one that I had to hustle to finish last month; it had to be shipped off to Colorado to be photographed for the December issue of The Quilt Life magazine.

I have made quite a few "twirly ball" blocks lately - they are addictive once you figure out how easy it is to make them. When I finished this quilt top, I had to quilt it fairly quickly in order to meet some deadlines... and I loved experimenting with the vase in the corner - it allowed me to make the feathers wrap around the quilt in both directions instead of all moving counter-clockwise.

Now here's a little quiz to see if you have been paying attention. What is it about this block...

... that makes it different from this block?

Have you figured it out yet? Well... when I set my template down to make the second block... I did a silly thing! I turned it upside-down. That meant that the spirals twirl clockwise on the second block. All the other blocks twirl counter-clockwise! Oops! Oh well... it' makes a great center block for my quilt!
Another workshop that I had to prepare for is one on making borders "fit." One can easily make a long line of half-square triangle strips, but can everyone figure out how to make them fit on a quilt center so that they do not have to be whacked off (a la Gwen Marston)? This workshop shows how to do that. Before I could teach the workshop, I needed to send out a supply list... which meant I needed to design a quilt with borders.... which meant I needed to stitch together all kinds of shapes in borders. Here is my initial pile of "junk" to work with. I decided to use reds and white because then I didn't have to spend any time making decisions about other colors and prints.

I needed a center block to work with and decided to use a simple basket block...

And, finally, I put all the pieces together to make this 48-inch square quilt top. This is fun stuff and should be an easy workshop for all of the participants to learn the process for making borders fit nicely.

My friend Becky visited a month or two ago and brought some "cowboy" blocks to me to look at. She had them for quite a while and decided that she wanted to use them in a quilt that she would then donate to our guild's annual auction. She asked what fabrics she should use to set these blocks, which are all prints of cowboy paintings done by Lynn Brown. Oooh.... we all drooled over these blocks! We looked through my stash and found some wonderful soft and earthy looking batiks that were perfect for setting the blocks.... Becky went home, made the quilt, and then brought it back to me to quilt for the guild's auction (yes, YOU could own this quilt! Just come to my guild's meeting in August!). Here is the finished quilt (without binding yet....).

It's a beautiful quilt and I decided it might be useful for some of you to see how I quilt something like this. I approached it with some degree of trepidation... the quilting on this quilt would surely end up being very "visible" because all of the fabrics are pale. The quilt is sort of masculine with all those cowboys on it... leaving me unable to use the usual meandering feathered vine all the way around the border. I decided to use a "rope" in the sashing and feathers with cables in the border. But how was I ever to make those designs when I'd never made them before and had no template for them? Eeek!
First of all... I loaded the quilt on my machine. Okay -- got that one down without any problems. So far, so good....
Next... the rope border in the sashing strips. That was, I feared, going to be a real trial for me. I'd never done it before. I had a plastic quilting template, though... and here was my first stab at making a quilted rope in the sashing. Not too bad!

So how did I do it? I often use the word "deconstruct" in my classes. Whenever I have a problem - or a project - I often "deconstruct" it. That is, I take it apart in my head and figure out how to approach it, one step at a time. Sometimes each individual step ends up being simple, but the whole project seems extremely complicated. In this case, I decided that the rope was simply a series of straight lines (running diagonally), with curves joining them. I searched through my box of tricks (tools) and found a template that I could use that would match the curve at each end of the diagonal lines. You can see my plastic template in the photo below, too....

See how nicely that template matches that little curve? I'm thinking it's going to be perfect for the job!

So how do I use that template to make the rope designs? First, I marked the rope along the sashing strip with chalk. That becomes my guideline for all the stitching I'm going to do. Next, I put the template one-quarter inch from the line I'm going to stitch -- because the foot on the longarm creates a one-quarter inch distance from the needle to the template. In this photo, I've already stitched along the diagonal line and am about to stitch around the curve, using the template and the chalk marks as my guide. In all the pictures below, I will be stitching the rope from the right end of the sashing strip toward the left end of the sashing strip.

Okay... now I've completed stitching that curve. I could backstitch at this point and cut the thread and start a new stitch line... but instead, I'm going to leave the template in place and simple stitch backwards along that same line (also called back-tracking).

Now, I've backtracked to the point where the next "rope" starts. I have to, once again, stitch along the curve of that rope using the chalk and my orange template as my guide.

Oops - let me break for this commercial interruption! I stuck this picture in here just to show you something cool that Carol Thelen showed me ten years ago. She showed me that I can take an empty thread cone, turn it upside-down, block the small end of the cone, tuck it in the handles of my longarm machine, and use it as a mini-trash container when I cut my threads. It's a little thing.... but a big help!

Back to quilting, now! I've stitched along that curve... and now I've got a straight edge ruler that I'm using to guide my machine as I stitch along that straight line of the rope.

When I get to the other end of that rope, I stop at the curve and replace the straight-edge ruler with the round template, so that I can stitch the curve smoothly.

Here, I've stitched around the curve... and will stitch around the next curve, too... and then then backtrack to the straight line.

Here I am, having backtracked around the curve, and now I'm ready to put that straight-edge ruler up against the foot so that I can stitch down that straight line.

Here, I'm stitching down that straight line with my straight-edge ruler...

And now, I'm at another curve. Time to use the other template.

With the curve template in place, I can stitch around this curve...

Which is where I am in this picture.

Once again, I've backtracked around that curve to the next rope segment.

Can you see how this becomes pretty simple after the task is deconstructed into little steps? It is much less intimidating, for sure! Once I reached the other end of the sashing strip... it's time to set aside the templates and find the next sashing strip to be quilted.

Here, I've done two rope segments. Only twenty-nine more to go.

After I finished quilting some of the sashing strips, I wanted to figure out what I wanted to quilt in the frames around the blocks. I tried several different templates I had in my template box and finally decided to do a little chain of squares.

To mark my quilting line when I use a template, I use a "pounce pad." Years ago, I did a lot of graphics design work and our pounce pads were filled with tiny bits of erasers. We'd run the pounce pad over our pencil drawings or graphs and it would erase any pencil smudges. The pounce pads I use now are filled with chalk - and I use only white chalk in them! - and when bounced on top of a template, the chalk bounces through the little pad and stays on your quilt top.

Here, I'm about to hit the pounce pad onto the template, which is set in place where I want the markings to be.


Once again, I use my straight-edge ruler and the chalk line as the guide for where the needle on my longarm goes. It's pretty brainless work, meaning it is very relaxing for me to do.

I just work my way around the block, doing one line, then switching the ruler to the other direction and doing another line... until the block is finally done.

Here, you can see that I decided to use a very large cross-hatch for the background within each of the blocks. Doing more than that would have led to an uneven amount of quilting across the face of the quilt, which would have led to a very un-flat, wavy quilt.

I've said it a hundred times but it is worth repeating. For years, whenever I go to the Houston quilt show (which is annually since I live a half hour away), I stop at the stencil booth and pick up 2 or 3 stencils/templates. I now have quite a collection... and whenever I need to quilt something, I can always manage to find a template that will fit the job.

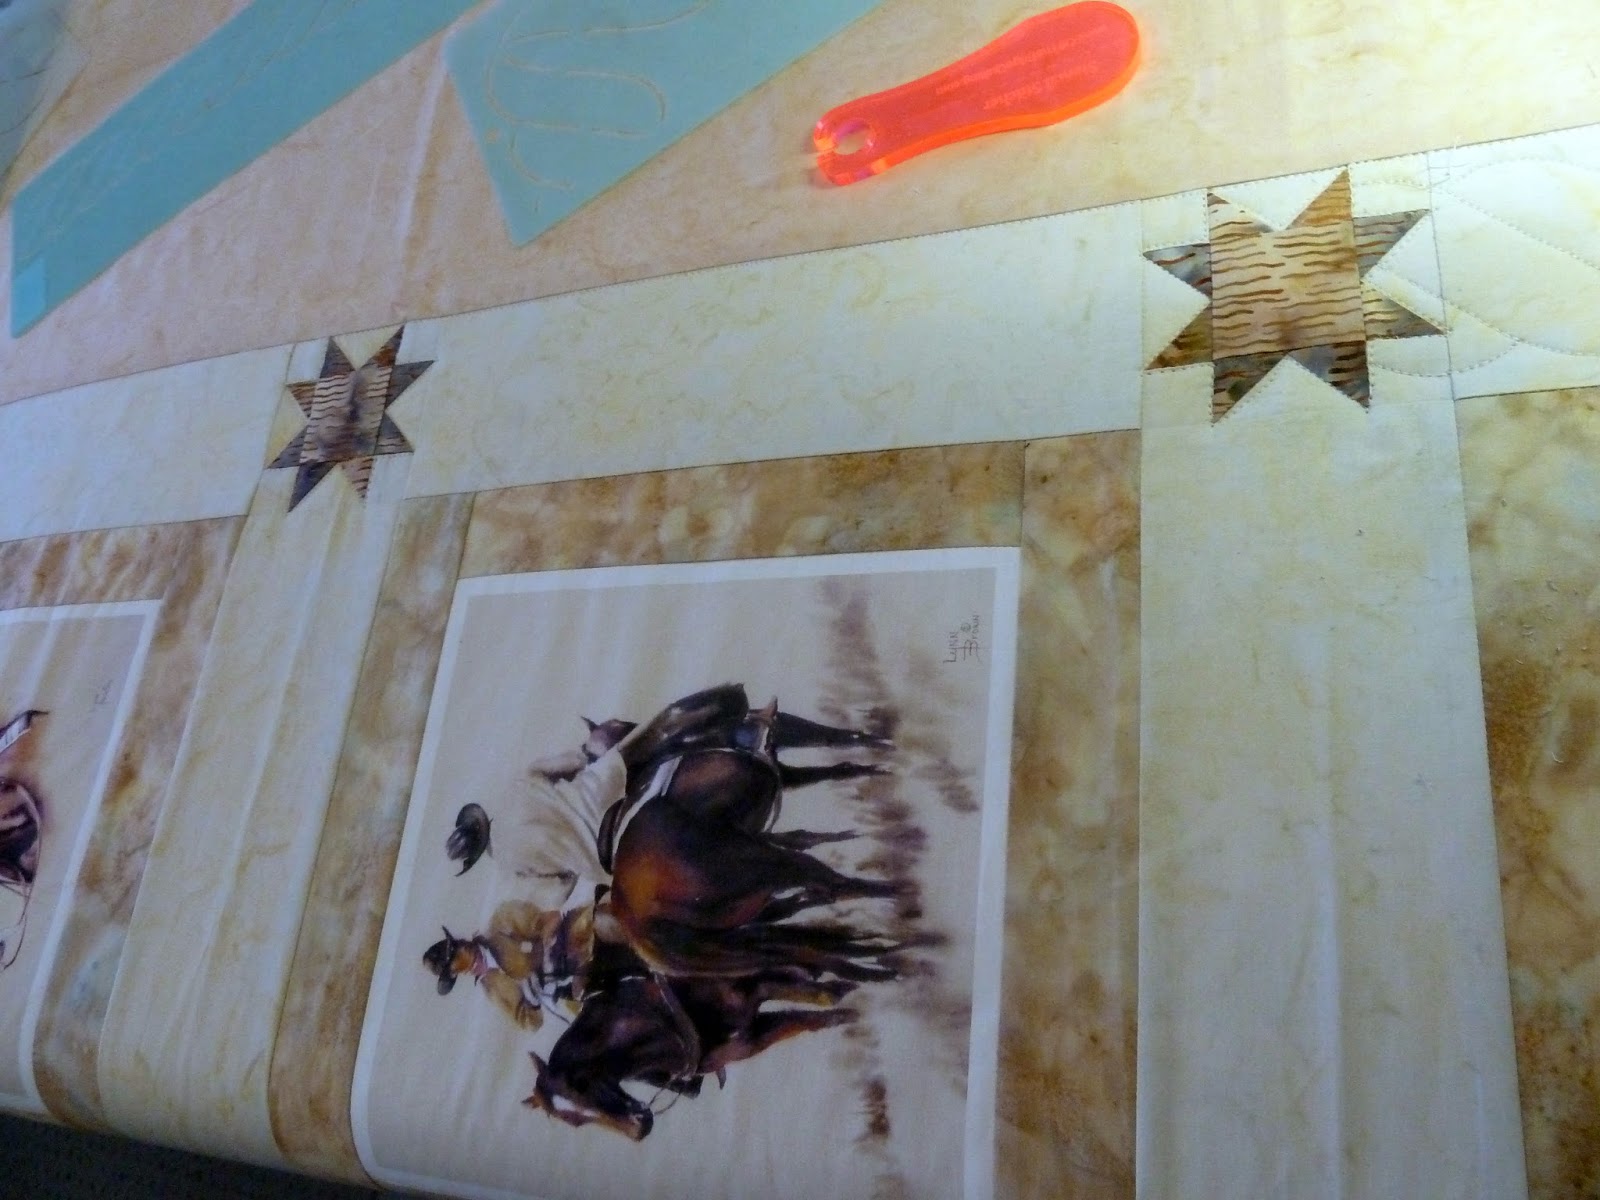
Now... Becky, who put that cowboy quilt together using my fabric, found that some of the batik stars she made for the cornerstones in the sashing were too dark. They stood out like a sore thumb. She took all those out (and they are 3 inches square!) and made new, light-colored stars. She took all the dark stars and made this 20 by 24 inch quilt which will also end up in our guild's auction. I love the fabric she chose for the border.

Not only is the fabric a great color to go with the stars.... it is a cowboy fabric!!! Is that cool, or what?!!! It's very subtle, which is part of what makes it such a great choice.

Becky is a wonderful piecer. Her work is flawless - as is her choice of colors and design. She made this quilt, which she recently showed at a workshop we had at my house. Talk about a lot of stars.... wow! This is a BIG quilt - queen size at least.

Cynthia C quilted it for Becky, and her work is similarly flawless. She chose to put a feathered wreath in each of the pieced blocks, with a rosette in the middle of the wreath.

In the open blocks between the pieced blocks, she put the same design.

Here's a close-up of it.

And the border has a meandering feathered vine - one of my favorite designs for a border.

And the star border has its own feathered vine.

Here's another quilt that was shown in one of my bees in the past few weeks. Virginia brought it home with her after a visit to relatives, and it has a most interesting history.

It was made in 1928 as a fund raiser for a local school. People paid to have their children's names added to the quilt.

Here, you can see the names some of the 8th grade students (and probably the teacher - Miss Hood?). Other grades were also represented in other blocks.

Here's the back of the quilt -- look at that tiny, tiny stitching! The amount of work that went into this quilt is phenomenal!

What is equally phenomenal is the fact that these blocks are adjoined without any seam allowance showing... it is all hidden in the tiny half-inch blue sashing you see on the front, as you can see below. The workmanship in this quilt is outstanding. This quilt is a "summer weight" quilt with no batting in it. It was used in the warm summers as a bed cover.

Here's a close-up of the front sashing and border. The care taken in making this quilt is amazing. The maker even used blue thread on top and cream thread on the bottom when stitching the sashing in place.

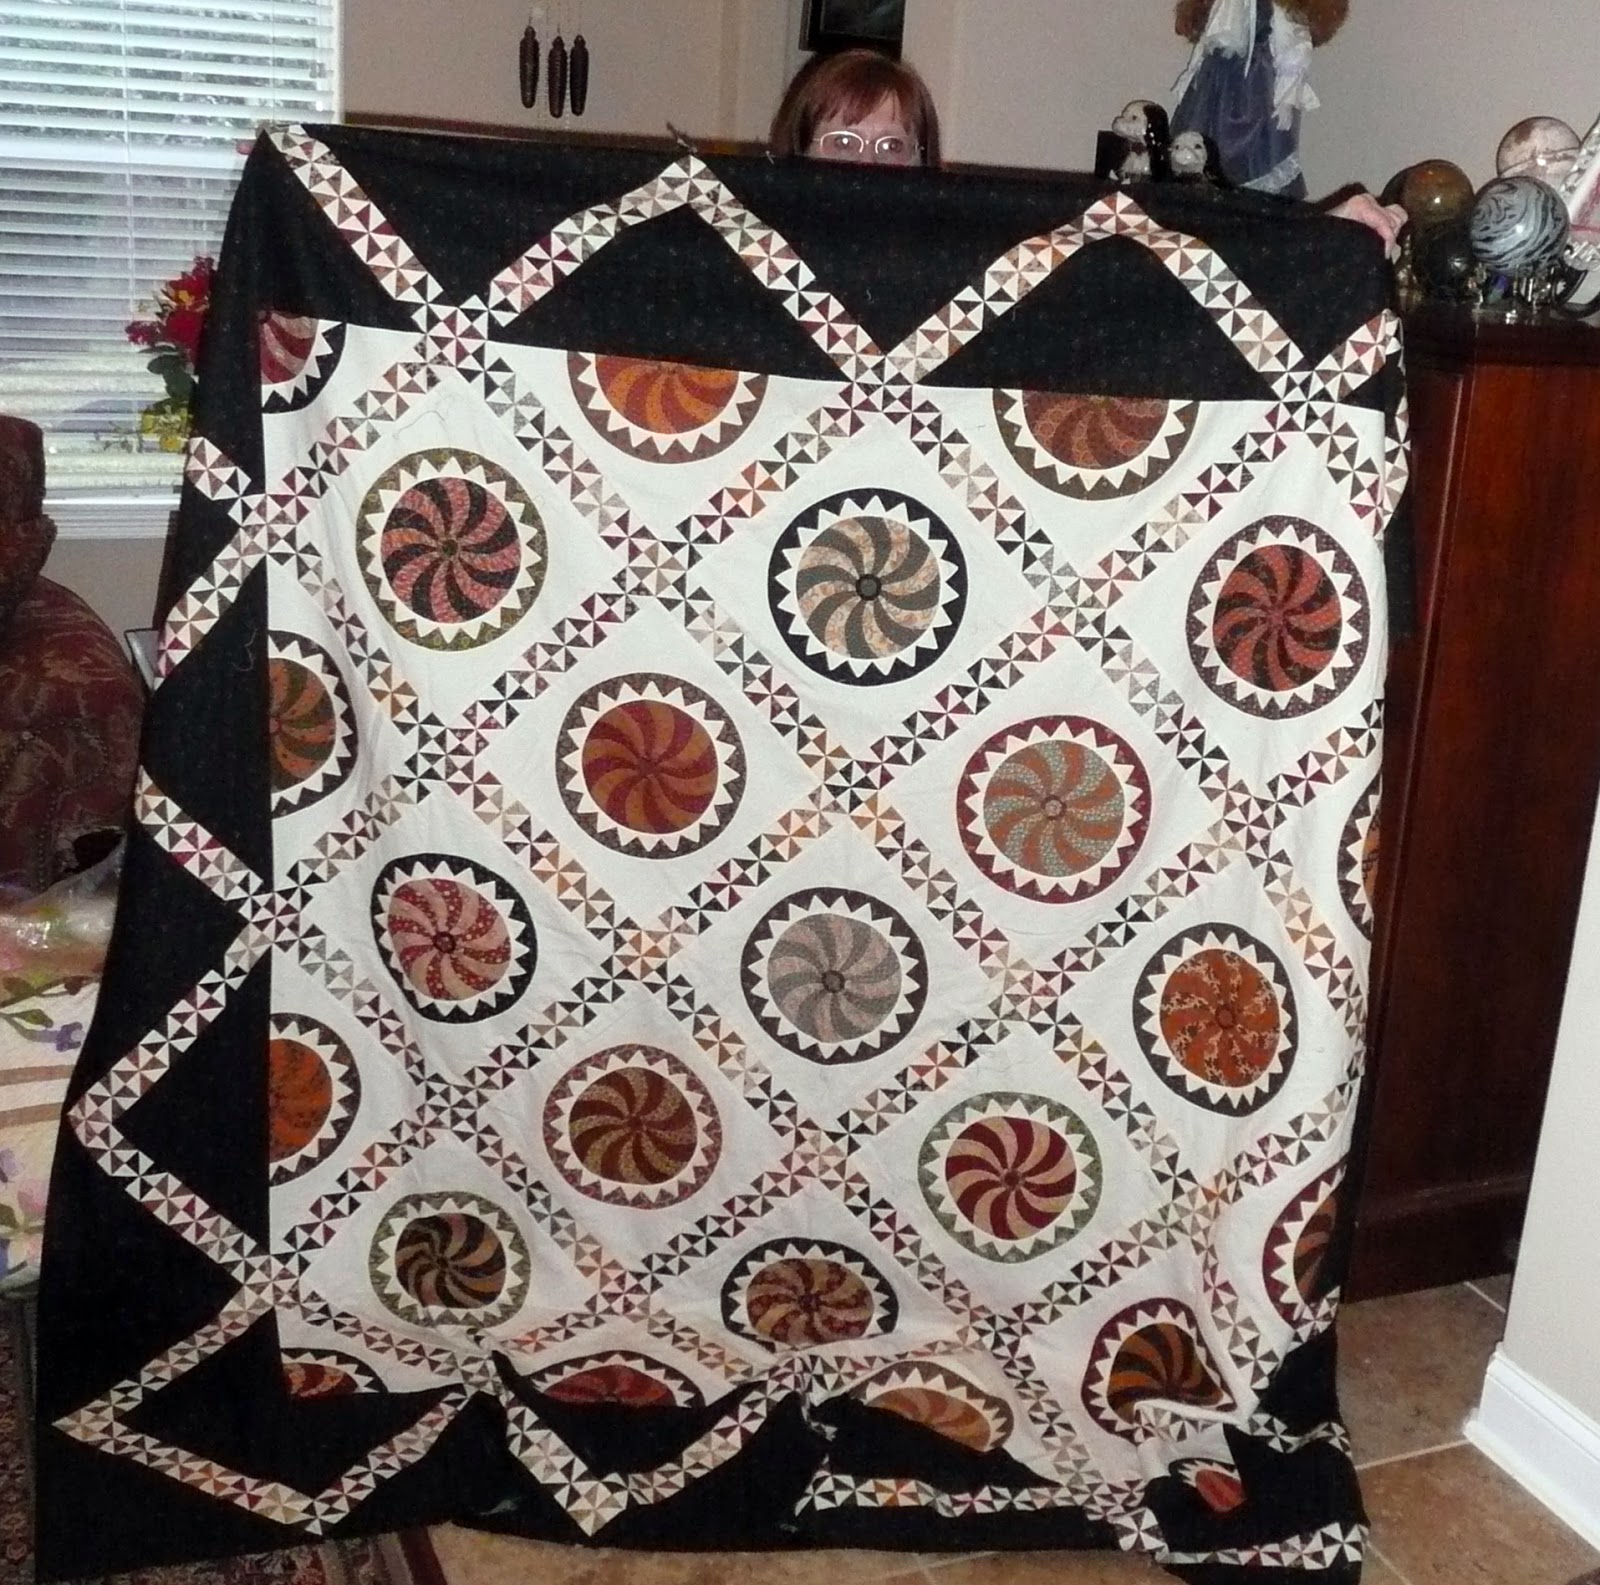
Judy, who brought the above quilt, also showed some of her own quilts. Here's Judy getting ready to show her own Pinwheels and Twirly Balls quilt, made with one of my patterns. I was teaching at a retreat where she started making this quilt - and she had it together in no time at all!

Here's the quilt top (with Judy hiding behind it!).
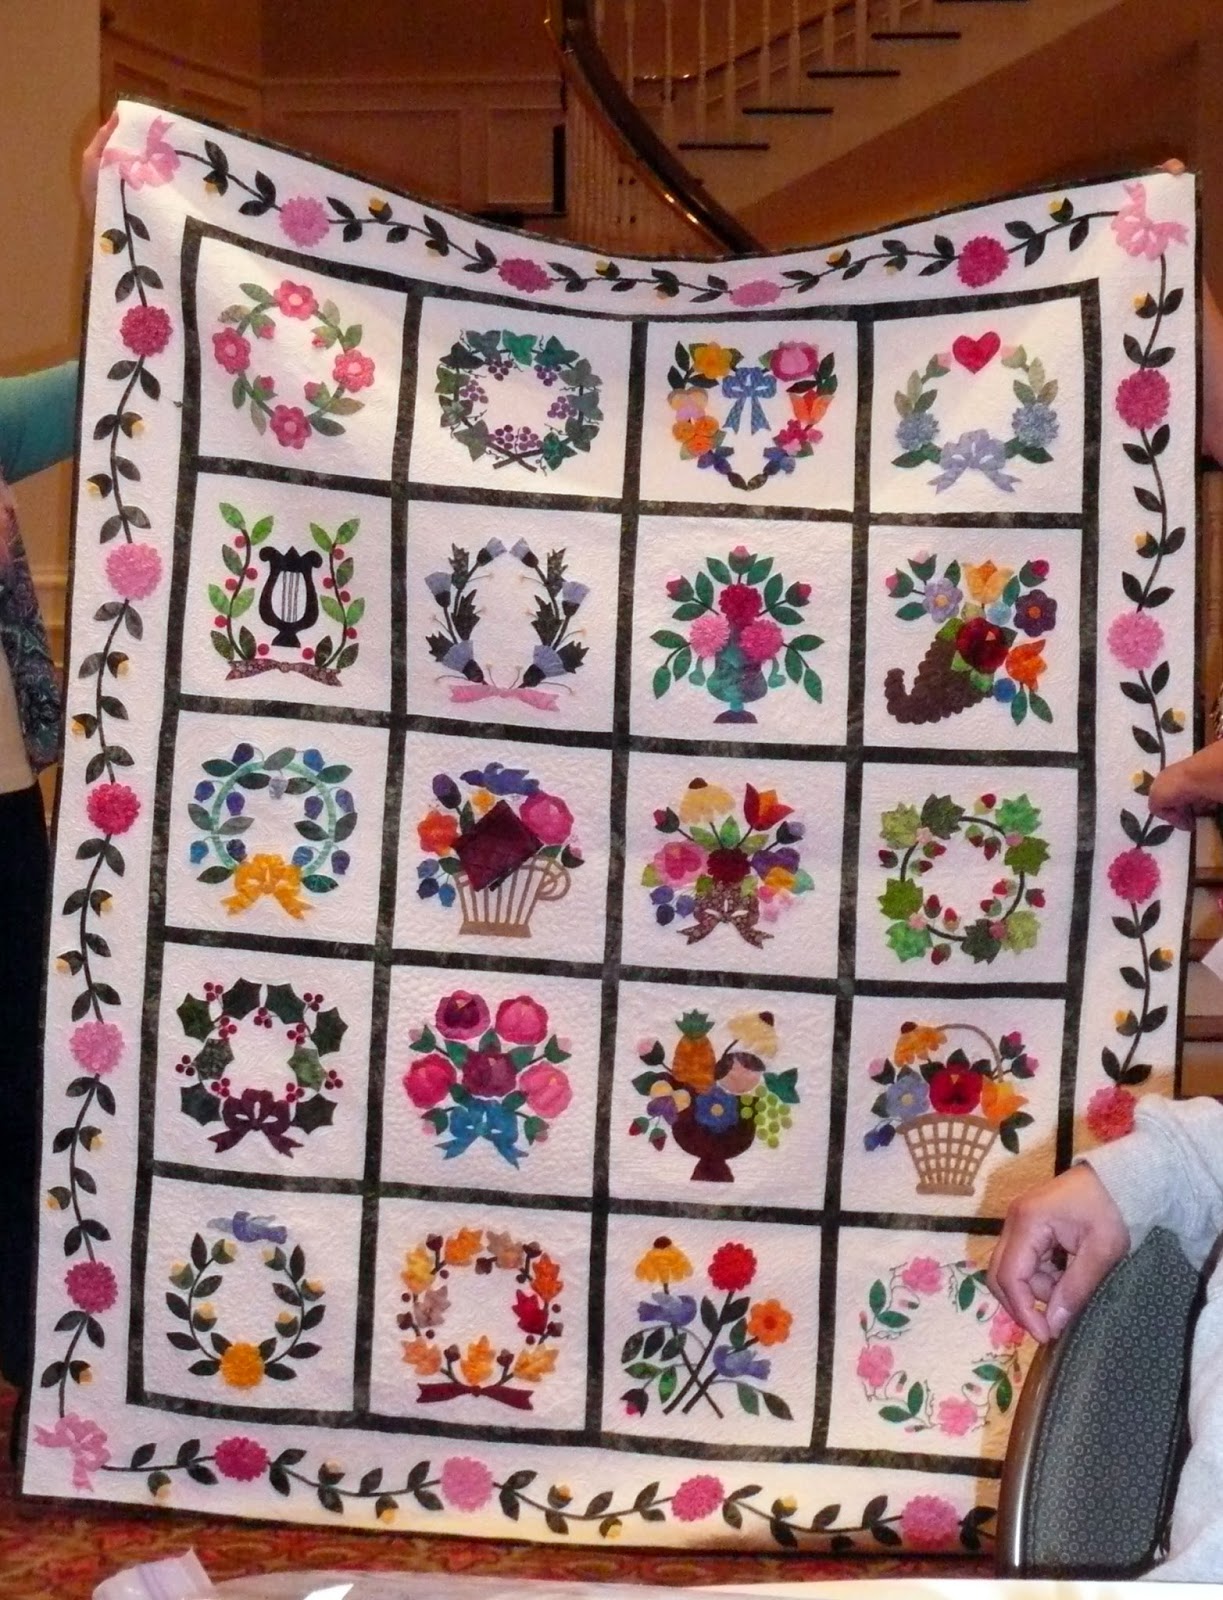
And here is Judy showing her Afternoon Delight quilt to all of us. She is a prolific quilter and like me, loves both applique AND piecing.

And, as always when show-and-tell goes on, we started looking at her work which was impeccable.

Afternoon Delight is still one of my favorite quilts and sometime in the next couple of weeks, I'm going to decide whether I will hand or machine quilt mine. I really want to hand quilt it but I'm just not sure that I have the time to put into doing it in a reasonable length of time. You'll see when I decide, as you'll see it here, in process!

So why was Judy here showing all her quilts? Well... a couple of gals had been to the retreat where I was teaching how to make feathered stars and we saw Judy whipping out applique blocks in the blink of an eye, using the starch/freezer paper method. We were so enamored that six of us invited her to come to town and teach us her method. None of us had ever used it before - we paid her an honorarium plus travel expenses, lodging and meals. Any of us can gather friends together to split the cost of a workshop, if you think about it... it's an excellent way to get an in-depth learning experience with something new and challenging. All it took was a teacher, a supply list from Judy, a place (my breakfast room). And after three days, I have to say that I think we all easily became experts. It's a much better way to learn than having just a 4-6 hour workshop. My guild has voted to have a 3-day "master class workshop" now, which excites me no end!

Here are a few of us, working away.... we learned, we ate, we laughed, we played... and we became better friends by the time it was all over and done. We even convinced Judy to join our guild and come to our Spring Retreat on Galveston this year!

And what did I learn and make in this workshop? I learned the freezer paper/starch method of applique. I never thought I would like it... but I did, and have used it since then. It has its place in the world of applique, though I will still probably use needle-turn for the majority of my work. Last year, at the Houston quilt show, Pearl Pereira was showcasing her newest block-of-the-month, Happy Trails. I fell in love with it, knowing that my daughter (who has a ranch) would love Pearl's Happy Trails quilt. I bought the pattern, put it all into a notebook, and am only waiting to find more time to work on my blocks!

Here's the first block I made -- I just love how it turned out. I decided to use batiks, as they are easy to work with when doing applique, and I had not used any of my batiks in a number of years. I was so happy I made the choice to use them; they seem to really make Pearl's blocks sing! I still have a ton of work to do on these blocks, including lots of embroidery.

Here's the second block I did...

And the third. Can you imagine doing these blocks in just three days? With a teacher like Judy... the answer is YES!

One of the things that I love seeing is other people's renditions of my patterns. Below is a quilt made by Kathleen Dombi, using my Sarah's Revival pattern. Kathleen worked on appliqueing Sarah for twelve months... and then spent another six months hand-quilting it. She says she "loved, loved, loved working on this beautiful quilt!" Now, she says, she's going to go back and work on Friends of Baltimore - she's already finished 8 of those blocks and one border, so she's well on her way to finishing another masterpiece. Congrats, Kay -- your quilt is stunning!

Another quilter, Emmy Storholm ("mamabear") sent me an answer to a question I asked in my last blog about the desire to see children's quilts. She said she'd like to see more designs by me.... and she has great grandchildren coming who will be getting things made by her. Emmy sent me three pictures of children's quilts that she's made. It put a smile on my face when I saw the pictures! Here's the first one.

And here's the second - isn't it a delight to the eyes?!

And finally, a third one by Emmy. These just make me smile - they are all very happy quilts - perfect for any child, including the child in each of us.

That's all I have for this month, at least as far as photos go. I do have some good news to report, though! Quiltmaker Magazine is coming out with a new 100 Blocks issue; officially, it goes on sale on May 6 (though it sometimes appears early). One of my blocks will be in the issue - a red and green applique block that I designed. Stay tuned - as part of being one of the designers, I have been invited to participate in a Blog Tour, which is loads of fun for designers and readers. I'll pass along more information as it becomes available.
I am not out of things to share... but out of time. I started writing this post this morning at 10:00 a.m. I've worked on it non-stop and it's now 2:15 in the morning! There is so much more I want to show you, but it will have to wait until next month. Until then....
Happy quilting!
Sue Garman

(c)2014 Susan H. Garman

