
Houston really starts to rally when the Houston Livestock Show and Rodeo comes to town -- it brings millions of dollars to scholars - plus it's just a LOT of fun! And rodeo time... reminds me it's time to have fun, which means it's time to sew. Over the past two months, I've tried hard to focus on sewing... and relaxing... and sewing some more... and so finally, I have a few things to show you. First of all, I've always wanted to make a crazy quilt and I've been saving fabric and ideas for ten years. Finally, I figured out that instead of waiting for the perfect set of ideas to materialize in my head (no pun intended!), I should just make a ton of fans and put a different stich down each fan blade and embroider some sort of motif in the area outside of the fan. Below is my first one... with half of a fuschia blossom done. I think I bit off more than I can chew with this project -- embroidery is not for the faint of heart... it reminded me of why I gave up counted cross stitch. For the amount of time it takes me to finish a 12" block, I could make a whole quilt! Nonetheless, all of my fans are done, so working on the stitching of the fan blades... over many, many months, one stitch at a time, will ultimately give me my long-sought-after crazy quilt!

The next picture is another very simple sawtooth star - I gave instructions for it in my November 30, 2011 post. These stars are simple and fun to do - and they are great for using up scraps. You can see one finished star below - along with a stack of pre-cut units for making a little over a dozen more stars. I cut up my scraps as I go, so that I always have some stars ready to sew. What am I going to do with all these stars? I don't know yet, but I better hurry and figure it out...

Because I have a stack of 50 FINISHED star blocks to go with the unfinished ones. Somehow, I don't think using them is going to be a problem!

I also found time this past month to resume working on my Block of the Week blocks -- making one block a week for a whole year gives me 52 blocks. Somewhere around block 39, though, I fell off the wagon and stopped sewing these blocks. And to make matters worse, I have not been making one block a week... I've been making one block a DAY... so at the end of the year, if all had gone well, I would have over 350 finished blocks! Back to block 39... I finished that set of 7 and started on the next set. Here's the first one... I am terrible at precision piecing except I know how to turn any block into a paper-pieced block which is what I did with all of the blocks. So here's the first one....

and here's the other six that I made using the same pattern. It's pretty nifty to see how one pattern can look so different depending on color, pattern, value... it's an interesting combination to see what I end up with when I'm fnished!

Here's another one of the blocks....

And here are its six siblings in different fabrics. This is where you can really start to see some differences in the background fabric and the star prints!

And here are another six blocks; the seventh is a duplicate of one of them, so I didn't squeeze it into this set of pictures.

But below are the almost 300 blocks I've finished so far... I'll use some in a scrappy quilt; some will
become borders in quilts, some will go into my guild's auction... and who knows where the rest will go?!

So what else have I been working on? I've got a new quilt in the works. See it below? You can see how I tape little fabric swatches onto each pattern so I can keep straight which fabrics go with which block. This will be a scrappy red and green quilt -- half applique and half pieced.

Once I have the fabrics chosen, I like to batch them together so I don't lose track of what they are for. You can see below that I've got all the fabric batched together for five different 15-inch star blocks -- I'm ready to roll at this point!

I really got rolling on the applique blocks over the past two months - there will be 8 applique blocks, 5 pieced blcoks, and a dozen corner/side setting triangles. Here's the only block I've finished so far.

This one is finished except for sewing down all those circles. If you look closely, you can see all the "tail threads" which I'll use to sew the circles on with.

Here is the third block; it too has a lot of tail tyhreads that I'll be using to sew down the pomegranate circles. I also have e of the gold flowers left to applique in place -- you can see here that I prepare all of my units, baste them in place, and then go back and needle-turn applique them onto the background fabric.

And this poor fifth block -- it's just covered in wooly tail threads, with all those berries based in place and ready to stitch down!

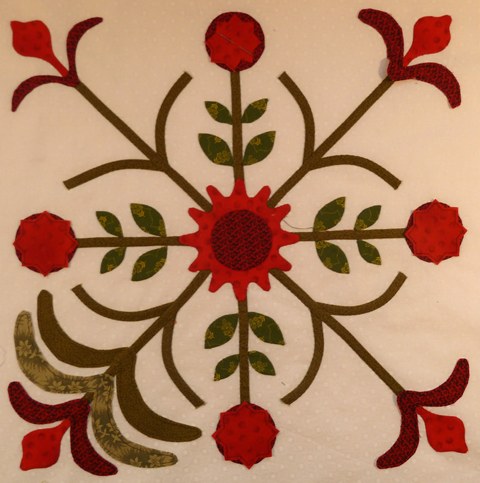
This block is not as done as it might look - you can see that the green "spikes" are sewn down on the left side flower and the lower left corner....and the circles are ready to stitch in place on the center flowers, once they are sewn in place.

These next three blocks have a lot of stitching left to do on them - this one needs berries packed onto all of those empty stems.

And this one needs a ton of berries, too -- at least these are sewn and ready to stitch down, though!

This last block has a lot of work left to do -- only one corner is basted and ready to sew - the others still have work ahead, as do all the red side flowers. Andonce the spikey leaves and flowers are in place, there are a ton of flowers that need to be finished. Sigh....
I get a lot of my sewing done by putting zip-lock bags together with berries ready to stitch... these go with me on doctor appointments, bee meetings, or just about any other trip out of the house. Note that my bags have more than needle, thread, scissors, and berries... I have my note card with a list of things to do... a magnetic "Needle Nest" to keep my needles from slipping around in the baggies and poking me, and somewhere in that bag is an extra pack of needles. You can see that I organize things so that I rarely miss a beat: I can always make a teeny bit of progress even on a very busy day!

My 13 blocks will all be set on point, requiring setting triangles to be placed along the side and corners of the quilt center. The quilt will be called Bed of Roses. Here is the on-point applique design...

and here is the first half-started setting tirangles... I think I'm really going to like how these look around the quilt's edge!

You might ask... but what is she doing for the pieced blocks? I'm making my own version of a feathered star. With some clever twisting of triangles, the star will look almost like it has a halo of traingles in its center. The paper piecing foundations are ready to go... I just need time, time, and more time. Leap Year day gives me an extra 24 hours... I suppose I should be thankful for it, but it just made me want ANOTHER extra day this year! Okay, so I lied. I want an extra day every week....

I can't show you the project I spent most of the last half of December working on, along with the first half of January... but here's a teeny tiny hint... Maybe I'll give you another little hint before the cover is pulled off the entire project; this is a quilt that will be shown in the June issue of Quiltmaker magazine!

The above hint is obviously part of a papercut block... which brings me back to Sarah's Revival, the papercut quilt I recently finished. I'm in the process of hand-quilting it and just finished quiltng the first block using 3/4" cross-hatching. Hand-quilting is SO relaxing for me - I love it!

Here's the border - I love how quilting really does make a quilt come alive! I generally buy 2-3 quilt stencils at every major quilt show I go to, so I have quite a collection of stencils to choose from when I decide which motifs I want to include in a quilt. The important thing to remember about using stencils is you do not have to use the WHOLE stencil each time you use it -- in the quilt below, the scalloped shell between the swags is part of a much larger stencil - but I only used the scallop portion of the stencil.

Below you can see the quilting in the corner of the quilt. I love how it looks!

Remember back in November when I showed you a tulip challenge quilt? Several members of a bee I'm in decided to use a late 1800s twleve-inch red and green tulip block, and remake it however we wished. I've seen MANY combinations of enlarging, shrinking, re-coloring, etc. of this tulip vase block. For my own quilt, I enlarged the 12-inch block and turned it into a 36-inch block... and then made four of them using teal blue, red, gold and cheddar! By the time I was done, I was not a happy camper - the block was too twirpy - read: ugly - for my tastes. I decided that I needed to take the primitiveness of the block (which is what happens when you supersize them!) and lift it out of the gutter by adding a very formal, structured, elegant background of quilting. Here is the pre-quilted quilt top....

And here is the quilt, complete with 1-inch and 1/2-inch cross hatch quilting. Doesn't it make a difference in the look of the quilt?!!

Here's another view.....

And here is the whole quilt... The quilting really made a difference by adding a formal texture to an informal applique pattern. I was quite surprised at the difference and now I'm ready to start another quilting project like this! The key to quilting with a longarm (for me) is to quilt it like you would like to see it hand-quilted. Don't take shortcuts and give it a fast whirl... add what you would have added if you'd quilted it by hand!

And now... we're at the end of the trail for this month. A hundred Salt Grass Trail Riders came clippety-clopping down the road where I live last week, so I know the rodeo is in town and it's time to keep on sewing!

Best wishes and happy sewing to all--
Sue Garman
Sue Garman
(c)2012 Susan H. Garman

