I love the holiday season and am always a bit sad to see it come to an end... but I am also always so happy that it actually gives me some free time to design and stitch and visit more with friends and family. December was terribly and wonderfully busy at the same time - and so refreshing! So as 2014 closes its doors and 2015 sits ahead of us, I'll visit the past with more photos from the October International Quilting Association show in Houston, followed by pictures that some of you have sent me with wonderful stories, along with pictures of what I've been working on. And finally, I'll close with a look into the future and what I hope to start... and finish!
The 2014 Houston quilt show was so full of beautiful quilts -- the pictures below are just a few more, but by no means ALL of what was there. I will share more photos in a subsequent blog post. For now, just relax and take a look....
* * * * *

The quilt is gorgeous - but Sandie's quilting was exquisite - as was her choice of when and where to use silk ribbon embellishments, as shown in the border picture below.

In this photo, you can see more of the wonderful hand quilting. Lucky Sandie, to not only love hand-stitching, but to do it so well.

Lynn McCartney of Bryan, Texas, made Hummingbirds in My Garden - an original design inspired by the garden quilts of the 1930s. Once she designed the quilt, she took it a step further by creating quilting designs that enhanced the applique.

Below, you can see some of her wonderful quilting designs, along with her beautiful applique.

My own quilt, Sarah's Revival, was in the judged show. The design was based on an 1847 quilt made by Sarah Holcomb. I drew all of the papercut designs myself, echoing the essence of Sarah's quilt. I almost called the quilt "Murder on Queensburg Lane" because of all the red fabrics... and all the murder mysteries I watched while I hand quilted it!

I hated to see the quilt not hang straight, as it is flat as a pancake when it went to the show. Sometimes I think that their hanging bars are not strong enough to hold some of the quilts that hang in the show. Below is a close-up of the hand-quilting in Sarah's Revival. I'm a stab-stitcher, and hand quilting is perhaps the most relaxing part of the quilt process for me.

Georgann Wrinkle (Houston, Texas) and I collaborated on her Woven Baskets quilt. When she made it, I begged her to let me quilt it for her -- I just felt like I had an image of how to make her wonderful applique "sing." I loved her basket designs and the open, airy layout, along with the sweet border of flower sprays.

Below, you can see how wool batting really allows the quilting to stand out. I love quilting with wool batting. I always pre-shrink it so that if the quilt is ever washed, the batting will not shrink to the point where you lose the quilt design amidst the puckers.

Sachiko Yamaji of Adachi-Ku, Tokyo, made Appreciation to celebrate all of the people who support her quiltmaking. She says her quilt "reflects their love and friendship that surrounds me." She hand-appliqued and quilted her quilt, adding trapunto in her original quilt design.

In the detail picture below, you get a better idea of how gorgeous this quilt was, in person. You could truly see that this quilt was a labor of love and that Sachiko had poured her heart into it.

The quilt below, A Soft Breeze, was made by Kayoko Hata of Yokohama, Kanagawa Pref, Japan. She made the quilt to commemorate her 60 years of age, filling it with hand applique, hand quilting, and hand embroidery. Her design is original, though she used Elly Sienkiewicz's book, "Design a Baltimore Album Quilt," as inspiration. The masterful techniques used in this particular quilt were impossible to capture through a photograph.

The blocks were appliqued with precision and the choice of fabrics was wonderful. But look at the sashing that Kayoko inserted in her quilt. It is made of tiny little yo-yos... the "black space" you see around those circles is just that: space -- what you are seeing is the black drape hanging behind the quilt!

You might also notice the amount of detail in Kayoko's quilt. She used a wide variety of sizes and colors of grapes, and also did very tiny cross-hatch quilting across the background of her block.
Here, you can see those yo-yos in the quilt border. Kayoko did not shirk her task in making this quilt. I hope she celebrated her birthday in style after the quilt was finished!

Yoko Masuda of Shimotsuma-Shi, Ibaraki, Japan, made Poppy Garden because in the early summer, there are a lot of lovely poppies to be seen around the river near her house. She stitched the lovely images into her quilt, using hand applique, hand quilting, hand embroidery, and trapunto.

Majestic Mosaic, made by Karen Kay Buckley of Carlisle, Pennsylvania, was quilted by Renae Haddadin. Karen spent a year on the machine applique - and then Renae spent a year on the machine quilting.
When you look at the detail photos below, you can see why this quilt took so long... and why it was a big winner in the Houston show. Look at the faint background quilting in this chose-up. Wow!

Virtually every quarter-inch of this quilt had both detailed applique and detailed quilting in it.


I just could not take my eyes off of this quilt and the mastery required to make it!

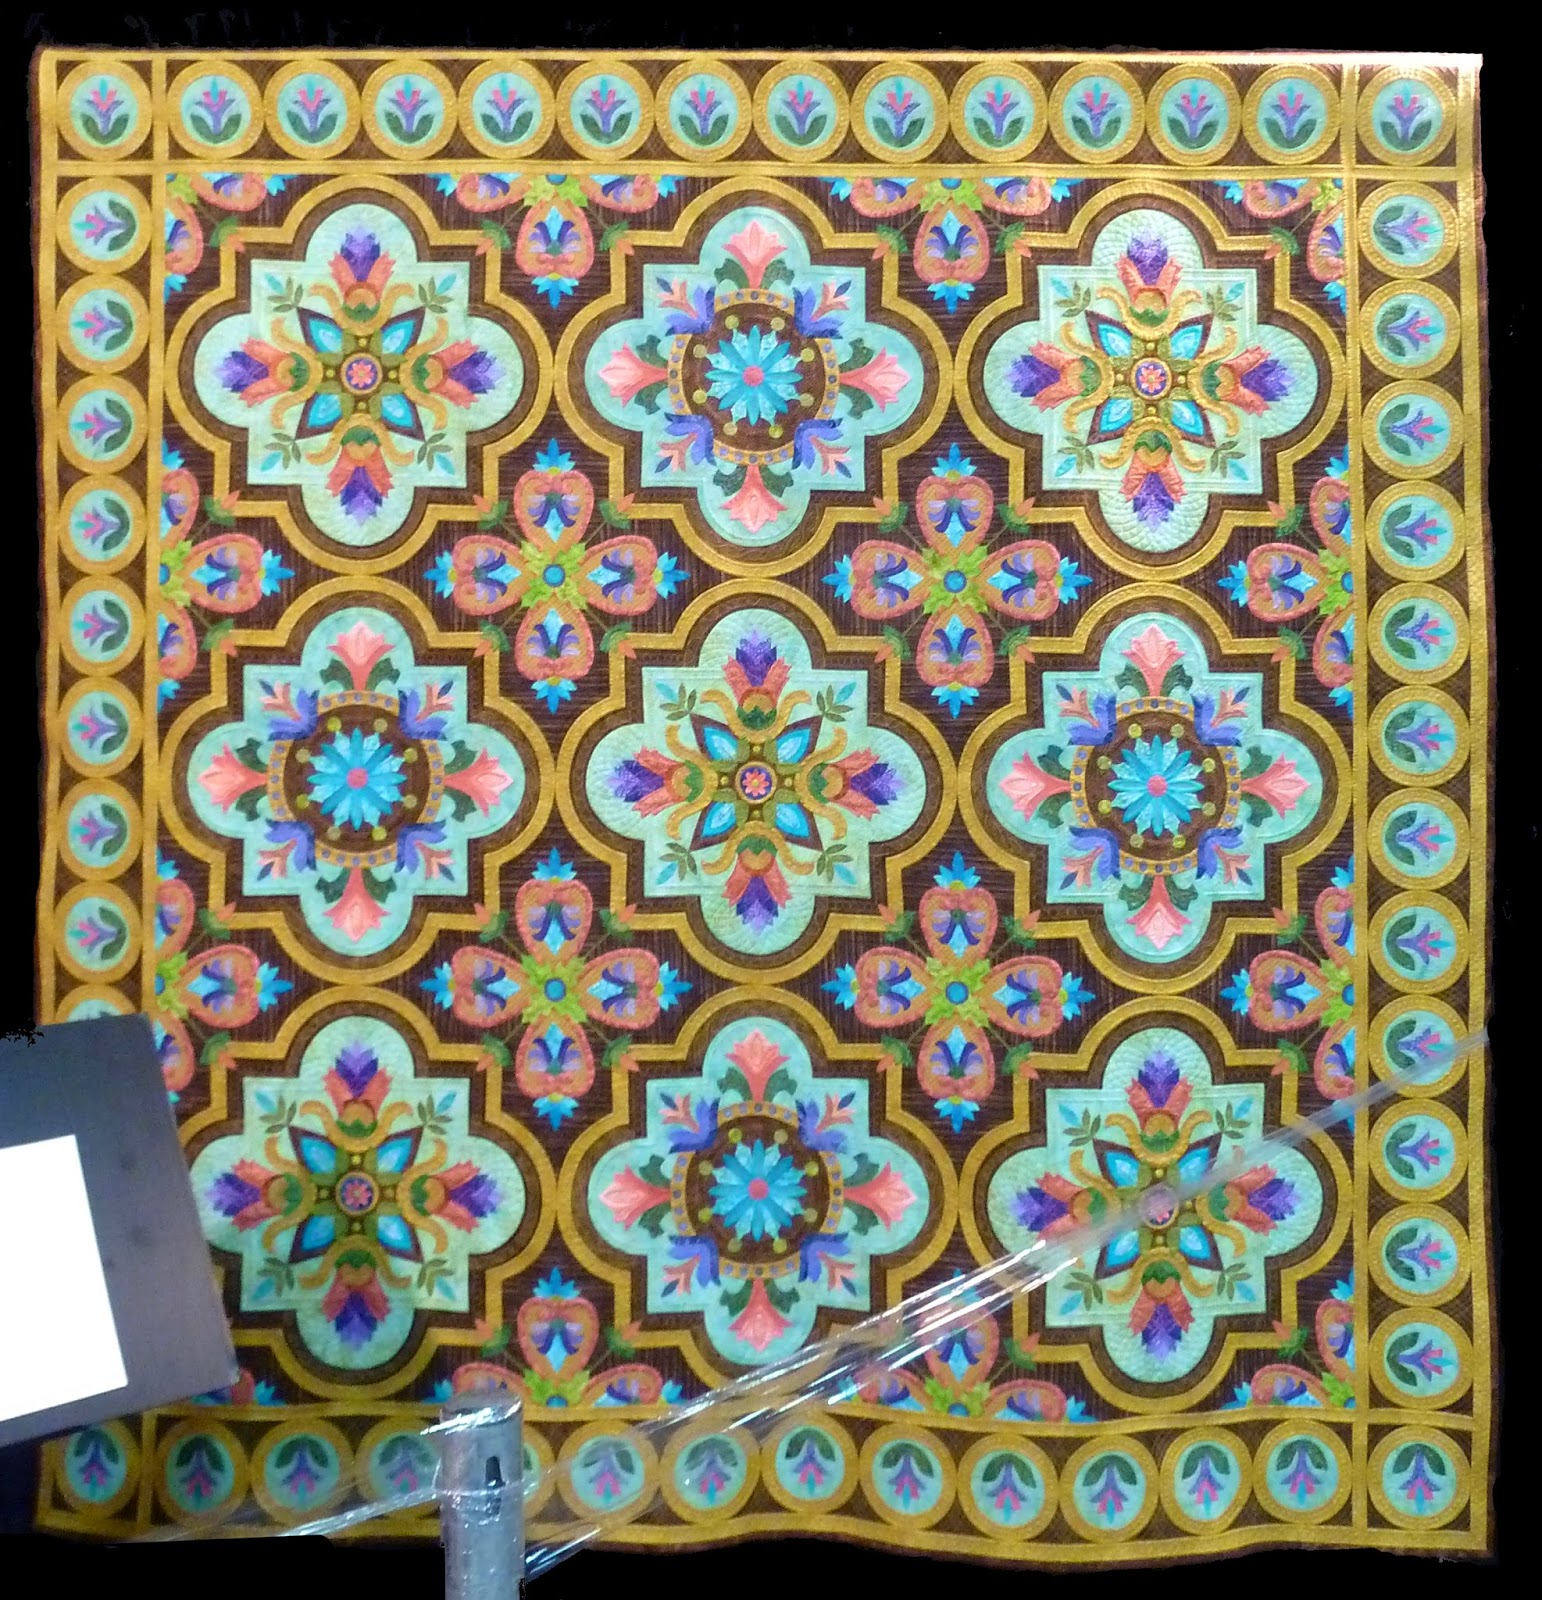
Barbara Korengold of Chevy Chase, Maryland, made Zeruah's Legacy, after being inspired by the Caswell Carpet in the collection of the Metropolitan Museum of Art, an embroidered wool carpet made by Zeruah Guernsey Caswell in Vermont in the 1830s. She loosely adapted 36 blocks from the rug and added an original border. She said "(I) started with the original color palette, but made my version more vibrant. I did a lot of hand embroidery to reflect the workmanship of the old rug." I'm truly sorry that my photo was not better but I had to work to avoid signage in front of the quilt.

Here are two close-ups of the blocks - you can also see the wonderful quilting in Barbara's quilt.


Robin Gausebeck (Rockford, Illinois) made Revolution #9. She said that when she was two, "my grandaughter, Charlotte, announced that her favorite number was nine. What better way to celebrate her delight in helping grandma in her studio than to make a quilt that features her favorite number and her favorite color, pink? This quilt will eventually be hers." I love the many techniques used in this quilt: foundation piecing, machine applique, raw-edge applique, painting, embellishment, and machine quilting. She also used commercial cottons, rick rack, cotton, rayon, polyester, and invisible threads in her original design. Note the unusual border/binding on this quilt.

There is so much to see in this quilt - from the colors and shapes to the quilting and the detail work. The quilting really serves to enhance the designs and motifs used across the face of the quilt. And look at all those nines - subtly worked into all aspects of the quilt. What a wonderful piece of work!

Chieko Shiraishi of Saitamashi, Saitama, Japan made Kalocsa. Kalocsa embroidery is a traditional Hungarian craft that Chieko loves and inspires her in her artistic endeavors. She says, "I dedicated my energies and time to represent its charming and appealing culture with this patchwork quilt faced with hand-crocheted lace." In simple terms, Chieko made this quilt as well as all of the crocheted lace that cover it. This picture doesn't show you how much work went into making the quilt, but the detail photos below will....

Here, you can see the crocheted off-white/white lace lining the pieced seams of the quilt - but you can also see all of the other crochet work: many tiny little flowers.

Below, you can see more crochet work adjacent to the seam lines, as well as in the floral applique. You can also see the trapunto work that has been included in this quilt.

The scalloped border includes more crochet. This quilt just floored me with the amount of patience it must have required. But we all know: if we love doing something, it's not work at all.

The next quilt was made by Hiromi Yokota of Yokohama City, Kanagawa, Japan. She made It's New Sue!! because she wanted to make a "new Sue." She used her imagination to create many different little Sues - and said it was fun! She incorporated hand applique, piecing, embroidery, quilting, and beading - and used cotton, ribbon, buttons, embroidery floss, boas, beads, organdy, and velvet to complete her quilt. What a treat - this quilt was not just fun for Hiromi - it was fun for all of us viewers to see.

Take a look at the border with all of its little checkerboard squares - and the funny lace-edging.

And each Sue was a creative invention. Here's quilter Sue...

And here is trombonist Sue....

And Sherlock Holmes Sue!

In Gentle Light, Yasuko Sugaya of Ichibara, Chiba, Japan, created a "gently shining star, showing faint hope born in darkness." Her work is an original design, inspired by a class she took with Ms. Noriko Masui.

There is an incredible amount of detailed piecing in this quilt. Take a look.

Mitsuko Sugimoto of Kawasaki, Kanagawa, Japan, made One of the Flowers, One and Only Flower II. The quilt and the name of the quilt came from the words offered to her by her mentor when she graduated: "You might only be one of the flowers, but also you are one and only flower in the world (sic)." Those are good words to remember throughout life - and this quilt was certainly unforgettable with its delicate color shading.

Kyung Eu Moon of Icheon, South Korea, made Moonlight Concert. She had been impressed by the works of the Japanese artist, Seiji Fujishiro, and she says, "in my own way, I tried to create a scene of the concert of the fairies in the woods." With a snowy background of hexigons, overlaid with trees and musical fairies, Kyung succeeded in achieving her goal. Seiji Fujishiro is a wonderful 90-year old artist in Japan, known for his illustrations, including one of musical fairies in the forest.


Terri Krysan and Page Johnson of Lakeville, Minnesota, collaborated to create Umbrellas in the City. The description on their quilt says it all: I have always liked batik fabrics, but could never figure out how to use them in a quilt... so I took the plunge and made some batik blocks and with black and white panes. The resulting top gave me a headache. After a year, I took it out of the closet and started doodling to create an image that could be appliqued on top, and this quilt was the result." This was a very bright, eye-catching quilt in the show; the design was very unusual and the sense of falling rain was quite realistic. Don't neglect to notice the little fire hydrant in the lower right.

This next quilt was another eye-catching design. Colleen Wise of Puyallup, Washington, made Hudson Trader. Colleen says her sister Tracy was not a quilter, so she is not in her thoughts when Colleen comes to big shows like the Houston festival. But when Colleen saw a bunch of indigo fabrics from South Africa at the 2012 show, she picked them up as indigos were Tracy's favorite fabric. Tracy's eBay handle is "Hudson Trader," so Colleen says, "This one's for you, Sis!"

I had to study the designs... and read the artist's description... to figure out how Colleen made this quilt. It was when I saw that her techniques included "painting" that I figured it out! You can see in the close-up below that the spheres are painted to make them look like there are shadows and reflections. What a beauty!

The Sun of Tenochtitlan by Miki Kano of Higashinada-Ku, Kobe, Hyogo, Japan took almost three years to complete. Miki says "I have loved Mariner's Compass and the Sun Stone, the center of this design, for a long time. I have completed this dynamic work with my favorite colors." Knowing that this quilt was entirely stitched by hand, one can understand why it took almost three years to complete.

Fusako Takido of Shizuoka-Shi, Shizuoka-Ken, Japan, made Flowers From the Window because she enjoyed looking at seasonal flowers from her window. She says she loves their natural colors, and found great peace while working on this quilt.

Marie Antoinette's Estate was made by Michiko Takahashi of Hadana-Chi, Kanagawa, Japan. Michiko has a lovely imagination: "Away from the Imperial court, Marie Antoinette always wanted to take her tight high heels off and stroll around her own estate." Her quilt is entirely hand made: hand piecing, hand applique, hand painting, hand embroidery, hand quilting, and trapunto. Note the beautiful reflection in the lake.

It seems that most of the totally handmade quilts that are juried into the show are made by Japanese quilters. Whether it is through their training or their culture, or their common sources of inspiration, their quilts are beautiful - and often quite complex. Here's another example, below, where you can see Sunshine Flower by Mariko Nakano of Yotsukaido-Shi, Chiba Prefecture, Japan. Mariko made this as her interpretation of "the beauty of the morning sun, as seen from the airplane."

In Breezy Garden Kayoko Hibino of Shiki, Saitama, Japan, says, "I would like to give the feel of a comfortable garden in my quilt. A gentle wind is coming from the oasis, waving many fine leaves and exotic flowers. To show a gentle breeze, I appliqued more than one thousand waving leaves." Again, this quilt is made entirely by hand.

Check out the fabric choices, the amazing quilting, and the intricate design work in this quilt.

Did you notice that the quilting motif is a ton of little flowers?! You can see them below.

Kyoko Yamauchi of Kumamoto-Shi, Kumamoto-Ken, Japan, made Gift of Appreciation while thinking of her family, teachers, and friends who supported her quiltmaking; she says, "This quilt shows my appreciation to everyone." It is entirely handmade. I will let the pictures speak for themselves.


* * * * *
These next photos were sent to me by various people. First, Gaye Ryon sent me picgtures form a trunk show their guild held. The trunk show was meant to show how the same quilt, made by different people, can have many different looks depending on the fabrics, the finishing techniques, and any other modification made. Below you will see a variety of quilts made using my All Around the Town pattern.

Here are more of them. You may notice that the last one is a bit different... the maker wanted her quilt included, and decided it was "All Around the Farm." Cute!

The next set of quilts shows four made using my "Monsters!" pattern. They are each so different! I love seeing everyone's changes - and most of the time, I wish I had thought of their changes first!

The quilt below is a variation of by Friends of Baltimore pattern. Sally Magee made it and asked for my thoughts. Well... first of all, I always blown away that anyone wants to make a quilt using my patterns. Second, I LOVE Sally's colorway - lots of blues have been included in this quilt. And third... the sashing strips are fantastic! My own quilt used a ton of red and white one-inch half-square triangles, but Sally's used strips with little nine-patches positioned every 5 inches. It is such a wonderful and unique sashing idea. Now why didn't I think of that in one of my quilts?!

Below you can see a close-up of one of Sally's blocks and see all the blue fabrics that she used. They look lovely!

Here is the eagle block... and she's added some wonderful feathers in his wings. What a great touch!

Here's another close-up of the eagle. Note the great quilting on his chest.

Here's another quilt that I love. My friend Marsha Fuller brought it over to my house after it was quilted and I snapped a picture of it. Her quilt is her own version of Omigosh - but instead of putting those Shoo-Fly/Four Patch Prairie Star blocks in the alternate block spaces, she used appliqued basket blocks. And she set the entire set of blocks on point. Again - such creativity!

Here's a detail picture of her blocks...

And here you can see the magnificent quilting that LeeAnn Lively did on her quilt.

This picture of the back of the quilt shows the quilting even better.

* * * * *
And so what have I been working on ? Well, the list of what I've been working on is long. What I've finished is a very short list, so let's start with this one. This started off as an antique quilt top that I bought on eBay. I loved the layout choice, the fabrics, and the blocks, which I am calling a variation of a Keyhole block, for lack of any better name for the block. Isn't this a grand quilt top? The blocks measure 7" square... except for where they measure 7-1/4" (and not necessarily square). Except for when they measure 7-1/2" (some square, some rectangular...). So, you can only imagine that it was the devil to quilt. At first, I thought I would use all those open alternate blocks to "practice" some nifty geometric quilting designs. Ha!

I realized after I loaded the quilt onto my longarm, that it was not going to be easy to "control" the lack of linear perfection. The blocks, specifically, were sort of "poofy" against the shirting squares. I had this idea that if I just sprayed a little water on the top and pulled it taut, perhaps it would flatten out enough for me to quilt it with those geometric designs dancing around in my head. Again... ha! After I sprayed the blocks and the quilt air-dried... it got stiffer and poufier! Oh my... now what am I going to do? I wondered why the fabric got so stiff, too. A friend of mine happened to pop over and she took a look at the quilt... and said, oh my! I've not seen this for ages! Seen what? I asked. She said that when she was a child, women sprayed ruffled, frilly little slips with sugar water to stiffen them up under little girls' dresses. She guessed that this quilt maker had probably tried to stiffen up the blocks by using sugar water (it was definitely not starched). That's a new one on me, but she's a good southern woman and probably knows that they used to do way-back-when. I chose, after all this, to just quilt random feathered vines across the face of the entire quilt. The good thing about feathers is that when you have a quilt that is not flat, you can "capture" all those little waves and poofs and volcanoes, bit by bit, within each little feather. So now... the quilt is completely flat. A little tuck here and there is hardly noticeable. This quilt will go to my older daughter as soon as I finish the binding, the label, and a good quilt washing to take out the old stains!

Some of you may remember late last Spring when I was working on this quilt, which I called Target Practice. I had started it the previous September (2012) at a retreat. Finally, it reached this stage and then I got waylaid by way-too-many lectures and workshops. The quilt top was not finished - I felt like it needed a final border to frame it. But what?

Here's a close-up of one of the block main center blocks.

I had thought that I wanted to add a simple border of chained squares on point. Below is a mockup of my quilt, done in Electric Quilt. EQ does not have my blocks in their inventory of block options... so I just use "similar" blocks to size the layout of my quilt with its own blocks, and to "audition" different borders. So imagine my wonky Target Practice blocks and not the blocks shown in this illustration. Argh - that sounds complicated, but I hope you get the picture!

Over the holidays, I finally had some free time and decided that I could tackle adding that chained border to the quilt. BUT... I also realized that I didn't want to put the time into the measuring and stitching and cutting and calculating required to make this border and make it fit. Call it lazy or call it pragmatism, I decided to make a simple strip-pieced border.
Ta-Da!
HERE is the finished quilt top!

Here is a close-up of the outer border. I love how it complements the whole back-and-forth of blue and white and cheddar fabrics. It's not such a dense border (such as a solid 6" border of blue) that it closes off the edge of the quilt. Rather, it is just as open and "happy" as the rest of the quilt. Whee! Now, the quilt lays atop my longarm, awaiting some magical notion of how I should quilt it to pop into my head. Maybe a little egg nog at midnight will help me? Nah... not my cup of tea. Or nog. I just need the magic notion, not a potion.

At the same time, I'll show you some other options I considered earlier when I was designing this quilt. What about doing the blocks in red and green and adding much simpler borders? I actually DID make a red and green Target Practice block and absolutely loved it! I used my picture of that red and green block and through the magic of computers, inserted it into this EQ mockup of another layout. Maybe another quilt is in the offing?

Here is another option... a lot more piecing is involved (versus applique) - but imagine how delightful this would be in real fabrics, versus a digital version. Wow!

I hope you're able to sort of "see" how my design process works so that you can think about and "grow" your own creative senses and design quilts that YOU love! A lot of times, it just involves "playing" with pictures, blocks, ideas... and auditioning them until they start to gel in your head.
And now... what about all those Baltimore blocks that I put together to make Simply Baltimore? You saw the quilt before I added the binding, last month. Here it is, finished. Yay! Finished is not just good, it's WONDERFUL!

Quilting this quilt was SO much fun -- I think it was more fun than my usual favorite part of quilt making, which is the designing and the applique.

How can this NOT be fun?! For me, quilting makes the quilt come to life!

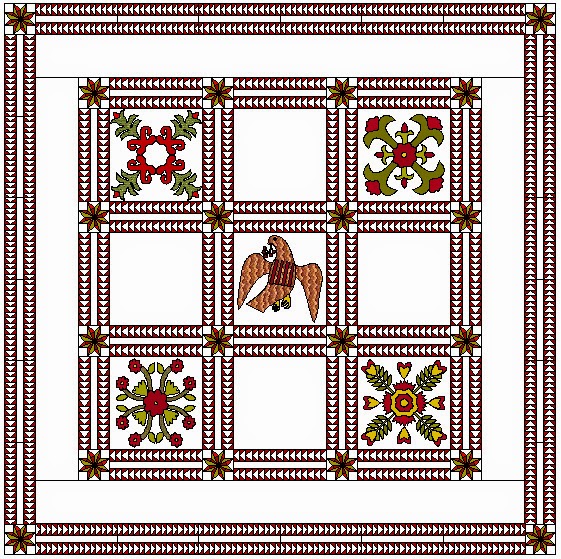
But some of you may remember that I made a DOUBLE set of blocks for Simply Baltimore. Why? Because I intended to make TWO more quilts that were not on-point blocks. Some of the blocks worked on-point AND straight-set, but others, I had to redesign for one or the other (such as the harp block). What did I have in mind for a set of straight-set blocks, though? I didn't want to just replicate my Simply Baltimore quilt with a straight-set layout - you don't need my brains to make that happen; you can easily sash and set straight-set blocks. Rather, I wanted to offer two semi-radically different layouts with the straight-set blocks. What I had in my head was to make a straight-set layout quilt with only FOUR blocks, but use double strips of flying geese for the sashing and the borders. Here, again, I've used Electric Quilt to test my layout plans, but inserted some standard Electric Quilt blocks, since mine are not part of Electric Quilt. Squint your eyes and imagine my blocks in this layout.

I LOVE this layout! But it takes a ton of flying geese strips. A TON OF FLYING GEESE STRIPS. So what? I can make a strip of 8 in about ten minutes. I've already started, as you can see.

To make it simpler, as well as less labor-intensive, I did consider using only a single flying geese strip in the sashings, but double flying geese strips in the border. Here's what that looks like (with EQ blocks - I like mine better, obviously! So squint your eyes again...). I like this layout but I have to say: I'm not really in love with it. I'm going to have to think long and hard about how to set those blocks and what sashings and borders to include.

But this is only four blocks. What about the remaining five blocks in my duplicate straight-set group? Well... I have a plan there, too. First, here are the blocks with double flying geese sashing and border strips. It's pretty impressive. But it's also pretty big. Too big, I think...
Here's a layout with single flying geese strips in the sashings and borders. Hmmm... much easier, but is it really that much different from the Simply Baltimore that I've already made? You may note that I've added some sense of what I would quilt in the open/alternate blocks, too....

I decided that I needed a whole new thought process. I needed to drop the flying geese in this set of blocks, and sash them entirely differently. I tried 1/2-inch sashing strips in red. I tried 4-inch sashing strips in red. I tried half-square triangles. I tried no sashing at all. I tried triple stripes with nine-patch cornerstones. Neither of these ideas turned me on. Then I thought... what about 4-inch sashing strips in white? Would it be too boring? Too non-descript? Hmmm... So I tried the layout in Electric Quilt (squint...).

It looked pretty good to me. It would require some spectacular quilting, though, to carry all that open white space... So I added some draft quilting in the open blocks.... and I think it's looking even better.

My next step was to test out making some split Lemoyne Star blocks that I intended to use as sashing cornerstones. Here was the first, with half of the block assembled and the remaining four sub-units still to be sewn together.

Well, I ran into a little problem. I realized, too late, that you have to decide which half of the block you're putting together - the straight half or the diagonal half. You can't choose both in the same block. Ooops!

I also realized that making those split-diamond Lemoyne star blocks was a lot of work - and making them absolutely perfect was tough work - getting all the center points to play nice together was hard with thirty two overlapping pieces of fabric. Ugh! I could cover the center intersections with a little half-inch circle, but what if I used only 16 overlapping pieces of fabric and made a simple red and green Lemoyne star, without the split diamonds? It looked good in the mockup:

And it looked good when I tested the block. Either one works, but I think I'll stick with the star on the left, below. After all... these are all four-inch blocks!

When this quilt and the other (four-block) quilt are done, the set of blocks will be called Straight Baltimore. You can already find my Simply Baltimore on my website, but you'll have to wait a bit for my Straight Baltimore designs. Keep checking... or keep reading my blog in the following months.
What else have I been working on? I'm half-way through my Cherry Wreath block for my Baltimore Glory quilt. Baltimore Glory will have nine heavily appliqued blocks with lots of detail work in them. The block below, as well as the next one below it, are the simplest ones; the others are doable but have a lot more work in them. The Baltimore Glory blocks are not online yet, as I've only finished four of them and partially finished two others.

Here is the other partially complete block; I designed this one on Christmas Eve during a much-relished and much-needed quiet time. It's called The Love Birds.

After I designed the block, I "colored" it in Photoshop. This is the first thing I do before I decide on the fabrics. Once it's done...

I gather fabrics to use for the block...

With the fabrics chosen I prepared the stems and the leaves and have started stitching away. I still have to finish appliqueing the leaves, as well as adding and appliqueing the birds, rose branch, acorns, and ribbons. I only have three more blocks to design for Baltimore Glory. These blocks are all going to be 15-inch square on-point Baltimore album blocks.

So what else am I working on? Well, I am joining in a UFO challenge in my guild, where each person agrees to finish 5 quilts over the next 10 months. We can finish a quilt top... or quilt and bind a quilt top. I have my work cut out for me, so to speak! I have not figured out which five quilts to commit to finishing because one of my girlfriends and I have decided to go cliff-diving. What does that mean? It means that instead of finishing five quilts over the next ten months, we are doing our own Thelma and Louise dive off of a cliff and choosing TEN quilts to finish over the next ten months. I know of at least three quilt tops that I intend to quilt and bind... and I know I want to finish the two Straight Baltimore quilts, and then quilt and bind them (which counts for FOUR more UFO finishes!). So that is seven of the ten commitments. Now I just have to decide on three more of the HUGE stack of UFOs that I have in my collection. Perhaps I should just give up and say I don't make quilts, I make UFOs, but I am really committed to finishing more things this year than I have for the past few years. Yessiree, I'm going to be a busy gal in the new year which means you'll get to see a lot of new quilts. Other than those UFO-finishings, I don't have a lot of resolutions on my calendar. I guess I can make them all day on New Years Day, right? Or any time during the coming year... but it seems best at the opening of a new year. I do have my sights on a few antique quilts that I want to replicate with my own spin. And that excites me!
I also want to mention... I read each and every comment that you make on this blog. I appreciate every one of them. I can't figure out how to answer the comments as an additional comment, but if a comment asks a question, I try to answer it here, or to contact you outside of the blog if your email address is included in your profile. Your insights and comments are very important to me and I don't want you to think I ignore you!
Which brings me to some one closing thought. More than anything, I have a wish for all of you: that you have the blessings of a year of peace, joy, health, love, and friendship. And QUILTING!
I hope our paths cross at some point -- Happy New Year!

Sue
(c)2015 Susan H. Garman

