This month I have a lot to share (again...). I have been working hard on finishing some quilts, and I was honored to be a judge and featured artist at the West Houston Quilter's Guild show in March. That guild has a fabulous array of quilts and quilters and you'll get to see Part One of their show - they had over 200 entries! Next, I'll show you how I bind my quilts - and then I'll show you my newest two quilts, along with how I did feathers on one of them. Put your feet up and relax - this is another long post. I can't seem to get away from those!
* * * * *
Below is me in front of my Twirly Balls and Pinwheels quilt. I had the honor of not only judging the West Houston Quilter's Guild's biannual show; I was also the featured artist and they hung a selection of my quilts. I hope someone walked away inspired by what they saw.

My Ladies of the Sea quilt hung at the show....

As did an older one of my quilts, Mama Said. I loved watching people stop and look at these quilts - especially Mama Said.

Aside from depictions of the core values of family (Believe, Love Learn, etc.), Mama Said has all those things, embroidered in it, that our mothers said to us as children, such as "wear clean undies" and "look at me when I'm talking to you!" It brings out lots of conversations among viewers.

Also hanging at the show was my Happy Daze --

And the bubble-gum pink and chocolate brown version of my Lily Rosenberry quilt. Most people never see this one - they usually see pictures of the red and green version of this quilt.

I thought it was funny (but probably only to me!) that I realized I had never finished hand quilting my Southern Beauty quilt. When I saw it hanging, little bells went off in my head, saying, "Oh no! You never finished quilting the spikes on the lower four blocks!!" Oh well... things happen. Finishing the quilting is now on my list of UFOs to work on.

But this blog is not about me, me, me... so let's get to the quilts that were hanging at the guild's show. There were SO many wonderful quilts that I decided to split them up; you'll see more next month and probably the following month. First of all... the RIBBONS at the show were wonderful! Here is the Best of Show ribbon - a real treat to Becky Hoffman, who won Best of Show for her Family Tree, rendition of Edyta Sitar's pattern.

This was the third Edyta Sitar quilt that Becky has made; she was drawn to this one because of its size, color, and design. I love this pattern, too - it's feminine without being frilly. And the colors are warm and quiet. This is not a bed-sized quilt - I point that out because most of the time, we see large quilts win ribbons at shows, with the smaller cousins left by the wayside. This quilt spoke for itself, though - the pattern/design/fabrics - the workmanship - the exquisite hand quilting... it kept coming back to the attention of the three judges of the show as being worthy of Best of Show.

This was the first time that Becky tried the back basting method of applique - she says she really enjoyed it and will definitely use it in other projects.

You can see that the workmanship in this quilt was perfect!

And the hand quilting? Oh my goodness -- it was unforgettable with the tiny stitches and the density of the quilting. Becky deserved the Best of Show, for sure!

The quilt below, called Alice Goes Fishing with a String, was pieced by Alice Sadeghpour and quilted by Nancy Ward. The pattern, "Thomas Goes Fishing," was made by Claire Haillot. The West Houston Quilt Guild issued a challenge for their members, to make string quilts. Many of the quilts you see posted here will incorporate string piecing. Alice, in making her fishing quilt, says, "I wanted to do the string quilt challenge, but got carried away." This is a delightful looking quilt!

Alice Sadeghpour also made Modern Art (quilted by Nancy Ward). The quilt is a modern art pattern quilted with a "cotton candy" pantograph. Alice says she loved the bright contrast in colors in a geometric application because it just made her feel happy. We should take a lesson from Alice and do things that make us happy. Alice also says the fabric felt soft and yummy.

Another entry by Alice was Modern Christmas Trees (quilted by Linda Hill). These were made with the stack-and-whack method. Alice used her Christmas stash to make the trees -- and said the pattern was fun.

Amazingly, she said the pattern was not paper pieced; rather, she said, "Think puzzle pieces." Here is a detail photo of her quilt. I'm still trying to figure out how it was made!

Alice was prolific -- here is yet another amazing creation she pieced (quilted by Cathy King), called Star Pineapple. The quilt was made of paper-pieced units. This quilt was particularly striking when you walked around a corner and saw it hanging. The sharpness of the geometry and the repetition of shape and color made it a stand-out quilt.

In this detail photo, you can see that Alice carefully selected different green and blue fabrics for each unit - and even used different off-white fabrics for the background. Alice chose the colors to go in her daughter's home, and chose the pattern based on the fact that it was very geometric; her daughter and son-in-law are both architects.


Since the quilt was for a teenager, Barbara added a lot of bright prints - especially knowing that her grandson's favorite colors were red, yellow, and black. The blocks were paper-pieced. I think this quilt is striking because of the colors, the design - and also because of the addition of black. We don't often think of black as an "accent color" but it can be!

The next quilt was nothing short of absolutely delightful! Christmas on the Fourth of July was pieced by Beverley Bennett and quilted by Quilt 'n Sew. I had never seen this pattern before, but I wish I had - it was so FUN to look at all the details in the quilt. The original pattern was called Christmas Flag and was designed by Tina Curran. It was published in 2012 in Quilter's Newsletter - the magazine published three blocks per week, online, from July 4th to November 12th. Look at the quilt... and then I'll show you some of the details in it.

There are fifty Christmas trees in the flag - just like the stars on our nation's flag.

Each of the stripes in the flag contained a different motif - from snowflakes and wreaths to mittens and snowmen, and more. It was a feast for the eyes!

The details in each stripe were fun to see.

Becky completed the quilt top in time for Christmas in 2012 -- but it took another year before it was quilted for the following Christmas.

Note the strings tying the pairs of mittens together.

You can see a couple more of the flag stripes below - ornaments that even had silver lame' tops on them, and Christmas lights with silver lame' bases on them. And poinsettias with beads in the center. No detail was overlooked. Even the fabric on the back of the quilt was fun to see - a real Texas Christmas print!

The quilt below was made by Barbara Wafer and is called Links and was quilted by Sharon Dixon. I like how the smaller Lemoyne Star blocks are framed with the rust and black fabrics; it gives the quilt a different look.

Carolyn Cordes pieced Fire and Ice,, which was quilted by Betty Baker. Betty saw the pattern at a quilt shop in Austin, Texas - and she and Carolyn decided to make it after they traded fabrics with each other. Carolyn stitched it up in one weekend at Betty's house.

Carolyn also made Texas Memories, below (quilted by Jane Plisga). This quilt was spectacular and the quilting included many Texas 5-pointed stars, along with a beautiful cable and meandering feather vine border. This quilt pattern is a favorite in Texas with the images unique to the State.
.

Below is Cathy Bliton's quilt, Belinda's Quilt, quilted by Sharon Dixon. The center block was actually one of the blocks in a block-of-the-month I did for Alex Anderson and Ricky Timm's The Quilt Show. I didn't even recognize it until I read the description of the uqilt! Cathy made this quilt for the minister of her church, who retired. She says she spent a lot of time working the math to balance the quilt and signature blocks. Although a challenge, she said it was a lot of fun to make this quilt. Signature quilts like this will always have a special place in the hearts of the recipient.

Cindy Gaa pieced Dissertation Spiral and then it was quilted by Rosann Gilbert. This quilt is unique in that the design was original! Cindy said, "I have always been intrigued by Ranae Merrill's Mandala quilts, so when she was teaching at Quilting Adventures, I took up the challenge. She called us her PhD class as we insisted on drafting our own totally original designs." Making a design like this... and making it a do-able quilt is difficult, but Cindy did a wonderful job. Bravo!

Cindy also made Mosaic Medallion, below, which was also quilted by Rosann. The design came from "Majestic Mosaic Block" by Karen Kay Buckley. Cindy and two friends took Karen Kay Buckley's 3-day mosaic class and focused on machine applique. Cindy said it was amazing to see the same design in different colors.

Tissue Box was pieced and quilted by Connie Bihner. She saw a quilt using this design at Quilt Works and admired it every time she entered the quilt shop. The pattern is based on the shape of a Kleenex tissue box. Connie chose to use an assortment of Kaffe Fassett fabrics for the tissue boxes and bordered them with a fabric containing little green apples. I thought it was a hoot - and perfectly understandable - to learn that Connie used a printed whole cloth fabric for the back of the quilt and quilted it entirely from the back side of the quilt. Sometimes you don't want or need to know what the design is on the front of a quilt when you quilt it!

Debbie Adami was my contact with the West Houston Quilt Guild and she was an absolute angel. She made Star for Benjamin David and had it quilted by Brandy Rayburn. The pattern is The Sentimentalities Quilt by Bonnie Christine Design. Debbie is giving the quilt to her niece for her first baby, so she let her niece choose most of the fabric and color palette, and said that getting the orange worked in was fun! She made matching bumper pads, a coordinating dust ruffle, and window treatments. Talk about a wonderful aunt! This is not a pattern that one would ordinarily choose for a baby, but when you look at it and think about it... it's really a fantastic choice!

Donna Simoneaux made and quilted Three Vessels, below, based on a pattern by Robbi Joy Eklow. She had taken a class on making this quilt several years ago at the big Houston quilt show - and finally decided to finish the project. The use of the fabric with gradations in it makes the quilt simply glow.

Dorothy McConnell, with the finishing touches of quilter Sharon Dixon, made Tranquility. The quilt is based on a pattern by Andrea Meegan. Dorothy saw the pattern at a quilt shop in Giddings, Texas, and bought it with no plans for making a quilt... but once she started putting together her beautiful batiks, she couldn't wait to finish it for this quilt show. What I love about this quilt - aside from the fact that I love scrappy quilts! - is that the center of the quilt is not in the center of the quilt. Take a look - the color ranges pool out from the orange/rust "circle" in the lower right. And the use of green quilting thread? Fabulous!

Teal Beauty was made by Dundee James and quilted by Lillie Hays. The quilt was based on a modified Maple Island pattern. Dundee made the quilt for herself until a friend said she was sad because of all the friends she had lost. It was at that moment that Dundee changed the purpose "to be something from a friend that she hadn't lost." That's true friendship and one of the many reasons we love making quilts.

Have you ever been to the Getty Antiquities Museum in Los Angeles? When Elaine Mason went there, she took her camera and lots of pictures of the floor tile patterns, which she fell in love with. They were based on ancient Phoenician floors. With so many photos, she knew she had to try making a quilt. She used several hand applique techniques along with machine quilting to create this masterpiece.

Gale Davis pieced and quilted her My Worlds Apart quilt (based on the Worlds Apart pattern designed by Judy Reynolds). This is an interesting quilt because of how she used color in the blocks. And the quilting was perfect for the quilt.

Geeta Mehta is a fabulous quilter who quilts for others - and herself. Her French Braid is based on the quilts in French Braid Quilts by Jane Hardy Miller with Arlene Nettten. Geeta loves batiks and took a year and a half to gather the fabrics for this quilt.... and two years to complete it. I've always said that fabric selection takes half the time in making a quilt. The quilt is for Geeta's youngest daughter.

And here, you can see Geeta's fabulous quilting. Oh my goodness - will I ever learn to quilt as well as this? I can always hope!

Geeta also made the quilt below and quilted it herself. The pattern is called Hot Flash and it is a companion pattern for the Rapid Fire Hunter's Star Technique by Deb Tucker. Geeta was inspired by the fabric colors when she made this quilt - she had always wanted to make a Hunter's Star quilt. The thing that caught my eye is the Air Castles border she put around the Hunter's Star blocks. This is an old, old border block and one that I love but do not always see very often. It makes such a beautiful frame for a quilt - particularly one with two major colors (other than the background).

And again, you can see Geeta's spectacular quilting in these detail pictures.


The quilting in this quilt was very unusual - and perfectly suited to such a geometric layout.

Helen also made Sea Turtles (also quilted by Patricia Lopes). Using Kathy Brown's Take Five pattern, Helen incorporated many of her favorite things: turtles, blue, seashells, and the ocean.

Helen also made Wildflowers Behind the Barbed Wire (quilted by Patricia Lopes). While visiting the Needle Nest Quilt Shop, owned by Joyce Godfrey, Helen says "I expressed my interest in several displayed quilts. Joyce gave me her hand drawing these two blocks. She passed away in 2011, so I am dedicating this quilt to her memory." Again, we see how quilts often deal with the importance of relationships, friendships, and family.

Here is a close-up of the blocks that were used in this quilt.

The apple core block - or at least the shape - is not one that is often seen today. It was more common back in the 30s and 40s. But Jean Fleming went to a guild retreat and sat with Teresa Rossman who was using an apple core template to make a quilt. Jean loved the design and so she went home and ordered the template from Missouri Star. She was making two of these quilts for the Mayde Creek High School donation quilts - but she liked her Texas to the Core quilt (quilted by Jane Plisga) so much that she decided to keep it!

Joan Rondeau pieced and quilted Moon and Stars -- it was a mystery quilt. Joan's niece loves astrology, so this fabric was a perfect fit.

The contrast and black with batik fabrics caught Joy Denk's interest when she decided to make Glorified 9-Patch (quilted by Jane Plisga). Joy initially thought that the challenge would be in sewing curves, but oh no! Accurate cutting turned out to be the most challenging facet of making this quilt: if the cutting was not precise, the pieces didn't want to fit together. I think we have all learned that lesson at one time or another - but a quilt like this one amplifies the lesson.

The batiks used in this quilt show up so well against the black - and the quilting sets it all off. Jane was careful to use thread that enhanced each block - you don't even notice the black thread on the alternate blocks, do you?!

The West Houston Quilt Guild had a whole lot of challenges -- within bees, across the guild -- everywhere, it seemed! The guild sponsored a String Quilt challenge -- string quilts are generally made by sewing strips together diagonally onto a square of base fabric. They often have little form or structure other than that -- just strips added to a square. I saw lots of string quilts at this show -- and here is one of them, String Quilt of Valor by Joy Denk (quilted by Jane Plisga).
Joy started with a square and added strips to one side, starting with a diagonal down the center. She had never made a string quilt and said, "I found the guild's challenge intriguing." She used chambray and red to give some unity to the quilt, while still maintaining a scrappy look. I think having a string challenge was a grand idea!

Julie Lisle made her Sailboats by the Lake (quilted by Jane Plisga) after Pat Sloan came and spoke to her guild. Pat had shared this quilt, and Julie says she loved the pattern and her quilt looks great at her lake house. The quilt design really is nice -- it's a simple pattern but it's a very HAPPY one!

The flags, stars, sunny sky, and stars are what make this such a cheery quilt - perfect for a bright sunny day.

Karen Coffey pieced Wild Geese and Lillie Hayes quilted it. Here is another example of how black really can make colors come alive. The use of checks is also a nice touch in this quilt!

Victoria's Rainbow is an original design made by Lisa Mautz. This quilt was made to welcome Victoria - the first granddaughter - to the family. Originally, Lisa was going to use the pinwheels in the border, but decided after she finished the French Braid that it would be even better in the border. Isn't it grand that we have the freedom to rearrange and change our designs in the middle of making a quilt? It makes it a lot of fun for me. Jane Plisga quilted this quilt.

This particular quilt was adorable. Marie Robinson made Pretty Dresses based on a pattern by the same name from Black Mountain Quilts. The quilt was quilted by Barb Knoblock. Marie arrived in Houston from Australia and didn't know a soul, so she took an applique class from Sylvi Sealy. She loved the use of Kaffe Fassett fabrics against a plain background - and learned a new applique technique, using freezer paper and hand stitching to attach the dresses.

Here's a close-up photo of one of the blocks -- the Kaffe fabric could not be more perfect!

Nasreen Saeedi made and quilted Lighted Tree using reverse applique. She topped off her quilt with metallic thread quilting. She is quite a talented and creative quilt artist

Quiltmaker magazine occasionally runs a mystery quilt in its magazine. Pam Heine took advantage of a Bonnie Hunter quilt in one of the magazine issues and made her Lazy Sunday Mystery. She quilted it herself. She says Bonnie's designs are beautiful and when she saw this one, she knew she had to make it.

Here's a close-up of the quilt. Pam says she loves bright colors and has done several mystery quilts. This one is definitely a beauty!


Aren't the fabric choices unusual? I love the creativity in choosing them. And the quilting? Out of this world! It was done by Sharon Dixon.


Above, we are standing together in front of two of her quilts. The first one, Rose Fan (shown below and quilted by Jane Plisga), was made in a workshop I taught a while back. Patricia modified the central flower design, making the flowers smaller, and used it in a border. This was Patricia's first experience with reverse applique in small pieces and she says "the border flowers were especially challenging!"

Patricia didn't stop with just one entry, though. She made and quilted Santa Baby using Cynthia Regone's "Joyeaux Noel" pattern. The center medallion was made with wool.


But what made it even more fun was to check out the border on the quilt: it was made out of "barbed wire" which, of course, was a big part of Texas' history as the cattle drives crossed the state in its early years. The barbed wire, by the way, was not made of metal, but of some sort of vinyl-like material. Too cute! You may also note the plastic gloves that everyone was issued so that we could "touch" the quilts at the show.


Sheila Tweed made It's a Party (quilted by Donna Warnement) based on the Best Friends pattern, although she chose to make it larger than the pattern said to. Sheila found the fabric and pattern while on a retreat with the Katy Rotary Bee, and had a blast making it. Sheila says she loves her quilt "because it is such a happy quilt." Yes - it is!

Over the next month or two, I'll show you more of the quilts from the West Houston Quilt Guild. It was a huge show and there was so much wonderful effort that went into making everything just perfect, including door prizes, 30 vendors, challenges, and more.
But now... After a lot of chatter on my yahoo group, I promised to show you all how I bind my quilts, so here's my little tutorial a la Sue. There are plenty of ways and shapes and sizes of bindings, so do not believe for one second that this is the definitive answer for how to bind everything. It's just MY way... and it works for ME! This is my antique frame quilt that I showed you how to make the meandering Amish feathered vine in, last month. Now, though, let's talk about binding it.

Step One: Cut your binding strips. I like mine to be 2 inches wide. I am actually not particular about whether the binding is cut cross grain or straight-of-grain, but I do want it to be cut precisely. Occasionally, I will cut the binding 1-7/8 inches wide when I want a good, tight, narrow binding. I don't like the 2-1/4 inch binding width because it seems to never be "full enough" for me, or because the binding on the back seems to be wider than it is on the front. There are not any hard and fast rules about how wide a binding should be, in any case, so do what you like on your own quilts - just keep the binding "full."

Step Two: Sew the strips together, making one long, continuous strip that will go all the way around the quilt. To do this, put right sides together at a 45-degree angle, and stitch a line diagonally....

... like this: (yes it's hard to see, but it's there... the stitching starts at the "crotch" of one side and ends at the "crotch" of the other side... it does not wobble or stray but is a STRAIGHT line from intersection to intersection. To make sure it is straight, I lay an index card across the fabric and stitch right next to the edge of the card. I use a brightly colored card, not a white one, so I can see it well.

Step Three: Trim away the excess seam allowance.

Step Four: Press the seam allowance open... and flat... to remove bulk in the binding.

Step Five: Fold the binding strip in half, wrong sides facing each other, and press it carefully. Make sure both edges of the fabric line up with each other.

Step Six: Place the binding along the edge of your quilt, lining up the edge of the binding against the edge of the quilt. Do this somewhere on a side (any side - top, bottom, left, or right), and leave a tail that is about 10 inches long.

Step Seven: Start stitching, keeping the tension even in front of and behind the needle, keeping the binding edge and the quilt edge in perfect alignment.

Step Eight (optional but it can help someone who doesn't have a good sense of what a quarter inch looks like): Take a short piece of quarter-inch wide quilter's tape (it's like masking tape but is only 1/4-inch wide).

Step Nine: When stitching, a little before you get to a corner of your quilt, place the piece of quarter-inch tape on the corner -- perpendicular to the direction in which you are sewing (in this picture, I am sewing "down" and not "across" the quilt).

Step Ten: Stitch down along the edge of your binding/the quilt until you get to the tape... and then STOP! By doing this, you will have stopped stitching exactly one quarter-inch from the edge of the quilt. Take one or two stitches backwards (reverse) to anchor your thread. You can cut it off... or leave it loose, as you choose. Eventually, you will likely trim off the excess thread, though, just to get it out of the way when you hand-stitch the binding to the back of the quilt.

Step Eleven: Remove your quilt from beneath the foot of your machine, and fold the binding back at exactly a 45-degree angle, with the "tail" folded away from the quilt. Finger-
press that fold so that it is flat.

Step Twelve: Make sure that your binding lines up as a straight line when pulled back from the quilt -- see how straight it is?

Step Thirteen: Take that long binding, now, and fold it forward (toward you), with the fold exactly at the edge of the quilt. Finger press it flat.

Step Fourteen: Now, place a piece of the quarter-inch tape across the edge of the quilt where you've already sewn the binding in place. Place it closely along the fold line.

Step Fifteen: Turn your quilt ninety degrees from your previous stitch line. Place the foot of your machine down, such that the needle will fall directly one-quarter inch from the edge of the already-sewn binding AND the binding edge that you are about to sew. Sink your needle right at the edge of that quarter-inch wide tape and take two stitches forward and two stitches backward to lock the thread... and then sew forward, keeping your needle one-quarter inch from the edge of your binding and quilt. Continue to make sure that your binding and the edge of the your quilt are aligned precisely against each other.

Step Sixteen: Below, you can see what the corner should look like when you have finished stitching the binding in place. Continue sewing around your quilt... maintaining that careful one-quarter inch stitch... and keeping your binding and the quilt edge aligned perfectly.

Step Seventeen: Now... repeat this process, stitching all sides and all corners, until you have sewn all but about a 15-inch length of the binding in place. STOP! Take the end of your binding and clip off a half-inch wide piece. This does not have to be an exact measurement.
Step Eighteen: Now is the time to join the two ends of the binding... invisibly! Initially, you had a ten-inch long tail of binding. Now, as you stitch the binding, when you get to within fifteen inches of the start of the binding stitching, stop stitching and cut off the end of the binding so that you have a 10-inch tail at the start of the binding and the end of the binding. Lay one end of the binding down flat across the "open" area of the binding. Line it up along the edge of the quilt (below, it is not yet lying along the edge of the quilt).

Step Nineteen: Take the 1/2" wide strip that you cut and lay it across the binding strip that you laid down flat, matching one end to the other.

Here, you can see the strip lying in place atop the binding, aligned against the edge of the quilt.

Step Twenty: Lay the other binding atop the one with the strip on top of it. Make sure the edges of all layers are aligned.

Step Twenty-One: Now... very carefully, LIFT the top binding up, carrying with it the 1/2-inch wide strip. Do not let the strip slide away from the top binding strip, as you are going to use it to mark where you join the two ends of the binding.

Step Twenty-Two: Using the 1/2-inch wide strip as a guide, CUT the top binding tail off exactly at the end of the marking strip. Now, you have two binding tails, and the overlap between them is exactly the same length as the width of the binding strip you are using.

Step Twenty-Three: It is now time to join the two tails, to make an invisible seam. To start, open the folded tails open and pin them together, edge-to-edge, with right sides facing each other, and with the two tails meeting at a 90-degree angle; this is every important, so if you do not understand it, revisit the pictures or try making two binding tails and practice the technique until you are sure you understand the process!

Step Twenty-Four: Stitch the two tails together, corner to corner diagonally. Again, though I have not shown it, I use an index card as my "straight line guide" when stitching the two pieces together diagonally.

Here's a picture of the stitched tails...

Step Twenty-Five: Trip away the excess seam allowance.

Step Twenty -Six: Press the seam open.

Step Twenty-Seven: Pull the binding flat against the quilt -- it should lie perfectly flat against the quilt edge. Stitch the remaining portion of the binding in place, keeping your stitch line a perfect quarter-inch from the edge of the quilt, and keeping your binding and quilt in perfect alignment. Drum roll, please! A perfectly stitched binding!!!!

Uh-oh... but wait, wait... there's more! We've only taken care of ONE side of the binding - the stitching done on top. Now, we have to take care of the stitching when you take the binding and wrap it around to the back of the quilt.
So here is the quilt with the binding sewn on. What do I do first?

I take my iron and press the binding tightly away from the quilt..... see, below, how nice and flat it lies now?

I'm careful NOT to press the quilt, itself, flat, or to press the batting in it flat. Press only the seam line!

At the corner, press right up to the "turn" of the binding, again being careful not to press the batting flat.

At the corner, press both sides....

And now it's time to deal with that persnickety fold. There's a secret to how to make it lie nice and flat and not have a lump - a secret that is aside from making sure that your stitching is exactly one-quarter inch from the seam line.

Take your thumb and finger and "feel" the fold. Here, you can see that the fold goes toward my thumbnail, not away from it.

IF I fold the binding on the right side (versus the top side) to the left, then when I fold the top portion of the binding down, the BULK of the binding will ALL sit beneath the left side of that fold line. Not good!

Instead, I will fold the binding down AWAY from the fold (ie, fold the top down first).

Now, when I fold the binding on the right side underneath... the binding bulk is evenly split on both sides of the diagonal fold line you see. Wow - sweet, right?!!!

But wait, wait... there's just a bit more. I take my iron and press the corner down before I go about stitching the binding in place. Here, it looks like I'm pressing the whole corner... but really, most of the pressing is ONLY on the binding.

The only remaining task is to stitch the binding in place. This is done from the back of the quilt with a blind stitch -- take care not to stitch through to the front of the quilt when you stitch your binding in place! And DO stitch those folds in place on the mitered corners.

And you'll have a gorgeously bound quilt!

* * * * *
Now, based on many requests after I did my little tutorial last month on making a meandering Amish vine, I am going to add a LITTLE insight into how I do my feathers. And you'll also see what I've been quilting this past month! I won't provide all the details on how to do feathers - there are plenty of experts on YouTube who can do a much better job than I can.
I just finished quilting my new Baltimore album quilt, Baltimore Squared. The pattern will take some time to write, so don't expect to see it on my website for another month or two. You saw the blocks in last month's blog post, but now you get to see what I've done with them!
First, I set the blocks with four-inch wide sashing strips and four-inch Lemoyne Star cornerstone blocks. I love LeMoyne Stars - I think they sparkle when they are in a quilt! But how do I turn this sashing strip (below)....

... into THIS?!!

It all starts (for me) with a nice wavy template.

The first thing I do when making the stems of a long wavy vine is to stitch along the edge of a long wavy template. But when I get to the end of the stem, I stop before I get to the end of the sashing strip. See below how I've stitched along the template and stopped stitching just short of the end of the sashing strip.

I stopped because I want to have my vine end with a feather, not a blunt cut-off stem. So when I get near the end of the sashing strip, I do a little free-hand magic and make the end a feather, as you can see below.

And once I've made that feather, I move the template over just a little and make the other side of the stem, stitching back down along the template edge as you can see below.

Here is a picture of the stem onto which I will now sew my feathers.

The first thing I do is to "whip out" a little feather. Some teachers will tell you to think of feathers as half of a heart, but I like to think of them, instead, as gentle lines that go out and capture a circle. The size of the circle can be something like a dime or a nickel - or bigger or smaller. But in general, it is a consistent size of your choosing. So below you can see my first feather on this vine.

With the next feather, I whip the stitch line out again, circling out around the first feather (these first feathers are kind of stacked on top of each other to fill the area, instead of making one giant long skinny feather) and stopping where it intersects the first feather.

Next, I "backtrack" (stitch on top of the stitch line I just stitched) along the second feather until I reach the point where I am ready to make another feather.

Below, I've made the third feather... and come back up with a fourth feather. From here on, the process just keeps being repeated: make a feather, backtrack along the top of it, make a feather; make another feather, backtrack along the top of it, make a feather.... and so on.

When I get to the feather at the tip of the vine, I stop. Here's a picture of that point in the stitching.

Next, I repeat the process on the other side of the vine, making a long wavy feathered vine in the sashing of my Baltimore Squared quilt.

The next step is to do a little echo stitching around the edge of all the feathers. I think it smoothes out the whole feather set to add the echo line.

So here's a picture of the sashing strip in the context of the block and cornerstones. I ABSOLUTELY LOVE FEATHERS!

Once I've done one sashing strip, I go to work and continue on the next and the next and the next sashing strip. I'm always afraid that if I don't do all the feathers at the same time, I will "lose" my rhythm and the next set of feathers will look like they came from another planet.
At this point, I'm really starting to get excited about how this quilt is looking. Woo hoo -- aren't you?!!

There's one more little tip: when I did the center sashing strips, I made a feather on both ends of the vine, and started making feathers from the center and then out to the left and to the right. It just felt like it needed to be done that way to balance the look of the vines in the sashing strips.

So after doing a bunch of sashing strips, and working on the cross-hatching in the blocks and the outer border, along with the piano keys, I was starting to get really excited about how this quilt was looking. For me, quilting is when the quilt starts taking on a life of its own!

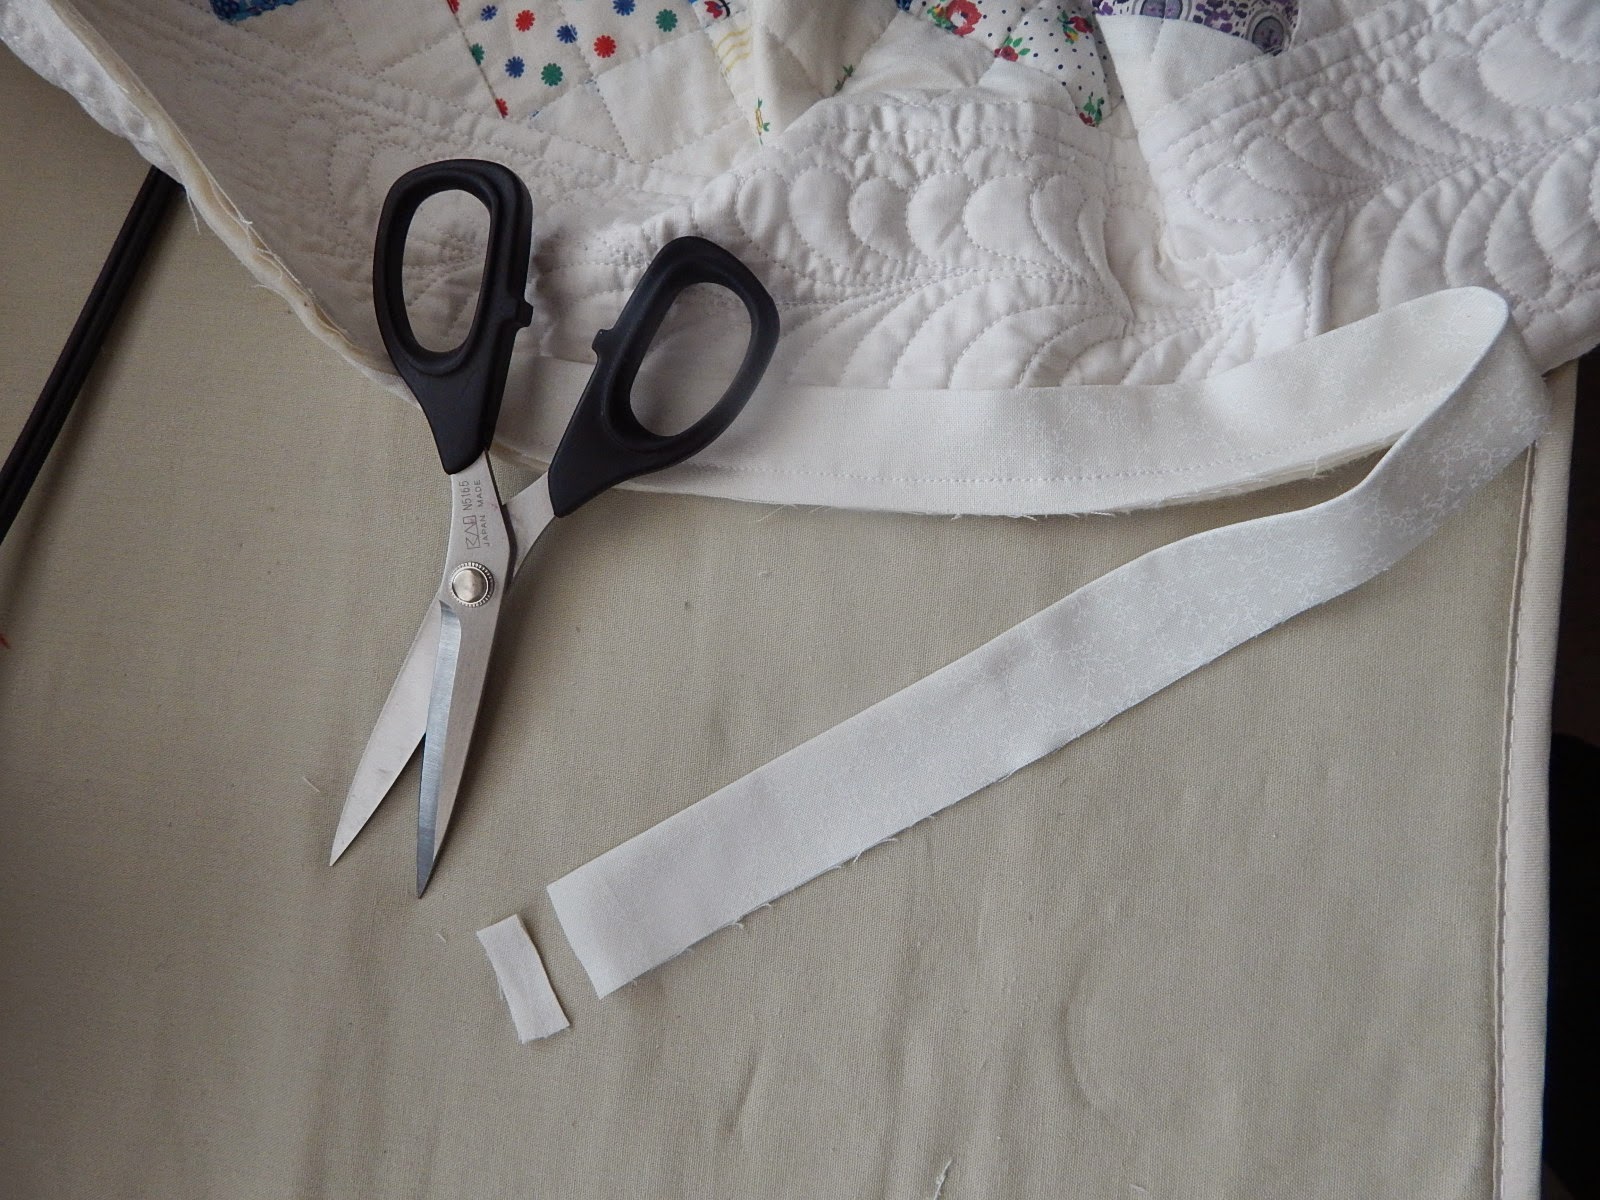
So what other tools do I sue? Curved trim scissors are a big help when doing a lot of starts and stops with the thread. A straight edge template is a requirement for the cross-hatching, but I also use it to guide my machine around curves by using it as a "fence" to keep the needle and foot where they belong.

What do I do about blocks like this where the vase is going to give me a big puffy place, since I used wool batting?

Or this cherry wreath block, which has a LOT of puffy opportunity?!

In the vase, I did cross hatching using green thread. On the wreath, I did echo quilting from the outside in, several times. I love how it looks!

You still haven't seen the quilt yet... but just remember: when I am quilting a big quilt like this, I don't get to see it either! Not until I can unroll the whole quilt when it's done. Like you, I only get to see about a 24-inch width of the quilt at a time. It's crazy, isn't it?
So now I needed to do something about those puffy double-swags in the border. Hmmm.... what would compliment the quilt and what can I do, given my skill set? I'm not great at thinking of things or creating things on the fly. I get out my clear plastic overlay and start drawing options. And in this case, I thought of plenty of different ways to quilt these swags.

But ultimately, I decided to use feathers. It seamed to complement the feathered sashing.

First one... then another... and another and another. I'm loving it!

But I've still not seen the whole quilt... so I won't show it to you yet, either! Here are the blocks, quilted.
Christmas Cactus....

A Cherry Wreath...

A Cornucopia of Flowers...

Crossed Flowers...

Four Pots of Flowers...

A Harp and Leaves...

Potted Tulips...

Two Flowers...

A Woven Basket...

And here, you can check out the corner swag.

And the Lemoyne Star cornerstones...

The backing is solid white... but you can see the colored thread on it. I had some reservations about that, but I figure it looks better than making white feathers on the red and green swags!

And so finally, thanks for your patience. HERE is BALTIMORE SQUARED!

My other Baltimore quilt, Simply Baltimore, used the same blocks (although I had to modify several of them to accommodate the change from an on-point block to a straight-set block. And guess what? I entered it in the Houston Livestock Show and Rodeo and it won Best of Show - Machine Quilted (they have two best-of-show quilts - one for machine quilted and one for hand quilted). Take a look - the rodeo has the best ribbons ever! I did not make it to the rodeo this year, so a friend sent me this picture. If I had taken the picture, I would have taken about 100 pictures!!! What makes me most happy is that this "win" gives a student in my Rodeo Committee area an $18000 scholarship. Now THAT is what I call winning!

And so you can compare it to Baltimore Squared, here is Simply Baltimore. The pattern for this one is available on my website - the pattern for Baltimore Squared should be done in a month or two. I'm short on time right now - every short - so it might take a bit longer, even.

Here's the original antique quilt; it was made in 1917 by Addie Heipler Allen. She lived in Pennsylvania. The original quilt measures 90 by 78 inches.

And here is my rendition of this quilt. You might notice a couple of things: I chose to put Lemoyne stars in each corner of the quilt, rather than three different stars and an ampersand (the "and" symbol). I had no idea of how much fabric this quilt would need and - literally - I finished the quilt with only a 4 by 6 inch square of the green fabric. Lucky me! My picture does not do the quilt justice -- the background is a nice "natural" fabric, not white, so it looks like an old quilt.

I chose to make "split" Lemoyne Star blocks - each diamond has a red and a green section. I think they look a bit grander like that. I'm working on this pattern, too... it should be ready in another month or two, also.

This picture shows the quilt and it obviously is not lying flat.. but by the time I finish quilting it, it will not only lie flat, it will be a perfect rectangle. I just have to square up the corners... and then "quilt out" the ruffles and flares in the inner part of the quilt.
That's all for now... I am running as fast as I can this month, as I'm on travel much of the time. But look for me again on May 1!
Happy quilting to all -
Sue
(c)2015 Susan H. Garman


I love hand quilting and your quilts I also like that when you machine quilt a quilt you really choose your design and do it to look like it would if you hand quilted it. The binding tutorial looks very easy to follow - I'm sure plenty will like it.
ReplyDeleteYour Baltimore quilts are beautiful! I have a question about your machine quilting the cross hatching behind the applique block. Do you start and stop the quilting at the appliqués or travel in the ditch around the applique where possible (like at the berries)? Thank you for another very informative post!
ReplyDeleteHi Cheri - you've asked a great question. I do a LOT of back tracking when I cross hatch quilt on an applique block. If I didn't, my up/down switch would surely burn out!
DeleteSue Garman
Thanks for all the eye candy this morning! I too am curious as to how you accomplish all that cross-hatching around your applique. Your feathers are beautiful--I'm so inspired, I may be brave and give them a try!
ReplyDeleteJust as a bit more information, I start my cross hatching by going diagonally from corner to corner of a block. Then I just stitch the next "line" 3/4 or 1 inch or whatever width I want between the lines, going out from the center. On the Baltimore Squared quilt, I tried something new, though - I pre-marked the lines instead of just using my ruler as my guide. I used a mechanical pencil and a VERY light hand, making the line barely visible. If the pencil line appeared more than visible (ie, not real light), I used my Mars Staedtler white plastic eraser (at Staples or Office Depot) to erase it a bit. It's a perfect pencil/fabric eraser. In this way, I could start my cross-hatch quilting wherever I wanted, and move around the blocks a bit more easily. I think I'll do that all the time, now.
DeleteThank you for the wonderful post. I learned so much by reading it. I can't wait to try your binding technique. All the pictures are beautiful but I love applique so yours were my favorite. Can't wait for the Alphabet quilt pattern.
ReplyDeleteThanks for another super and inspirational post!
ReplyDeleteThanks, Wendy -- you have a great blog, I see!!!
DeleteSue
Thank you for your amazing tutorial on binding! Where did you get your wavy template for your feathers? Would love one! You are by far the most generous, gifted teacher in the quilting community. I'm always in awe of your work.
ReplyDeleteHi Sandra -
DeleteThe wavy template was made by a guy named Rob who lived in Brazoria (TX). He has been out of business for a few years now, but I think you can find wavy templates from a variety of other template vendors -- Quilters Rule, Gadget Girls, etc. Just do a search on wavy quilt templates....
Sue Garman
I have such envy for the work you do and all of it you get done. I am sure I am not as dedicated to my quilts as you are. They are beautiful. I enjoy your posts. Thank you. Chris
ReplyDeleteWhat a great post, sharing the quilts from the show, all your quilts, and especially your tips and tutorials. As always your talent is something I can only aspire too. I've just started making another Star for a New Day for my aunt. This one will be 104 x 104 and will be machine quilted using my Juki. This will be the largest quilt I've made. Hope you have a great month creating what to love.
ReplyDeleteThanks, Virginia - everyone's comments continue to inspire me to keep on writing and sharing. Best wishes on quilting that 104 x 104" quilt - I have quilted one and ONLY one king-size quilt. I learned very quickly that a 70 x 90" quilt is 60% of the size of a 104 x 104" quilt and have never made another quilt that big since!
DeleteSue
I always enjoy your tutorials and learn so much from them. Thank you for generously taking the time to develop your posts!
ReplyDeleteThanks, Mary. I guess I'm a born teacher. That's the problem with perfectionists like me... I think we want everyone to do better when they can (and secretly, I want everyone to love quilting as much as I do!).
DeleteSue Garman
LOL - this wasn't a blog post, but a blog book! So much to see, so much to enjoy. I bind my quilts as you do However, How do I not to stitch through to the front of the quilt when you stitch your binding in place with the blind hem stitch?? Right now I sew the binding to the back bring it foward and press it and then stitch it down with a straight stitch. I'd so like to know how you use the blind hem stitch. Back to reading the rest of this wonderful post. Thanks so much for the quilt show photos - all beautiful quilts.
ReplyDeleteIf you've stitched your binding down and managed to dive your thread through the quilt top, as I have many times... you become much more aware of your stitches. Just be sure that your needle doesn't come through to the front when you are blind-stitching your binding to the back of the quilt. It takes some practice - keep your finger underneath (on the quilt top) and if you dare feel the needle... your thread is going to show on the quilt top! When you stitch your binding, the stitch only needs to be attached to the quilt backing, nothing else!
DeleteSue Garman
Always an inspiration here and thank you for the clearest directions that I've ever seen in regards to binding! :) I have it bookmarked :)
ReplyDeleteThank you so much for the wonderful "quilt show", including your comments and detail shots. I thought I had seen all of the quilts at the show, but you photographed some that I must have missed. I really enjoyed seeing them and reading about their creation! (I know how much work goes into creating this kind of post.) Your own quilting is spectacular as well, and your Baltimore quilt is gorgeous. Thanks for sharing your process.
ReplyDeleteHoly Christmas, Sue! How I wish I could take a feather class from you! Your quilting is so over the top spectacularly phenomenal. I don't have enough superlatives to describe it.
ReplyDeleteI love your Baltimore Squared-I am going to have to make it. No ifs, ands or buts about it.
Thank you for a beautiful and informative post this month. The quilts are always wonderful examples of the craft. This month your tutorial on making and applying a binding was just what I needed. I was two days from finishing the hand-quilting on a special quilt for a friend. The binding instructions are clear and concise. The photos are a great help. The only problem I had was with Step 23 where we join the two ends. But you cautioned us about this, so before I sewed the ends together, I pinned them to make sure my binding would lie flat. My binding is the best I have ever done. It is even all around on the front and back; the corners are nice and square; and the binding is full of batting. I cut my strips 1 7/8 inches wide. What a difference this made! Thank you again.
ReplyDeleteWow - Thanks for your note, Maxine - you put a smile on my face this morning!
ReplyDeleteSue Garman