Last month, I mentioned at the end of my extra-long two-part blog, that one of my block designs, Target Practice, made it into Quiltmaker's 100 BLOCKS magazine. This issue will be on sale on May 6 in your local quilt shops and other places with magazine sales. Whee! It's so SO exciting to see one's work in print! If you would like a complementary copy of the magazine, courtesy of Quiltmaker, be the TENTH person to leave a comment here. In addition, to celebrate having my block in the magazine, I am going to give away five more copies of the magazine - which has a wealth of ideas for your next block or quilt in it. How do you become a candidate for one of my copies of the magazine? Simple! By May 15th, leave me a comment or send me an email with your idea for what you'd like to see me design sometime in the future. You don't have to be detailed in your description (in fact, it is probably better if you aren't!). It can be as simple as, "another Baltimore album quilt" or "something with tiny pieces" or "a quick and easy quilt" or "a Christmas quilt with Santas." You get the idea. Your thoughts always make me think of new things that otherwise escape me... so I'd appreciate hearing what you have to say to me! I'll take all of the inputs, number them, and draw five random numbers from the inputs... then I'll ask you for your address and you'll have a new magazine full of amazing 12-inch block designs in it! Whether you are the tenth commenter (for Quiltmaker's free issue) or one of the people leaving a comment for me, please make sure that your profile has your email address in it (or another way for me to contact you) so I can get the mailing information I need. I will need the tenth commenter to send me their contact info by May 5th. In advance: thank you!!!

In addition to my block being in the magazine, a set of the block designers have been included in a Blog Tour. What is a blog tour? Well... click on the link at the end of this blog and it will take you to a new list of designers each day... including THIS blog (on April 30th)! You'll see some fantastic blogs full of ideas and inspiration. Get your cup of coffee or your glass of water ready for a relaxing afternoon...

But wait... don't you wonder what the block I designed looked like?? Of course you do (I'm guessing). So here it is; I call it "Target Practice." It's a simple block to applique and I like that the design seems to sparkle with all those little circles. After I made the block, I was ready to make a whole lot more... as soon as I designed a quilt for them.

There are lots of ways you can use this block -- just put it in a sampler of red/green blocks, make a set of twelve blocks with sashing and add a border for a bed-sized quilt... or use a software program like Electric Quilt to make up any one of dozens and dozens of options. I played a bit... and here are two options I came up with. In this one, below, I used nine blocks, added what could easily be a double border of flying geese, and a floater and wide outer border to frame it all.

Here is another idea I came up with in playing around -- I used Orange Peal blocks around four Target Practice blocks set on point - then added an Irish Chain border, and a few more borders for good measure. I know, I know... why do I have to make things so complicated? Well... because intricacy is eye candy to me - it keeps my attention, and I hope it keeps yours, too.

When I started to really make my own quilt using the Target Practice block, I had been wanting to make another quilt with cheddar-colored fabrics in it. I decided that I'd make a cheddar and blue Target Practice block. You saw it back in my January blog, but here's a refresher.

And here are nine of the blocks. You all know that I love scrappy quilts, so there are lots of different blue shirtings for the background fabric, and lots of different cheddar and blue fabrics.

Once I got all of the blocks made, it was a matter of deciding how to set them. Having named the block "Target Practice" sort of made the sashings and cornerstone designs simple: plain sashings and a little target design for the cornerstone.

So, how do I make all those circles in each block? I start by stacking fabric and cutting circles from the fabric, and storing them all in a ziplock bag.

Next, I use mylar templates and make those circles into berries, leaving the threads attached. I put them in ziplock bags after they are made, leaving the tails to hang out of the bag.

Once I get all of my circles made, I separate them into bags... one bag for each block. By doing this ahead of time, I don't have to spend time deciding which circles go onto which block when I'm ready to stitch them in place.

You may have noticed that some of those bags have just a few circles in them... and some of them have a LOT of circles in them. What's the difference? The ones with a lot of circles in them are going to be used in a long border, inspired by the antique quilt pictured below. I saw this photo several years ago and have saved it because I fell in love with the quilt... because of the border lines made of little circles. I had never seen or thought about using this concept before... and I've been waiting for the perfect moment and the perfect quilt to use it in; it is so unique!

So that border became the germ of an idea that grew... and I decided that my Target Practice quilt would be the quilt that finally had a circle border in it. First, I had to design the area where the circle border would fit. I came up with this border - mimicking the zig zags in the Target Practice block.

Once the borders were appliqued, it was time to add the circles. This became SO much fun for me. The circles were all made - it was just a matter of stitching them in place.

After I got all four borders made, I had to cut them to fit. I always make my borders oversized and then cut them down to size. But how do you cut a 50-1/2 inch long border when you don't have a 50-1/2 inch ruler? Easy. Get out the old reliable metal measuring tape. Lay your border on a table. Butt your regular quilting rulers up, end to end, and then use the long tape to double-check the length... then take another ruler and line it up along the cutting line at the end of each border. Hold your breath, measure once more before opening up the rotary cutter, and cut! It's the old measure twice, cut once rule. What a pity if I cut it too short! But I didn't. An hour later, I had four 7-inch by 50-1/2 inch borders. But how did I cut the 7-inch wide part of the border when I don't have a 7-inch wide ruler? I line up two rulers whose sum is correct -- in this case, a 3-inch wide and a 4-inch wide ruler served as my 7-inch wide ruler. Using those rulers together (as shown below), I carefully cut the width of the border. You have to be careful not to let your rulers slip and slide across the width or length of the border... and once I've cut one part of the border, I carefully do slide the rulers, one at a time, sliding them against each other, further down the length of the border. It's not a difficult process, but I do have to pay attention!

So here are my borders, sitting around the quilt center. You'll note that I was still auditioning what the results would be like, before I even finished the fourth border (it isn't fully appliqued and has no circles on it yet). I like to make sure, before I progress too far, that I am going to be happy with the results. Yes, I liked how these were looking.

But I felt like I needed something to separate the zig zag borders from the quilt center. I knew I could "afford" an inch floater between the zig zags and the quilt center. I could have used one fabric, two fabrics, a strip of pieced squares, or a variety of other options, but I chose to make a floater strip using what would end up being a set of three strips: a 3/8-inch blue, a 1/4-inch cheddar, and a 3/8-inch blue strip (finished sizes), totaling one inch. Here was my test sample:

So how do you stitch such narrow little strips and have them remain straight and even? The key is to have a quarter-inch foot on your machine. First, I stitched the cheddar to a blue strip. To make it all come out straight and even, I just have to keep the edge of that quarter-inch foot against the edge of those two carefully aligned strips, as shown below.

Next comes a careful pressing -- keeping the seam allowances folded toward the wider fabric (the blue). If I had pressed the cheddar seam allowance back onto itself, it would have made it very difficult to stitch the next blue piece to it.

Next, I wanted to add the second blue strip. I put it face up beneath the cheddar strip, aligned the edges tightly together.... and here's the key to keeping that quarter-inch wide strip of cheddar straight and even. Despite all best attempts to keep stitching lines straight and even, I suspect that none of us are perfect. We all need a little help at some point. Right now, when stitching this, I want, more than anything, for the second stitch line on that cheddar strip to be exactly 1/4-inch from the first stitch line. How do I do that? I line up the LEFT side of my quarter-inch foot against the FIRST stitch line -- I do NOT line up the right side of my quarter-inch foot against the edge of the two strips, as I tend to see a little wobble there sometimes. Using the first stitch line as my guide ensures that the width of the cheddar strip, when stitched, is an even and straight one-quarter inch.

Finally... press the seam allowance toward the blue, being careful to press the fold over completely.

In the picture below, I've added the floaters to the inside and outside of the zig-zag borders, after inserting cornerstones at the corners. I am loving how this is turning out at this point! You'll notice, by the way, that this quilt is not on any quilt wall. I could only wish that I had a big quilt wall to view my work on, but I don't have any big open walls that are "free." My walls are full of windows, furniture, and artwork. I am happy to live without a design wall; I have a big design floor, instead, and it works just fine for me. We all have to work with what we have available, don't we?!

Here is a close-up of the cornerstone in this border; these are just replications of the center of the Target Practice block.

Is the quilt done yet? No, not by a long shot! I knew from the beginning that I wanted half-blocks to encircle the quilt. Here's the first set of those half-blocks. I have the others all ready to stitch in place... but I haven't made the cornerstones for this border yet, so you'll have to wait a bit before this quilt gets finished. Silly me, though - I accidentally made thirty half-blocks. What was I thinking? I only need twenty-five! I'd probably have finished the quilt by now if I'd counted right. Instead, you may see a mini-Target Practice at a later date. Ha!

* * *
You know I never work on one project at a time, so what else have I been working on? A friend of mine made a Borrowed Roses quilt; mine is shown below. It's based on a quilt designed and made by Rose Kretsinger in the 1930s. Rose was a prolific designer who made her first quilt when she was forty years old; she did it as a form of therapy while grieving over the loss of her mother. When she made her own "New Rose Tree Quilt," she not only designed the applique motifs... she designed the quilting motifs. Friends of mine were able to visit the museum with Rose's quilt in it, and took pictures of the quilting in her quilt - and my quilt replicates Rose's quilt design, as seen below. 
Okay, but what have I been working on? That quilt is three years old! Well, a friend of mine used my pattern and made the same quilt. She asked me if we could collaborate and if I would quilt her quilt for her. Sharon is a good friend, so how could I say no? So here are some photos of Sharon's quilt, quilted by me. I start by quilting in the ditch around all of the applique, then I go back and quilt all of the feathered vines and shells, while adding piano keys (straight lines) in the borders. My quilt, above, had cross-hatching in the borders, but Sharon's is a little different. I like the piano keys!

More feathers...

More feathers... you might ask how I mark these feathers. I only mark the spine, using a simple mechanical pencil with a very light hand. The rest of the feather quilting is done free-hand.

Finally, I reach the other end of the quilt and I'm ready to start filling in the open background areas with cross-hatching.

Here is the cross-hatching... it is such a beautiful filler in any quilt. Many longarm quilters do not like to do cross-hatching because it involves a lot of starts and stops, but my thought is: why not do what looks best?

More cross-hatching... (I never seem to get tired of looking at quilting!)

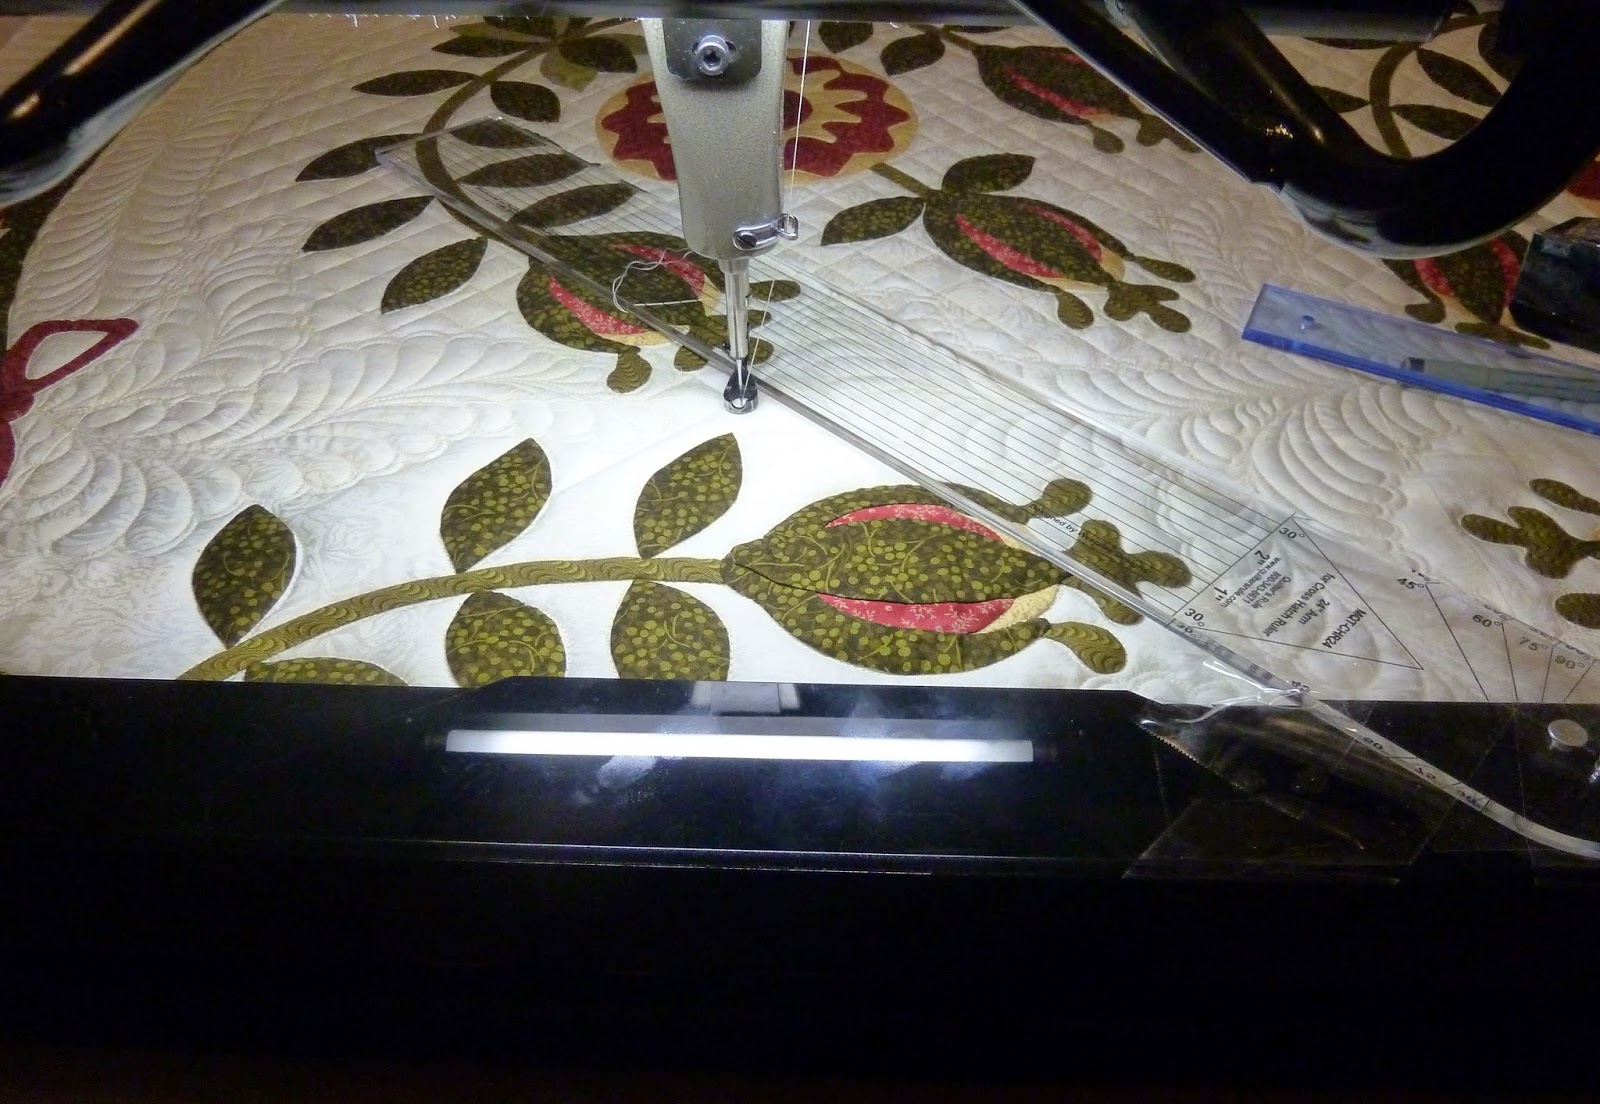
And a last look at the cross-hatching. But how do I do all that cross-hatching? Painter's tape? I use painter's tape to do my cross-hatching with hand-quilting, but it's a messy job if you stitch across painter's tape with a longarm machine.

I use a special ruler that has lots of quarter-inch lines on it; I use those lines to line up each new line as I quilt it. The ruler "fits" against the "belly bar" on my longarm, and the ruler is held at a semi-permanent 45-degree angle. Sweet!

Here's a picture of the whole ruler (below). It actually can be adjusted to different angles than 45 degrees, but I keep it taped to a permanent 45 degree angle. It makes it easy to do all that cross-hatching because the bottom part of the unit is straight (that's the black part at the bottom) and wraps around and against the pole (mostly referred to as the "belly bar") on my longarm. I can just slide that whole ruler along the pole as I quilt each cross-hatching line. The ruler is made by Quilters Rule (www.quiltersrule.com - and no, I don't have any association with them; I just like their products and I know somebody will ask me who makes it). I actually spoiled myself and bought two of them -- one that I have set for the right-facing lines and one that I have set for the left-facing lines. That way, I don't have to keep unscrewing the arm on the ruler. It makes life a lot easier when doing cross-hatching. This quilt is still on my longarm, as I have finished only half of the cross-hatching. You'll see the finished quilt in another post in the future.
As an aside, there is an old, old book called The Patchwork Quilt in America that has a picture of Rose Kretsinger's Rose Tree Urn quilt. I actually used this picture when I was quilting Sharon's quilt, to verify how the original quilt was quilted - Sharon wanted me to use the same design in her quilt. I had forgotten about some other quilts in that book that inspired me...

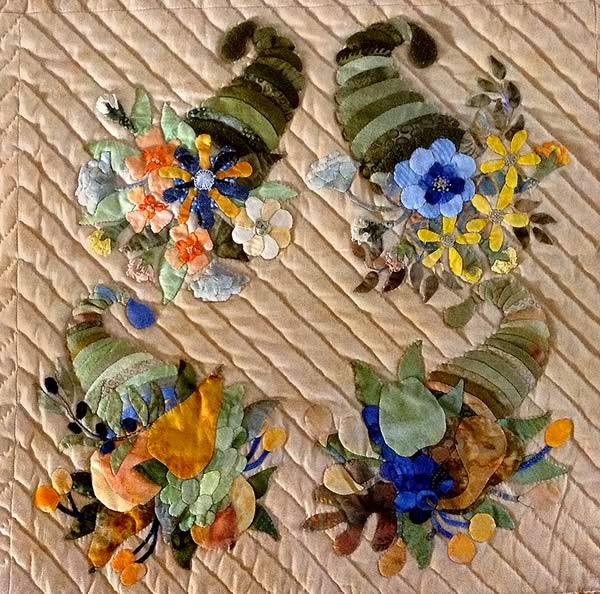
Here's a great one by Rose, which was based on a quilt by Marie Webster:

And here's another great quilt in that book. Many of us have seen this quilt pattern in other quilts and books (notably the Ford collection).

There is even a picture of the quilt on a bed, way back when...

And here's another delicate quilt - what an intricate border! See... old quilts are often my inspiration because if I find they are still pretty today, they have stood the test of time.

I found this to be an interesting alternative layout for the Rose Tree Urn block. Do you think it might be possible that someone just cut this quilt in half? It seems that the border just sort of... stops!

This interesting old book also has a picture of the Rose Tree Urn block... and plenty of other blocks, too. It's almost like a primitive version of Barbara Brackman's wonderful Encyclopedia of Pieced Quilt Patterns. Barbara's book is a real resource to me when I start designing new quilts, by the way.

* * *
Last month I showed some of the quilts that were being worked on at my guild's annual spring retreat. I neglected to show this quilt, where one of the gals "threw together" a set of old blocks. She was in the process of binding this quilt.

What was interesting is what was on the back of the quilt. She used a bunch of other leftover blocks to make the back of the quilt - making it a two-sided quilt. Of course, I have to giggle a bit: aren't all quilts two-sided quilts? I guess so. But I like showing this quilt so we can all see how to use orphan blocks in our work... and how to empty out our cupboards and closets of unfinished projects more quickly. I certainly need to do that.

Becky showed us another quilt while at the retreat - one in which she used many of her plaids and homespuns - stitching strips together, then slicing them apart, then stitching the sewn strips together to make this wonderful quilt.

It is a very bright quilt - something I don't think we expect out of plaids and homespuns - but if you throw a few cheddars, purples, and rich blues into a quilt, it easily becomes a rich-looking quilt.

Becky cracked us all up, though. She claims she dressed to match her quilt. Well... maybe! Who would have guessed that plaid deck shoes would fit in here?!

Becky was also working on finishing up another quilt. She had just gotten this one back from the quilter, Cynthia Clark, and was ready to trim it to size and start binding it.

I believe that Becky was very wise in not putting the vertical strip of blocks with black setting triangles in the center of the quilt; it would have divided the quilt in half. Good choice! Here is a close-up of some of the blocks in this quilt. Becky's setting triangles are all scrappy - and make the quilt very colorful.


And another close-up of the quilting. So simple, so fitting!

In the past month, Jerrianne finished assembling most of her quilt top. This is what she had put together at last year's Spring retreat:

She took all of those blocks home, layering them so she would know in what order to stitch them together... and finally stitched them together, with setting triangles of a modified fleur-de-lis in a black print. I love it!

Here's a close-up of some of those blocks.

And another. I love her use of scrappy black white/off-white shirtings for the background of each block. It makes your eye dance across the face of the quilt.

When it came to the corners... Jerrianne had to figure out what to put in the setting triangle. A fleur-de-lis would not fit. She decided on a simple circle. Below, you can see the triangle just lying in place, not trimmed or stitched yet.

So what is a good way to put a triangle like that in place and make sure it is the right size? Jerrianne developed her own little tool. She traced the planned triangle unit onto vinyl, using a Sharpie marker. You can see that she planned "extra fabric" on the outer edge of the triangle. I'm like Jerrianne - I like to "reverse engineer" some blocks and borders. That is, I cut them larger or longer and then trim them to size after I know how big or small I need them to be. Yes, I know people complain about those of us who just stitch a border onto a quilt and whack off the excess fabric. But if it works... what's the problem?!

Below, you can see how Jerrianne used the same method to mark the side-setting triangles... and then when she was ready to cut them, she taped her vinyl overlay to her ruler. She could then place the ruler with its overlay on top of the side-setting triangle and trim the inner triangle sides to size before stitching them in place. Genius!

Jerrianne and I like working together. A few years ago, she showed me a picture of a Tulip Pots block - about 2 inches square - in the book, Carrie Hall Blocks. She asked me if I could draw it up to put in a Barbara Brackman-designed quilt she was making - she had made a few other changes to the design and wanted this large block (over 20" in size) in the middle of it.

I drew it up.... and here is what it looked like when stitched.

Jerrianne's finished quilt, with her block in it, is below. What a nice touch! The photo below was taken by Jim Evans, an expert quilt photographer (and Jerrianne's husband).

* * *
What else have I been doing this month? I did a couple of lectures but then I had the joy of going to Waxahachie, Texas (just southwest of Dallas) to do two workshops. I was the guest of Denice of Common Threads Quilting. I'd always heard raves about her shop, as they focus on Civil War era reproduction fabric, along with 1930s and turn-of-the-century reproduction fabrics. They have oodles of the most gorgeous quilts and kits and patterns there - it's a sort of heaven for quilters like me!

The shop is spacious and has an endless line of fabrics... fun, fun, fun (translation: money, money, money! But what's a girl to do? Spend it, of course!). Their staff is first-rate - always friendly and always helpful. And always busy!

Denice showed me how they had taken my Happy Daze quilt pattern and made it using Christmas fabrics. It was glorious.

On their display bed, they had one of the prettiest quilts I've seen in a long time. Of course, I'm fond of reds and greens - and a touch of black sparks it all up even more. You can get a pattern and kit for this by visiting their shop online at www.commonthreadsquilting.com.

The walls were full of quilts, too - beautifully quilted. It was an inspiring visit to the shop before I was off to teach the workshops.

* * *
This month, I also had the pleasure of going on a quilt studio tour. This is the second bi-annual studio tour our guild has sponsored -- they have quickly become something we all look forward to seeing. What, exactly, is a quilt studio tour? It's a simple and easy fundraiser for our guild. We get six quilters to agree to open up their homes to everyone so we can all see what their studio looks like, how they work, how they use quilts in their homes.... it's a wonderful insight into how different we all are! Today, you all get to go on part of the tour. I did not have my camera for the first three houses (sorry!), so you will only get to see three of the six studios.
First, Cynthia Williford opened her home. She is a very accomplished quilter whose life history is reflected in her work. As we approached her home, we were greeted with balloons and a sign. Obviously, fun is ahead!

In the entry, she has a beautiful small wall quilt.

Walking through the entry, one enters her living room with a magnificent Broken Star quilt over the fireplace. You see the violin on the mantel.... Cynthia and her family love music. They have no television in their home - just music. It is part of Cynthia's having been raised in Europe.

Cynthia is an ace when it comes to using subtle, muted colors... and exquisite embellishment. Here you can see how she added a lace star to the bottom of the quilt.

And a bit more lace at the diamond intersections.

Her beautiful Baltimore album quilt, Une Belle Amitie, was lying on top of the grand piano. It's beauty and her attention to detail are unsurpassed. She made it, based on an old album quilt, with her young son drawing the patterns for her in a revivalist adaptation.

Here is her own photo of the above block -- a much better rendition of her work than mine, for sure.
Une Belle Amitie draped softly off of the piano; it was impossible to capture the quilt in its entirety. After you've read my blog, take a moment to check out her website at www.cynthiawilliford.com. You'll be able to see many of the embellishment details within each block.
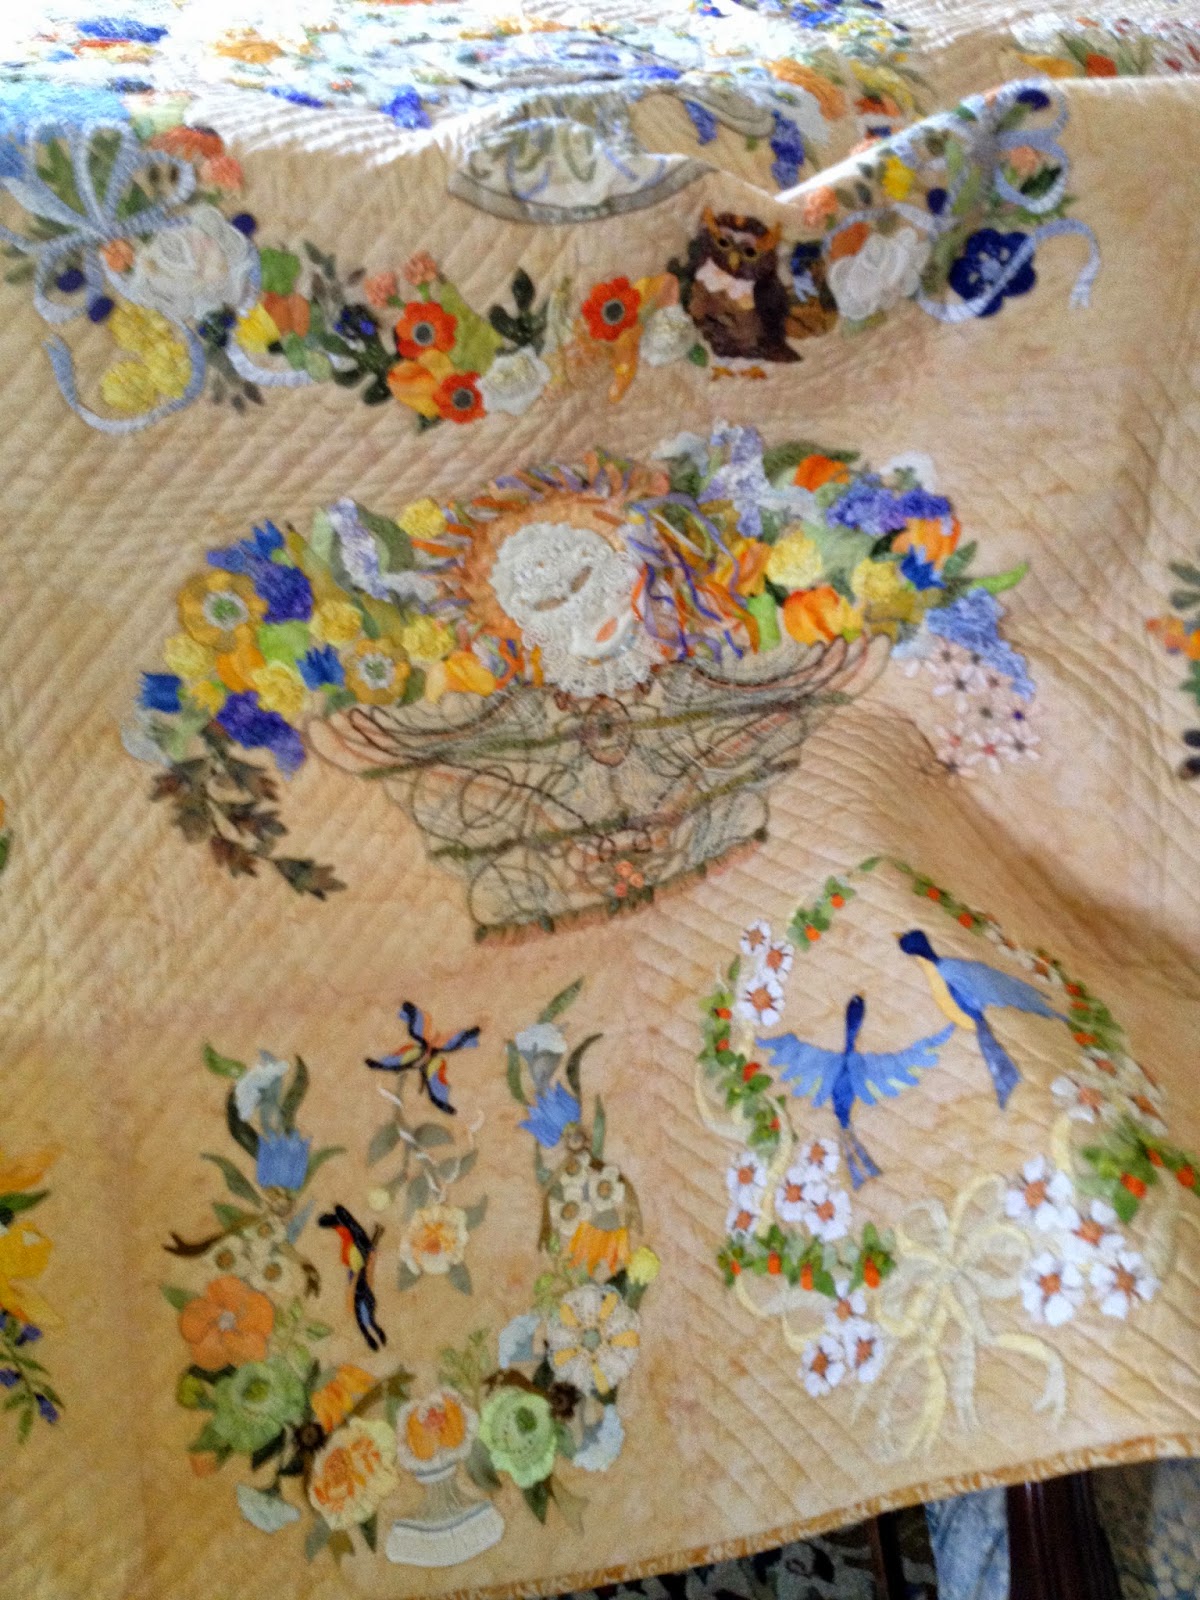
Here is a close-up of the block you see in the side of the quilt above - again, from Cynthia's website.

But back to the quilt studio tour. Near the piano was a large, comfortable sofa. A quilt was hung across the back of the sofa -- but the sofa, itself, was upholstered in a quilt! The coloration of it all was incredible.

Here is a close-up of the seat cushion on the sofa. I have never see such an unusual sofa in my life; it was stunning.

Adjacent to the living room was Cynthia's family room - which is also her quilt studio. Cynthia's set-up is very unusual. She does not have the classic "sewing room" that most of us have. Her sewing area is incorporated into her living area. There is no clutter, no tangle of notions and fabric and tools and whatnots that most of us have; it was an eye-opener to see such simplicity in design.

Here's another view of her sewing area.

On the desk, in the corner, are many of the embellished items Cynthia has created. They were so very pretty.

Across the room was another sofa where Cynthia does much of her stitching, in front of a pass-through to the kitchen.

Beside the sofa was a small table; Cynthia keeps her patterns in the drawers. It is a clever disguise.

And in the hallway to her bedroom are a stack of boxes - full of her embellishments: beads, lace, and more. Again, a subtle disguise that hides the clutter most of us have in stacks of plastic bins and ziplock bags.

Cynthia's bedroom had a very soothing look to it - how could one not relax in this room?

She has pillows on her bed - embellished in her inimitable style.

Here was my favorite:

Would you guess that this woman of the arts has five children? And that all of them are sons?!!

This beauty was in a hallway being repainted... with the "W" in the center.

Moving through the kitchen left no doubt that quilting and stitchery are ingrained in Cynthia's soul.

Cynthia used her dining room to show some of her small quilts.

Take a look at the gorgeous embellishment on this piece. Cynthia has a knack for detail where it really counts, with ribbon, lace, stitching, and design.

These sweet silk ribbon roses are showcased in this block.

And this lovely piece even has Cynthia's baby shoes on it.

The quilt on the wall in the dining room was, for me, a study in techniques.

Take a look at some of the details in this quilt -- woven ribbons...

...cutwork and lace...

... and more.


This petite woman is just a delight and a dear friend to all; I was sorry when we had to leave her house to go on to the next studio, though more beauty awaited.

At Lecia's home, her sewing room was a study in organization; everything had a place and was in it. I can't decide if I have too many things (though I wouldn't know what to remove) or too few places to put them (though I wouldn't know where to put more); maybe I need a warehouse? The top of Lecia's stairs was a gallery of quilts hanging over all the railings. She has many of her own, as well as some unusual antique quilts.
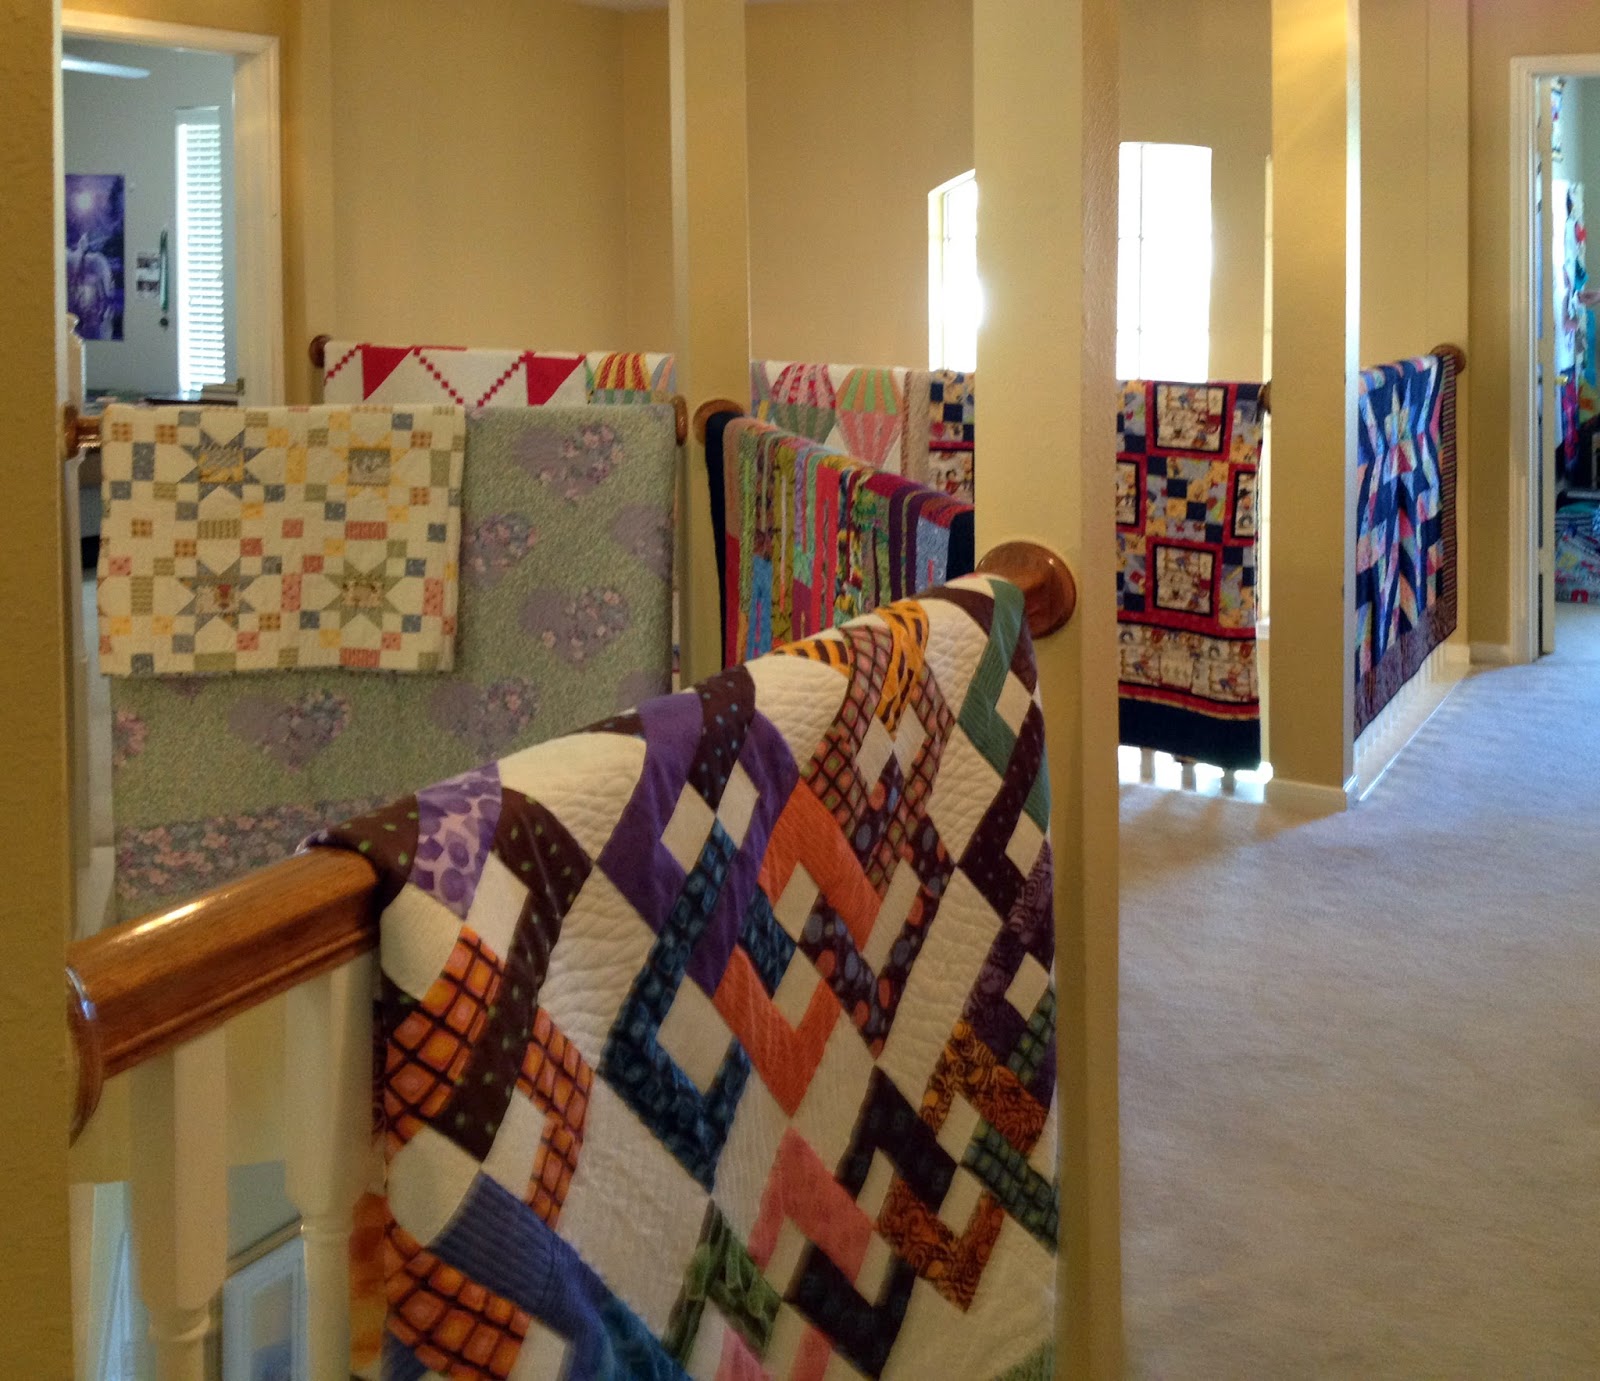
This vintage quilt was made of cute little scotty terrier blocks - done in feed sacks.

Here's a close-up of one of the dogs.

At Maurita's house, we had a real treat! She lives beside our local lake -- giving her a beautiful view as she sews. Because we live where hurricanes often bring in very high tides, we are not allowed to build permanent housing below the 16-foot level -- so Maurita uses the ground-level "basement" of her house as a huge sewing hall for her bee. They meet there every other week and have a set of tables set up with lighting, chairs, and more for each of the bee members. One whole wall is a design wall. There is a dining area... a small kitchen... and more. Oh my, but don't we wish we could all have something like this? You can't see it, but behind me sits a wall of windows that face onto a sky-blue pool and the sparkling waters of Clear Lake.

While touring, the bee members supplied us with treats -- all done with the "bee" theme of yellow and black. It was so cute and sooooo fun!

Everyone in the bee has their own seat where they keep their own machine and supplies. I am in awe of their good fortune to have such a delightful place to meet and work!

Here, you can see the length of the table with everyone having plenty of room to work.

Could it get any better? Well, I'm not sure -- the studio homes were all so wonderful. Our next treat came in the form of Sherry's home. We passed through the entry into her living room - with its grand piano where Charlie plays every morning - and where a striking quilt is the focal point of the room. I believe that one of the easiest ways to bring a warm feel to a room is to hang a quilt on the wall; it is such a good decorative touch.

Going up the staircase, we looked down at some quilts... and up at others.

Sherry's sewing room was immaculate. I could only wish that I were this organized! Here is her cutting area, with rulers at hand and plenty of storage above and below.

Here is her pressing area - again, with storage above and below.

The corner of the room had a pleasant set of sewing items -- and wonderful outdoor lighting to keep the room bright and cheery.

Here is another corner of the room - Sherry has two design walls and a wonderful work table with her sewing machine on it.

In an adjacent room, a closet holds more stash...

And shelving holds even more.

Sherry keeps her favorite magazines in holders - making them easy to pull out and browse through.

I loved some of Sherry's sweet little dolls. Humpty Dumpty was a favorite...

...along with these two sweet dollies.

The upstairs entry had a big antique Ocean Waves quilt on the wall. Ocean Waves has never been a favorite quilt block of mine... but this quilt was very striking in its rich pinkish-salmon color.

Sherry had this little quilt on display... so sweet!

And this one was hanging on a wall in one of the upstairs rooms.

The second floor of the entry way had one of my favorite quilts - a red and white house quilt. Someday I hope to make one of these.

This bedroom was just the sweetest of rooms with its softly colored quilts on the bed and wall.

The pony at the foot of the bed was a delightful touch.

And the flowing curtains added to the softness of the room.

In the corner of the room was a loveseat with a sweet 1930s era quilt on it.

Back out in the upstairs entry way area was a cabinet with quilts in it. The one to the left caught my eye.

Perhaps it was the lone star block design, perhaps it was the set of soft colors, perhaps it was the triple-quilted Baptist fan quilting motif... but it sparked the notion that someday I'd like to make a quilt like this one, too. I need to live a very long time with all my "want-to-make" quilts. I hope that doesn't mean I have to start some intensive cardio program.

Another quilt over the rail in the upstairs entry way caught my eye - a beautiful vintage red and green quilt. Can you take your eyes off of them? I certainly can't.

And in an upstairs corner were yet more quilts. Oh my - such delights!

Everywhere I turned, there were quilts.

And I mean everywhere!

This bed had a great spread on it - along with soft pillows and dolls.

Here's one...

And this sweet piece was on the door of one of the rooms.

Another quilt did not escape my eye with that beautiful green that I love. It would be easy to make one like it; the blocks are just a nine-patch of four-patches.

The quilts, as I said, were everywhere -- even the office offered the comfort of a quilt.

And I think that's why we love quilting so much: quilts are a comfort, quilts are a social outlet, quilts are a community of friends, quilts are an artistic outlet, quilts are therapy and relaxation, quilts are fun, quilts are items of beauty, quilts are art, quilts are gifts of love for family, friends, and those in our community who have need of support. Quilts are a passion for most of us. What would we do without quilting? I'm not sure...
* * *
I want to thank everyone who sent me information about bleeding fabrics based on my last blog post. After taking everything into consideration and reading all about everyone's experience and answers... it is clear to me that the bottom line is some fabrics will never be colorfast. Period! We can wash them, boil them, soak them, treat them... and even though we think we have solved the problem, I repeat: some fabrics will never be colorfast. So what is one to do? Well... if we are going to wash a fabric in a machine or a tub where they will be well-rinsed when done, then perhaps the problem won't arise. But if, like me, you occasionally have the need to block a quilt - despite having pre-washed all the fabric - you run the risk of bleeding, particular with red, dark blue, and black fabrics. Not all of those colors of fabrics will continue to bleed - just the ones that will never be colorfast. So what is my solution? Continue to prewash all my fabric. And in the future, if I am working on a quilt that I don't ever want to have a problem with, I will likely test each fabric one more time with a damp white cloth to see if the dye will bleed onto it, before I use it. It's a pain in the patootie, but it could just save me a lot of heartache.
* * *
So... that's it for this month! Let me remind you once again: be the tenth person to make a comment and Quiltmaker will send you a copy of their 100 Blocks magazine. Leave a comment telling me what you would like me to design in the future... five of you will receive a copy of the magazine. And go out and buy the magazine when you see it on the shelves in your local quilt shop or neighborhood magazine rack. It's supposed to appear on May 6.

Don't forget to check out the blog tour -- you've just read one of the blogs (mine), but there are more. To see them, click on the link below when you're done here; Quiltmaker and the bloggers are giving away lots of fun prizes!!

And last but not least... check out what's new on my website, Come Quilt! Here's the link, below:

For those of you who are new to my blog... I generally post only once a month, on or about the first day. In my blogs, I hope that you are inspired and learn a little - and that you get excited about doing more quilting!
I may be wearing you out with these longer posts - but I hope you've enjoyed the time. Before I forget, in response to interest expressed in an earlier post (I DO listen to you!), I will use a future post to tell you how I use the Draw function Word to make many of my designs. It's easy to use and meets all of my needs.
Until next month, happy quilting!
Sue
(c)2014 Susan H. Garman


You're probably not going to like this, Sue, LOL, but I'd like to see what you could do with piecing rather than more applique. Something modern/contemporary. :):)
ReplyDeleteI am not the 10th person but I learn so much reading your blog. Thank-you for all the lessons. It took a whole cup of tea.
ReplyDeleteSo much information and so many beautiful pictures - as usual! I for one absolutely love your longer posts - I sit with my coffee and just totally immerse myself. As for what I'd love to see you work on next? It would be so interesting to see what you'd do with houses - appliqué? pieced? a combination of both? It takes a village :-)
ReplyDeleteLove your block and the quilt you made from it!
ReplyDeleteLove all your tips on how you make your blocks and borders!
ReplyDeleteYou are my hero - I do so love you quilts and your block. Your attention to detail is a wow.
ReplyDeleteI never tire of your long posts; I look forward to your ideas, photos and techniques that you share each month. Your quilts are amazing! Today's post is delightful--what lovely homes in the quilt tour.
ReplyDeleteI was going to suggest that I'd like to see a new quilt with blue in it, and as I scrolled down there it was...your blue and cheddar quilt!
Circles always catch my eye. I wonder about a quilt with all different circular designs in the blocks, either papercut designs or wreaths with leaves, grapes, roses, etc.
(Is it really possible that I'm the first to comment today? That surprises me :).
Thanks, again, for everything you share with us.
Wow. How about a quick & easy table runner.
ReplyDeleteI love your quilt...the quilting was beautiful. The ruler you have on your long asrm looks wonderful
ReplyDeleteLooks like I am the first to comment! What a BUSY, BUSY quilter you are! I LOVE your Target Practice block! All that hard work has produced a beautiful quilt! I don't see how you find the time, but I am sure glad you did! All your quilts are stunning, and I cannot wait to see more!!
ReplyDeleteGreat block and blog started following you love the pictures
ReplyDeletewhat a tour you have taken us on today! so many wonderful quilts to look at the process that you use for some thing as well. Thanks for taking the time.
ReplyDeleteLove the block stated following you
ReplyDeleteLove the block
ReplyDeleteI would love for you to design something using small scraps from all the leftovers we have. Something on the order of Afternoon delight. I love the target block in the orange peel/Irish chain setting--so rich. Also, I think I should get a copy of Volume 9 for being the 1st person to post (instead of #10). I think everyone is afraid they won't be #10 so they are not posting.
ReplyDeleteToo late to be the tenth person, but as usual, I really enjoyed reading your post. Gotta love seeing the process photos of your work and all the other photos.
ReplyDeleteOops, not number 10 but oh well! Love your block for Quiltmaker and love the blue and cheddar colors. I'm going to try it in red, white, and blue.
ReplyDeleteyour block is wonderful! thank you for sharing so many beautiful quilts - great way to start the day
ReplyDeleteI'd like to see another Monster quilt, maybe one where they are wearing trick or treat costumes.
ReplyDeleteI'm in awe of these women who opened their homes to show their work space and their quilts - Every thing is in it's place! No clutter!! It is amazing!
ReplyDeleteTarget Practice is a wonderful block. When I saw it I admit that I was thinking pillow only. Then you showed the possibilities as a quilt. I am particularly taken with the quilt using the orange peel design.
You asked for ideas for a new quilt - I'd love to see what you would design for a quilt with a steampunk theme.
Please don't worry about the length of the post. Every word is interesting to read. Thank you for sharing your doings with us.
Kim
I started reading your blog post very late or should I say very early this morning. I dreamed of quilts and such lovely quilts they were. As what I would love for a design, even though I don't like square quilts I would love to see another medallion quilt with the center begin applique with scrappy pieced blocks for the all the borders. If you could also show different design options to make it a rectangular quilt. I still get intimidated with applique especially hand stitching all those pieces. I've experimented with starch and machine stitching but I need more practice. I'm more comfortable with pieced blocks.
ReplyDeleteAs always your monthly blog posts are my favorite. Thanks for keeping me inspired to try new things and to keep learning. Have a great month.
I love the block and would love to see more like it! Thanks for the awesome eye candy today! I would like to see your take on a quilt along the lines of a Mrs. Billings or something similar.
ReplyDeleteI'd love to see something that is EPP'd, and a little different from the usual Grandmother's flower gardens or those diamond-shaped things. :)
ReplyDeleteThank you for sharing this with us. I love the organized manner in which you make and store your circles. Thanks for the chance.
ReplyDeleteDebi Horne
debihorne54@yahoo.com
Very eye appealing and intriguing Quiltmaker block entry. Maybe an angel designed block would be on interest to quilters.
ReplyDeleteHi Sue,
ReplyDeleteLike many others that religiously follow you, I love your blog. it is such an inspiration to me. I have a finished Afternoon Delight top waiting to be quilted. I love it. Your Target Practice block reminds me of blocks in this quilt and I would love if you would take some of the other blocks in Afternoon Delight and "expand" them into new blocks and quilts. It was such a fun quilt to make. Thank you so much for the pattern. Congratulations on making it into the magazine.
Best Wishes
Mary
I really love the cheddar and blue target blocks. One of my goals for this year is to do some applique and your block is just luscious to my way of thinking to learn a new technique. You can make anything. poladydwd at yahoo dot com
ReplyDeleteHow about mariners compass or/and stars.
ReplyDelete24Tangent@gmail.com
I love your blog. You are quilts are such an inspiration to me; thanks for sharing your work.
ReplyDeleteLove the little dots -but I'd like to see more detail about how you stitched them down. I've done something similar with yo-yo's and stitched all around - but they didn't lay nicely. Hard to see just how you are connecting them. Tips on sewing little circles would be appreciated more than new designs.
ReplyDeleteWow, beautiful work. The quilting is amazing. I'd like to see you design some placemats. Mine are worn out - it's time for new ones.
ReplyDeleteI love all of your patterns, but I tend to like the less formal more whimsical ones best. I love the summer joy and shivery snowmen, how about something along those lines for spring....
ReplyDeleteI recent met you at the Lakeview Quilt Guild retreat in Houston, which was my first time attending this retreat. You were sitting at the table behind me and every time someone called Sue...I'd turn around. You were very popular at that retreat and I now understand why! You are 'that' Sue Garman! LOL I'm not a hand stitcher, so can offer no ideas, but I love looking at them. How about machine stitched applique?
ReplyDeleteI think it'd be cute to have several different variations of this Target Practice Block. I mean, they would be different and yet look similar. Don't know how to explain any better. Thank you for a chance to win!
ReplyDeleteThat was a lot of eye candy, love seeing your block and the variations you made and love the ric rac border. I also enjoyed seeing what you are working on and the home tour.
ReplyDeleteDebbie
It's brilliant that you used blue and orange for your Target Practice block - not a combination that most lean toward but it works beautifully with your block! Lovely!
ReplyDeleteI would like to see some piecing. Modern piecing!
ReplyDeleteThat block would be beautiful in solids and made HUGE! Or perhaps in a few different sizes and colors scattered across the quilt top. Your post was very detailed - always a plus! Thanks for the opportunity - notwendy gmail
ReplyDeleteIt is realy long blog post with so many nice pictures and stories. Thank you for it. I love to see interesting border.
ReplyDeleteGreat post.....very informative......would love to see applique designs suitable for baby and toddler quilts.
ReplyDeleteBarb
spurr@mts.net
Wow! You are certainly one busy lady. Thanks for sharing your quilts and process with us. All of your quilts were beautiful. I would love to see what you would do with the Dresden Plate block,
ReplyDeleteI would like a wall quilt size with applique and piecing.
ReplyDeleteWow your tour was wonderful-I love combination quilts-applique and pieced. I have done a few simple ones but need to learn more! Thanks.
ReplyDeleteLove all the home decorating ideas. Nice Block
ReplyDeleteGreat block and information. Loved the pictures of the tour. Wishing all who read this a wonderful day.
ReplyDeleteWow, that's a lot of information in one blog post. Thanks for sharing your techniques and the for giving the studio tour. I never get tired of seeing how other people set up their quilty homes. Design idea: how about a fresh take on pinwheels?
ReplyDeleteWell I missed being #10 by a long way!!
ReplyDeleteHow about a medallion quilt????
I love all the applique. I would like to see some paper piecing with applique added.
ReplyDeleteStunning quilt block. Loved reading your post. I would like to see you applique a more modern design.
ReplyDeleteI love your block. I love anything applique, I so enjoyed your rose appliqued quilt...Thanks for sharing!
ReplyDeleteSo much beauty in your quilts, I am thrills to see your work. Love your circles to. Thanks for the giveaway.
ReplyDeleteHow would you use antique handkerchiefs in a quilt?
Another wonderful post. I know it would be lovely to hear from you more often than the 1 monthly post, but then they would likely have to be shorter and that just wouldn't be as satisfying. I'd like to see more of the mix of piecing and applique, but everything you produce is beautiful.
ReplyDeleteThank you for all the inspiration! Your block is lovely. I'd like to see you do something quick and easy. Maybe a small project?
ReplyDeleteBeautiful block...I would love to see you design a gnome block!
ReplyDeleteThank you for all of your lessons. I learned a lot...but all those circles...I am glad that you don't cut them by hand. Thank you so much for sharing.
ReplyDeletewow! what an awesome post! I'd love to see something with peacocks or sea themed (mainly because I have a turquoise/yellow/gray quilt that I started and realized it has WAY TOO MUCH YELLOW and needs something to tone it down......) So, I'm selfishly on the hunt for some applique or embroidery to cover some of that yellow, and I am shamelessly dragging you into it.......
ReplyDeleteI would love a new design with lots of small pieces. Or that terrific small lone star block from the house tour.
ReplyDeleteWhat a happy post to read. Loved seeing the quilt that you made with your block and those beautiful quilts on your tours. I would like to see some whimsical santas as a pattern.
ReplyDeleteI love your block and patterns! I think most of your patterns are beyond my expertise, so perhaps a few easier designs?
ReplyDeleteWhat could you do with stars?
ReplyDeleteYour block is gorgeous, like all of your work. I would love to see you design another red and green appliqué quilt!
ReplyDeleteI love to see updated versions of antique quilts like Rose Kretzinger's. Your blog post was so full of great photos. I loved visiting all the beautiful studios.
ReplyDeleteWow, wow, wow. Love Target Practice and the quilt you completed with it. Love it. I had a thought? How about a pattern with embroidery? Maybe you could convert your applique designs into embroidery? Just a thought!
ReplyDeleteI really like the second idea for setting your blocks with the Irish chain border, wonderful!
ReplyDeleteIt is a realy nice block special with The Irish chain border is my favourite
ReplyDeleteThanks for the tips and I love your sstunning quilt and block!
ReplyDeleteI would like to see more quilts that would be suitable for men.
ReplyDeleteI love birds and pineapples. Your post was amazing. So many quilts Thankyou
ReplyDeleteToo late to be number ten, but I really enjoy reading your blog
ReplyDeleteSoo much eye candy!
ReplyDeleteI need to get some Mylar templets for my circles. Love you quilt. crystalbluern at onlineok dot com
ReplyDeleteWhat a wonderful, informative and interesting blog post! Thanks for sharing so much! Beautiful work, great tutorial and lots to reflect on!
ReplyDeleteThanks for all the great info. Love the block and the quilt that you made from it.
ReplyDeleteI have not done much applique but yours is beautiful.
ReplyDeleteYou are one busy lady. Sheesh I'm tired just reading your blog. i would like to see something for fall with a few leaves and maybe some squirrels.
ReplyDeleteLots of information and lots of eye candy. Can't get any better than that. Fun block but I don't do a lot of applique. How about some piecing for the other have? Maybe something to do with some variations on a traditional block?
ReplyDeleteSo much inspiration! I loved reading your post and enjoyed seeing all the pictures! Congrats on a great block! thank you!
ReplyDeleteI love those tiny little yo-yos! And what a lot of information in your blog! I can see why you only do it once a month!
ReplyDeleteWow...I loved your blog post and of course you block for the Quiltmaker magazine. I like quick and easy quilt patterns. Thank you for all the pictures in your blog and the chance to win.
ReplyDeletethim3@hotmail.com
Come up with Celtic appliqué --knots or something.
ReplyDeletereillyr2(at)hotmail(dot)com
Sue, your posts could never be too long for me! I love reading them. I've recently begun reading Cynthia's blog; her embroidery and embellishments are beyond beautiful. Thank you for sharing the tour with us.
ReplyDeleteI find it fascinating how you find inspiration for your quilts. Every one is a jewel!
What an informative blog post! Your block is delightful too! I'd love to see you play with something Halloween\Fall Themed! :-)
ReplyDeleteI enjoyed the post. what beautiful quilts.
ReplyDeleteIdea... well, I love things that are asymmetrical. So I'm drawn to on-point blocks. Is it possible to do a quilt that is more asymmetrical than on-point blocks?
ReplyDeleteWow, I just love your blog, definitely subscribing to this. Since you asked, I'd love to see more applique blocks in the flavor of your block in this issue of 100 Blocks, with the modern feel. I so love applique, and it's really wonderful to see new things, and the modern style is just something new, different and wonderful. Thanks so much for your block, and I simply LOVE YOUR BLOG!
ReplyDeleteYou add a lot of detail to your quilts. Such work(wo)manship. Target Practice is a nice block.
ReplyDeleteNo suggestions for you as I think you have done a wonderful job with the quilts you have made.
Wow--thanks for the detailed tour and for the excellent tip about using the left side of your 1/4 inch foot to obtain accuracy. I have so enjoyed this visit!
ReplyDeleteGreat block…boy you do fine work…your quilting is spectacular!
ReplyDeleteHow about some more circles or hexagons!! I love your block and can't wait to see the finished quilt.
ReplyDeleteI love your applique! How about a pieced quilt with applique borders? I just love the salmon/pink quilt, and the star with the pink. Your site has quite a lot of good info! Thank you.
ReplyDeleteGreat Block! Love your tidbits on organizing the ornery little pieces :) I love to see Baltimore albums, especially in Christmas settings….
ReplyDeleteLove your attention to detail in your designs!! These intricate touches give lots of depth and intrigue to the the final project. Thanks also for all of the great info in your post - really enjoyed reading it! :)
ReplyDeleteI think you should try something that uses charm squares. It looks like something that would be a challenge for you.
ReplyDeleteI may not be the 10th person, but I have to say there are some fantastic quilts and some interesting things on your blog post.
ReplyDeleteI'd like to see a more "guy" type block/quilt. I have a hard time getting my mind around that with out plaids or stripes.
ReplyDeleteI liked the colors you used to demonstrate your block & quilt.
I love your quilt block and the circles inside the zig zag border. I would love to see more quilt designs using the circles.
ReplyDeleteThis is a fun blog tour and thank you for putting my name into the drawing. I'm sorry but most of your pictures didn't load but I enjoyed what I did see. I like table toppers with snowmen.
ReplyDeleteLove this blog. You give we quilters a great deal of information and technique instruction. I would love to see you do a Christmas quilt that is simple. Circles and I do not get along when appliqueing.
ReplyDeleteI liked the angel idea someone else had! Thanks for the chance to win a copy. You do such beautiful quilting!@
ReplyDeleteksmith8@emich.edu
I just love applique, but maybe for something different, use "modern" fabrics or do something a little more quirky. But, please, don't give up your lovely work.
ReplyDeleteSincerely,
Paula K.
Your block would make a great Christmas quilt . How about designing a miniature . Thanks for the chance .
ReplyDeleteYour posts are always a feast for the eyes and the imagination. I love reading what wonderful projects you are working on.
ReplyDeleteWhat a great post, loved the pictures of everyone's "Studios". Thanks for sharing. The Target block is such a fun block and I love the quilt, especially the borders. I would love to see another quilt from you with tiny pieces. But, honestly everything you design is wonderful.
ReplyDeleteLove the dot border, I never saw a border like that before I am glad you posted it. I would like you to finish your target quilt so I can see it done. It kept getting better and better.
ReplyDeleteI love applique but don't have the patience for it. Your work is lovely. I would love to see some modern applique.
ReplyDeleteHow about something with an animal theme? Thanks for the opportunity to win the giveaway.
ReplyDeleteI love the look of your block. I tend to like blocks with small pieces so something like that would be great.
ReplyDeleteLove your block and border. I'm always looking for fun, new borders and would love for you to design more borders. Thanks!
ReplyDeleteThank you for another long, delicious blog! I love them and reread them several times to drool over the lovely quilts shown. I love the Target Practice quilt and love reading how you develop each border. As far as future quilts, I love baskets and stars and appliqué, singly or all together. Thank you again!!
ReplyDeleteThanks for so much quilting inspiration! I'm new (only a few months) and I really don't know what I would do without quilting! I love it that much. Your block is beautiful, but nothing less than I expected. I'm hoping to make a lot of your quilts, I think they are so beautiful. Happy Daze is my favorite at the moment! Thanks for the giveaway!
ReplyDeletetdkcarpenoctem@hotmail.com
Great block! I love doing Miniatures so how about a block with lots of small pieces?
ReplyDeleteYou designed a great block and quilt; lots of punch to it. How abut something for wool applique?
ReplyDeleteYour Target Practice block is awesome. I'm new to your blog and enjoyed all the information. I like ideas for scrappy quilts.
ReplyDeleteThe block for the magazine has a southwestern flavor to it to me, even though that doesn't seem to be what you had in mind. I'd like to see what you'd come up with if you tried for a southwestern look in a quilt or block.
ReplyDeleteI love reading your blog monthly. Your work is so beautiful, but I especially love that you are a hand quilter.
ReplyDeleteI have no ideas for you that others haven't already mentioned, I do favor a few small items such a table runners and place mats for an idea though.
Thank you for sharing the quilt studio tour. So many new decorating and organizing ideas. I appreciated homeowners graciously sharing to all of us who couldn't attend. Thoroughly enjoyable!
ReplyDeleteLovely post! I've been shopping online at Common Threads for years, so it was fun to see pics of the store itself... and those studios!! Love your QM block, too, and the variety of settings you shared. As for design, I'm a sucker for album quilts, holiday (any) quilts, and house quilts, just to skim the surface. Love everything you've done.
ReplyDeleteWhat a great block. I love how you went into detail about the design process of the quilt you made and the tips on keeping all those circles straight. I went looking in your store to get an idea of your style and loved all the beautiful patterns there. Have you ever tried working with animals? That was the only suggestion I could think of. Thank you for a chance to win and for sharing your great talent with us.
ReplyDeleteI would love a Christmas quilt with the focus on the Nativity or true meaning of Christmas
ReplyDeleteHave you done a quilt with a poinsetta? I really look forward to every post you make because of the fresh look on classic styles and the tips you give.
ReplyDelete