Whew -- that's a long Subject title for this post, but at least you have a clue about what's coming below. I've been having a lot of fun this past month - quilting in spare minutes here and there. Let's take a look!
First of all, can you figure out what you're looking at below? YES, IT'S THE LAST BORDER of Sarah's Revenge on my quilt frame. Oops! I heard so many people laughingly call it Sarah's Revenge that I sometimes forget and call it that too - when the real name of this quilt is Sarah's Revival - based on an antique quilt made by a woman whose name was Sarah. What you're looking at below is the quilt on my Grace frame -- I love the frame because it eliminates basting. Wheeeee!!! It's not my knees that make me dislike basting any more... it's my back! Bending over the quilt for 3 to 4 hours is a killer... until a three-pole quilting frame came home with me one day!

When I hand quilt, I like to keep a little tray table next to me. Note that I have on it several things: a cup to collect thread trimmings, a coaster for my Diet Coke, quilting thread spools, and little flashlights. What are the flashlights for? Because every once in a while, I lose a needle. It flips off the quilt top or falls out of my hand, and I need to find it before my foot does. I turn off the lights in the room, turn on the flash light, and the needle glints in the light when the flashlight eventually shines in its direction. It's a handy tool, since I drop a needle at least once a day.

Another tip... for hand or longarm quilters... is that I always pin a piece of fabric to the leaders (the wide canvas strips you attach your quilt top/back to). I never seem to be able to remember from quilt to quilt which way the fabric is to be pinned: right side up or up side down? So this little fabric square keeps me flying straight when I'm loading a quilt on my frame or machine.

So how do I go about hand quilting? It starts with an idea of what I want to do, but before I sit down, I always have a roll of painter's tape. I use it as a cross-hatching guide. You can see it on a quilt, behind the roll of tape in his picture:

But how do I make sure that my tape is at an exact 45-degree angle when I'm quilting? I use a triangle ruler. I place one edge of the ruler along a straight line (see the little arrows pointing down at the straight line I used). Then I make sure my tape lines up (see the l o n g arrow) with the diagonal of the triangle. It never fails me!

I use the same method with vertical lines: put one side of the triangle ruler along a straight line (the one you want your quilting lines to be perpendicular to -- indicated by the little arrows pointing up), and make sure that your tape (which is NOT in the picture below) lines up with the vertical line (by the long arrow I've marked). This method never fails me either. Yet, at least!

I use this same method when quilting cross-hatching across the blocks in this quilt -- it works!

But what about quilting little feathers on my ruffled swags? How did I do that in a uniform way? I had to give that some thought before I started quilting this quilt, as there was no template in my box of quilting templates that would fit this swag.

Using a piece of Templar and a Sharpie marker, I drew the outline what I wanted to quilt and then marked the lines that I wanted to quilt within that area. Next, I cut out every other feather... and on the odd feathers, I cut out the area that ran into the other side of the "smile" shape. It took a lot of care to cut smoothly and not too deeply, but it worked. Check it out, below -- it's my own "home-made" quilting template. Note that only HALF of the template design has been cut out -- I just reversed the template when I quilted the other side of the ruffled swag.

So here is the template, laid on top of the swag and ready to quilt. And here is my ever-present white-lead ceramic pencil for marking the template lines onto my fabric. If you use the pencil, use it with a light hand - it rubs off pretty easily (or you can use a Mars Plastic Staedtler eraser from your office supply store) if your quilting doesn't quite wipe it out.
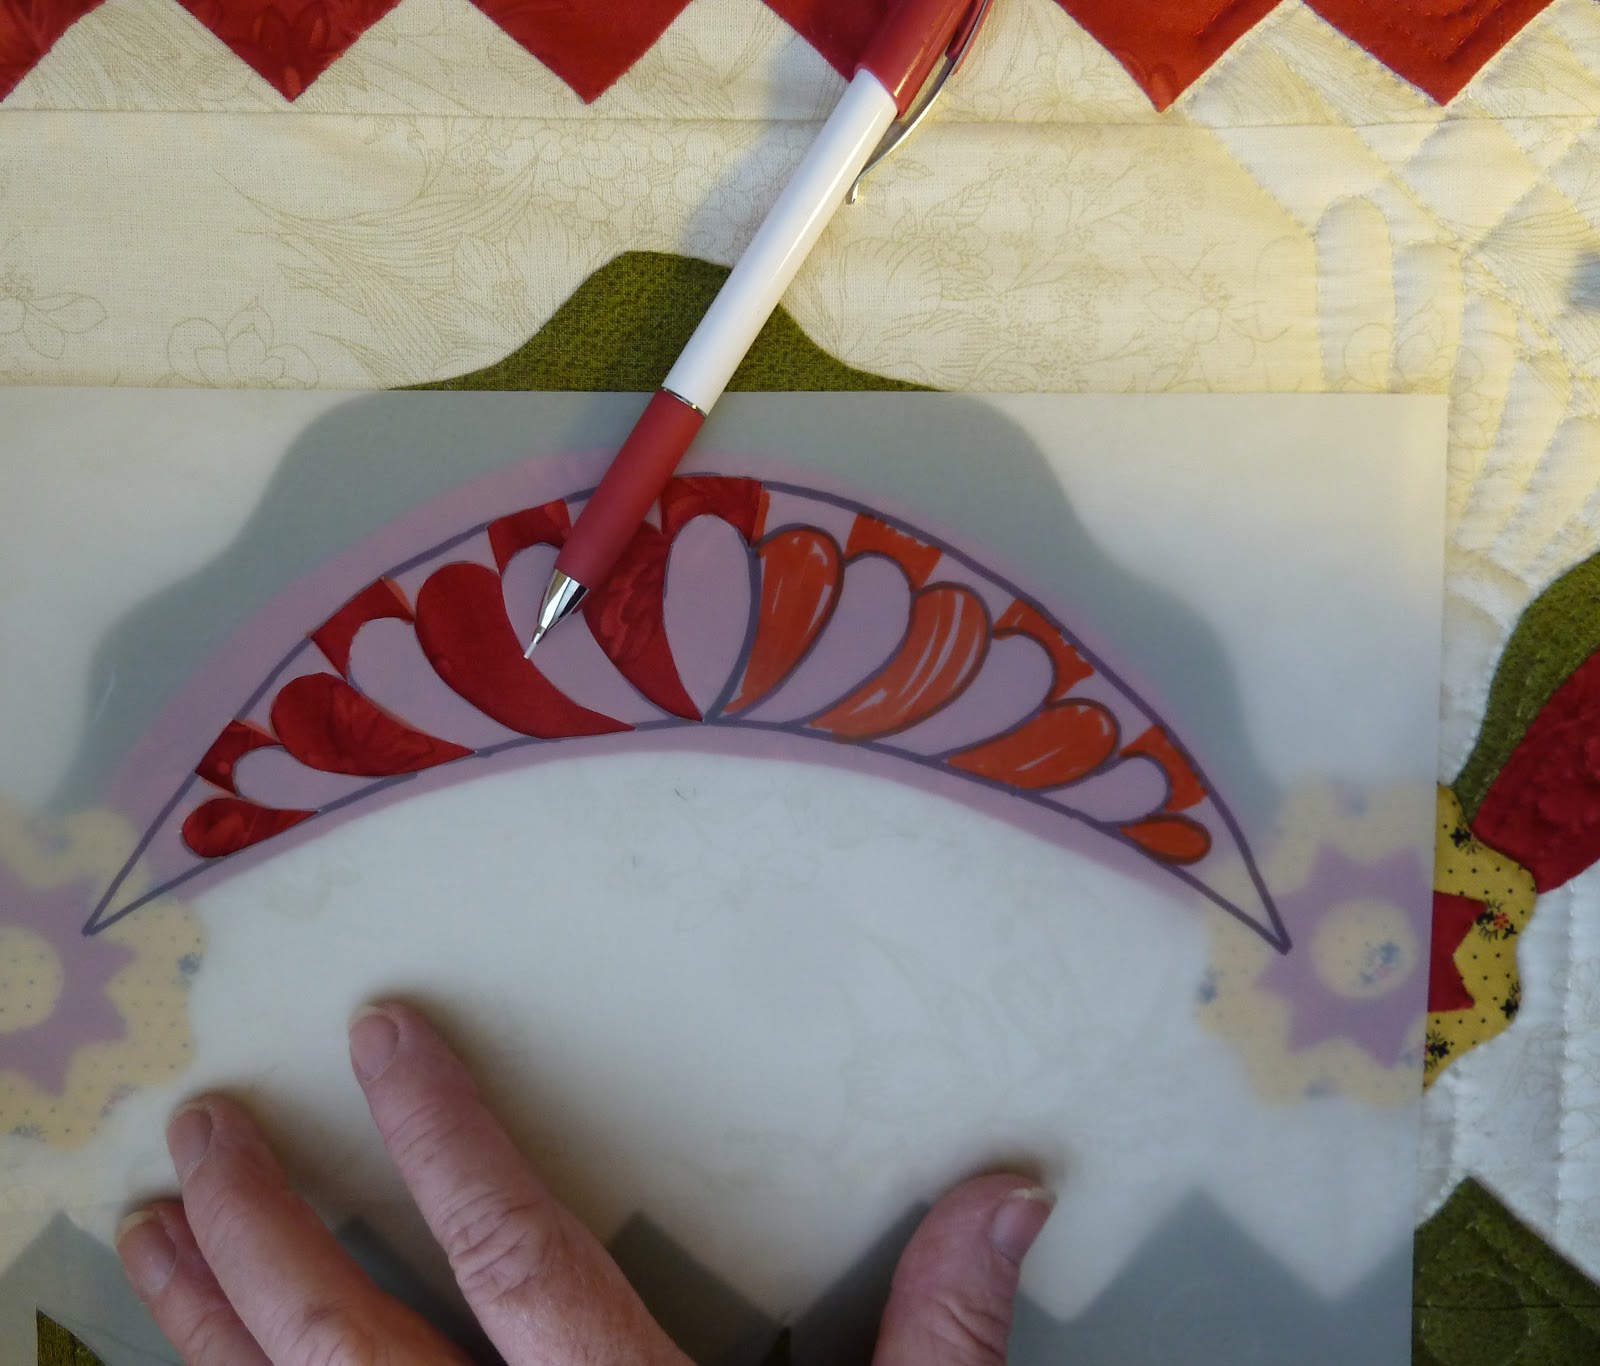
In the picture below, you can see that I've quilted the feathers. I remove the template to do the hand-quilting -- I am just showing it here so that you can see how it laid on top of the swag for marking it.

For the area between the swags, I decided that I didn't want to "just" do cross-hatching, so I took a border quilting template and used only a piece of the design...

Because this design is on an off-white background fabric, my white-lead ceramic pencil would not show up well. I use a cheap Papermate mechanical pencil to GENTLY mark the quilt design. By the time I quilt across the line, it becomes invisible. IF I have marked the line too heavily, I erase it til it is barely visible before I start quilting -- it's too difficult to remove pencil lines after quilting, otherwise. Can you see the line below? It's there! Note that I've only done one half of the cross-hatching on this part of the quilt... the other cross-hatch lines will be added soon.

And here is the finished quilted border. I love how it turned out!

Here's the cornerstone of that border. You may note that I've got little circles quilted in each of the dogtooth sections of the inner and outer border strip. How did I do those? I started off by using those adhesive circles you can buy at the office supply store and quilting around them, but the circles just didn't adhere to the quilt top well enough.

I pulled out my very FAVORITE circle template... I like it because it is thick plastic. It doesn't bend and it has a beveled edge for inking without bleeding. Sweet!

I used the template by putting it on the quilt and marking the circle with the ceramic pencil. It makes it very easy to mark and then quilt circles.

And here is the final Sarah's Revival quilt. I think it's one of my favorite quilts because it's so bright and cheery! Many thanks go to the original quiltmaker, Sarah, of course.

I'm always working on multiple projects during the month. You don't get to see them all - only those where I make progress, usually. Below is a quilt made by my friend Jerrianne's hairdresser's stepmother (did you follow that?!). This woman made dozens of quilts, all completely hand pieced, but never did finish them. The hairdresser gave a dozen or more to Jerrianne, and she has been feeding some to me to quilt for our guild's annual auction. The quilt block in this quilt was unusual - it was not one that Jerrianne or I had seen before. After much thought, I quilted the top with a simple Baptist fan (or "dinner plate") quilt pattern. It is a quilting pattern used often in the past.

Jerrianne and I, along with lots of other bee members, did a lot of guessing about this block pattern, though. Some thought it to be a flower pot or a flower basket of some sort. Others thought it was a wonky star or a crown. I think it looks like a rising star. Who knows?

I even looked in Barbara Brackman's Encyclopedia of Pieced Block Patterns... no luck there, either. The origins of this block remain a mystery... I suspect that it is just a unique creation!

I have another one of my friend Jerrianne's hairdresser's stepmother's quilt tops for my guild's auction... it's a unique Trip Around the World quilt top. Hopefully I'll have it quilted by next month and you can peek at it then. In the meantime, remember this block? I bought a set of them on eBay and they inspired my Happy Daze quilt, shown in a previous post. They did more than that, though.

They inspired yet another set of "twirly ball" blocks, which I did in browns, golds, and cheddars. But in this set of blocks, I reversed those "spikes" on the outside and had them point inward instead of outward.

I knew I wanted to set these blocks on point, with sashing strips made of 2" pinwheels. To do that, I cut hundreds of triangles. I stacked and stored them in cookie sheets like this:

Then I made paper foundations for strips of pinwheels -- and made those strips in two pieces-- a left and a right side. I laid out four triangles for each pinwheel, along with the background fabric, and started sewing.

For each pinwheel strip, I had to do two single strips -- one for the right side of the pinwheel and one for the left side of the pinwheel. Then I had to sew the halves together. Knowing that, I wanted each half-square triangle to face its "partner," such that the seam allowances would "kiss" and butt up against each other, instead of on top of each other. To do that, I had to sew one long strip from the "top" of the strip and one long strip from the "bottom" of the strip.

It works! Here is a sewn pinwheel sashing strip and you can see the seam allowances kiss quite nicely!

And here is the pinwheel strip, sewn together. Note that in this picture, I've cropped off the seam allowances in the photo - if I didn't do that, these pinwheels would look really wonky in the photo.

When I sewed the two strips together, I also pressed the seam allowances open. It wasn't easy -- but it was important because if I didn't do that, it would be quite difficult to get the foot of a longarm machine across that "hump" in the middle. I believe that you should always think ahead about how you will quilt everything when you are done. Note that when I sew the strips together, I do a LOT of pinning to keep those seam intersections meeting precisely where they are supposed to meet. Patience pays off. The other thing I do after pinning and pressing is that I place one of my long rulers on top of the pressed strip while it is still freshly pressed and warm. This keeps that seam from relaxing quite so quickly (thanks go to Sally Collins for that tip!).

So what did I do, once I had all those pinwheel strips sewn and pressed, along with a few more extraneous pinwheels?

I laid them out on the floor with my twirly ball blocks, of course! Take a look...

But it wasn't until I put the setting triangles in place around the border that the quilt came "alive" for me!

The quilt needed to be sewn together in diagonal strips. That meant that I had to take "half twirly ball blocks" and pair them with a setting triangle. Math isn't particularly difficult for me... but cutting triangles the right size for what is the equivalent of a 12" half-square triangle is daunting to me -- it's just WAY TOO EASY to screw it up and cut that diagonal seam allowance or the outer edges too big or too small. Now, bear in mind... the BLACK triangle IS the right size because I knew the finished block size was going to be 12 inches... and to make a setting triangle for a 12 inch block, I know you just quarter an 18-1/4 inch square. That's easy enough... so how did I put these together and have the whole block come out to be 12 inches square (finished size)?

First, I trimmed the diagonal edge of the appliqued triangle block... that was easy because I knew where the center of the block was, and I knew that the seam line would go through the "dip" in the dogtooth spikes in the outer circle of the applique. I just lined my ruler up, adding the quarter-inch seam allowance, and cut it. Next, I folded the black triangle in half to find the center of the long side.

I placed that center fold on top of the center of the appliqued triangle -- I knew where the center was on that triangle because there is a circle on the center of that triangle.

Next, I pinned the two triangles together, using plenty of pins because I was sewing a bias edge to a straight-of-grain edge...

And I stitched it very carefully, not letting it drag or be pulled... and removing pins as I stitched...

And after I stitched the seam line, I pressed the triangles open.

Here is where a 12-1/2 inch ruler comes in really handy!

I put the ruler down on top of the CORRECTLY SIZED black triangle... and trimmed the excess fabric off of the appliqued triangle. Voile!!! Simple as pie!

And I had a perfectly sized block, ready to stitch in place!

I'll spare you the details... but here is the finished quilt top. Sorry it's not the greatest picture -- I take photos in my entry way because it's big and flat... and the weather was not cooperating and providing good light! I'm going to be quilting this quilt in the coming month, so I'm sure you'll see more of Twirly Balls and Pinwheels! This quilt design will eventually be offered as a single pattern -- or shops can kit it as a 6-month block-of-the-month quilt. I should mention for those of you who have the Quilts of Virginia book, that the idea of using pinwheel sashing strips that drifted out into the border came from a quilt made by Fanny Tod in the 1800s. Ever since I saw that design, I've wanted to make a quilt with pinwheel sashing strips - and finally, I did it!

In the meantime, between other projects, I've been preparing some blocks for workshops that I plan to teach. That means... I have to design a new quilt! I have, after much thought, decided to do a teeny bit of lectures/workshops in the future. I have been on over a three-year hiatus due to family matters that took priority. So... you might see me out and about some time in the future! I'll be offering workshops on simple-to-make, pain-free wonderful feathered stars, lovely papercut applique blocks, and some elegant new Baltimore blocks, along with some other fun options. Here is one of the Baltimore blocks - a glorious eagle.

Here is a colorized version of the block -- I haven't decided if I want to make the eagle brown (its true color) or blue (it is such a rich color!). Both options were used in the heyday of Baltimore quilts over a century ago. I'll just have to audition fabrics to decide.

BUT... I really want to do a Baltimore album quilt with all of the blocks set on point. So... not one to take the easy path... I'm designing blocks that, with only slight alterations, can be used in either straight sets or on-point sets. How cool is that? Well... I think it's pretty cool! Except that I will have to make two blocks, since I need to have samples of blocks done both ways. That's okay - if I didn't love these designs, it might be a problem, but I LOVE these blocks! Here's the on-point eagle.

And here it is, "colorized." Isn't it awesome? Sorry if I sound like I'm stuck on my own designs, but I'm just really excited about doing these blocks! They will all be 15 inches, finished size.

Okay, I'm not quite finished yet... Several people had questions in the Comments I received. Here are some answers:
- Do I draw my patterns by hand or computer? I draw them out full-size by hand... then scan them and do a lot of clean-up work in Adobe Photoshop Creative Suite.
- Do I use an overlay for applique? Only when I have to - like when I'm making a complex Baltimore applique block and a light box isn't strong enough to penetrate multiple layers of fabric. Overlays are great, though - I like to use them when light boxes won't suffice.
- How do I avoid bleeding (when/if I block a quilt)? I try to prevent bleeding by pre-washing all fabric, and by avoiding chemicals which come in the form of starch, Best Press, fabric finish, washout markers, disappearing ink markers, frixion pens, or anything similar. The only thing I use on my quilts contain inert ingredients like plain old pencils, ceramic pencils, or white chalk. I try to avoid, also, being in a position where I need to block a quilt: I hand quilt in square frames and on the longarm, I make sure that my backing fabric is squared up (not shaped like a trapezoid).
- There were some other comments to talk about buying and putting fabric together, and piecing and hand-quilting tips. I'll answer those in another blog post, as I think my answers need some thought and pictures.
NOW I'm done... just in time to say that I really, really DID meet my deadline (Central Time, anyway) of posting on or by the first of the month. It's only 11:15 pm here... so I DID it! Until next month...
Happy quilting!
Sue
(c) 2013 Susan H. Garman


I am speechless - how do you manage to get so much done? And I love the new Baltimore blocks!!!
ReplyDeleteSusan,
ReplyDeleteHow do you make accurate circles when they are so large?
I love that you use antique quilts to generate your designs. I just think that it honors the work of those quilters - names known or not!
Such eye candy! Love your work and look forward to the first of the month for a new post!
ReplyDeletewow/ thanks for the tips! your worl is most impressive!
ReplyDeleteJust beautiful work!!!!
ReplyDeleteFabulous, as always! You are my hero! Glad to know you'll be teaching a little again. Thanks, Sue, for your wonderful blog!!
ReplyDeleteare the Sarah's Revival blocks reverse applique or needle turn applique? Beautiful quilt
ReplyDeleteA Baltimore album on point!!! I'm so excited! The eagle block is gorgeous, and I love it in both the brown and the blue! It will be tough to decide!
ReplyDeleteWonderful post! These quilts are all wonderful! And thanks for all the great tips and how-to's!
This is one of your best posts yet!
ReplyDeleteThank you for the how to instructions. It comes at a perfect time! I've been using the tape method on the Angel BOM quilt, but I've been on the fence on what to do on the border. Thank you!
I'm looking forward to your classes!
Just great storytelling this time, Sue! I love how you suck us in with the details of the pinwheels, and then wow us with the final layout! More fun than a rollercoaster! LOL.
ReplyDeleteAnd the blue eagle? Way, way better.
Great post. Thanks again!
Very informative! I enjoyed reading it. I especially liked your Twirly Balls and Pinwheels quilt. I'll be on the lookout for the pattern! Thanks for all the effort you put into preparing these posts.
ReplyDeleteYour quilts are absolutely breathtaking! You are amazingly talented. Thanks for sharing the pictures on your blog. I'm looking forward to seeing more pictures in the future. Thanks!
ReplyDeleteMy favorite post all month. I always learn so month.
ReplyDeleteFirstly, its fabulous news that you will be teaching again. Please keep us appraised. Although I am on the west coast, I will find a way to make one.
Secondly, the pinwheels sashing wheels quilt, sorry if you gave it a name and I forgot, is stunning, absolutely stunning.
Your work is such an inspiration !! thanks for the wonderful information on your hand quilting - fantastic that you take the time to show us those details!I love that "Revenge" - and the hand quilting is perfect.
ReplyDeleteHilda
I am completely and hopelessly in love with Sarah's Revival. :) Thanks you for sharing so much about how you go about your hand quilting. What batting are you using? It looks so nice.
ReplyDeleteI look forward to your posting each month with great anticipation. You never fail to amaze me both with the amount of work you do - and your great instructions! Love the Baltimore on point - have been wanting to make one that way for a long time. Looks like now is the time!
ReplyDeleteI can't wait to take classes with you. I am so excited. I am flying to wherever you teach.
ReplyDeleteThanks for all the photos of great work and sharing.
Oh My!!! As always your artistry takes my breath away. The Sarah Revival quilt is fabulous. Then what can a say about the pinwheel and twirly quilt other than I want to make it. I love the pinwheel sashing. Thanks again for your monthly posts.
ReplyDeleteI really do love your work Sue, But the new twirly balls are SOOOOOOOO great. It is one of my favourite quilts from one of my favourite books.
ReplyDeleteThanks for being so inspirational.
Incredible! Great, great quilt & I loved seeing your process.
ReplyDeleteWhat an informative post on handquilting! I learned a lot. The border quilting is gorgeous!! Those pinwheels make incredible sashing!
ReplyDeleteGreat post. I learned so much. Thanks. I am curious about the Creative Grids triangle ruler you used to mark quilting lines; I don't remember seeing it before.
ReplyDeleteSo many wonderful ideas in this post! Thank you for sharing your beautiful quilts!
ReplyDeleteSarah's Revival is very impressive and your quilting is just stunning. Thanks for the great tips! Ruth
ReplyDeleteWhat type of thread did you use to quilt this gorgeous quilt?
ReplyDelete