Showing posts with label design process. Show all posts

Monday, June 30, 2014

Simply Baltimore!


I love Baltimore album quilts.  It wasn't always that way; I had to learn to love them by designing my own album quilts.  First was Ladies of the Sea with lots of ships, followed by Friends of Baltimore with lots of flowers.  And now I'm working on four Baltimore quilts at the same time.  I am sure my friends must think I'm crazy and I'm not so sure that they are much off the mark.  So... let me show you what I've been working on this month.

After complaining for months that I had little time to design anything, as family and lecture/workshop commitments have really eaten into my schedule, I finally found a week when I was not on travel, not otherwise tied to meetings or workshops, and not trying to catch up on home tasks and chores.  It was heaven!  You saw some of the blocks in last month's blog -- I haven't made much progress on the ones I started because I've been working on the newer ones I've designed.  This month, I'm going to show you how I develop some of my ideas.  I get asked that question often and the answer is simple.  I often just look at old quilts... and adapt the designs I see there.

Here's a quilt that gave me a wealth of ideas.  It is an 1847 Baltimore album style quilt that is housed in storage at the Grand Rapids Public Museum.  The quilt has 16-inch blocks set on point, with most of blocks done in turkey red prints and greens.

 
Take a look at the individual blocks in this quilt.  They are fabulous!  Here is one that immediately caught my eye - a harp and leafy vines.  I love the simplicity of this block.  You cannot read the inscription, but it says "Mathilda Kindle (or Hindle), May 30th, 1847."  The quilt was made for an 1847 wedding. 

 
There are two other harp/leaf blocks in this quilt.  Here is a second one.  Aren't those little pots just too cute?  and funny!  The name "Mary E. Shipley" is embroidered below this harp.

 
When I decided to use one of these blocks in my own quilt, I chose the first option.  I have not prepped my block yet, but here is the pattern I've drawn out (and this is where I'm making four quilts:  one will be complex blocks - with an on-point and a straight-set option, and one will be simple blocks - also with an on-point and straight set option).  This design is for the on-point version of the harp/leaves block.  I've added a bird at the bottom because my "potted tulips" blocks that I showed last month have birds in them.  This helps carry some continuity across my blocks.

 
Another block that struck me as being unusual - but traditional - and wonderfully exciting to draw out and make, is the Christmas cactus block.  Here's the original block.

 
And here is my block.  My berries are a little bigger... the design is a little more refined... and only one of the four quadrants has been appliqued.  You can see from the block below that, when I can, I always like to baste all of the pieces of an applique block in place before I start the applique.  When I do that, I am ready to take the block with me and not have to carry an overlay or a tracing block along with me.  Sweet!

 
As you can see, I am sticking with a very simple color palette:  solid red fabrics, sometimes a red print if more than one red is to be used... and a green that carries yellow within it or is a very yellow-green print. 

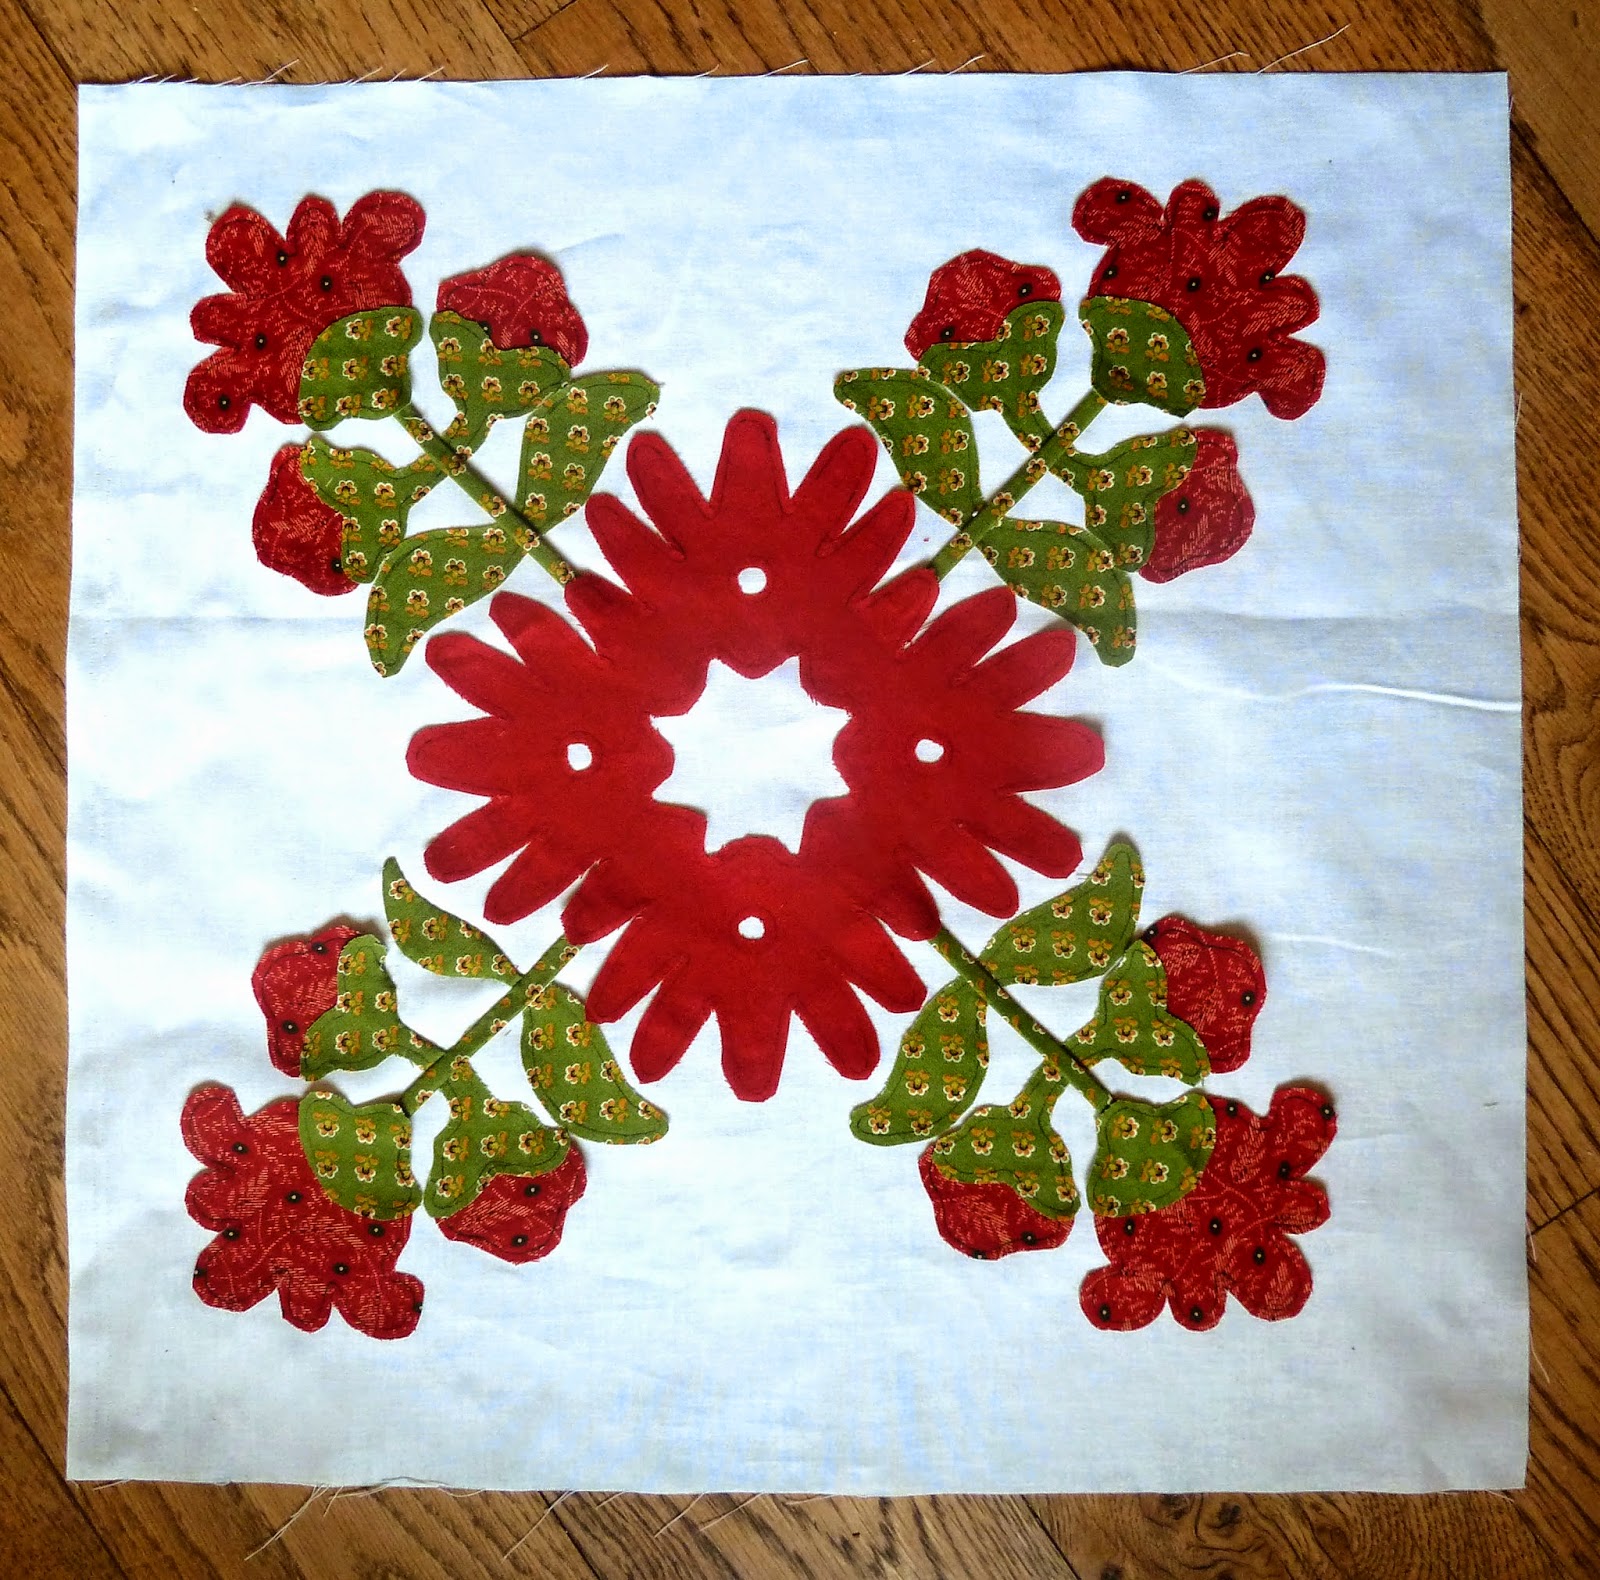
Another quilt that gave me a ton of ideas is this one, below.  This quilt can be found on the Mingei International Museum's website.  They have hundreds of quilts in their digital library - just do a search on "quilt" and you may be surprised how many quilts the museum has.  The quilt below was made in 1847 (maker unknown) and measures 99 inches square.  Take a look at the blocks in this quilt.  Is there one that intrigues you?  Or grabs your eye more than some others?  If you made a table with A-B-C-D-E on the top and 1-2-3-4-5 on the side, here are the blocks I really liked: A-4, B-1, B-2, B-3, C-1, C-2, C-5, D-1, D-5, E-2, and E-4. 

 
In particular, the E-4 block was a beauty for me.  It offered lots of opportunity for me to "rearrange" the flowers and refine the cornucopia. 

 
And so here is my block, below.  I have not finished it yet, so don't be too critical.  I finished the cornucopia, the red flowers, and some of the greenery.  I like how it looks, though, and especially like the green and black checked fabric that I chose for some of the leafs.  It's a good civil war print, though it's not seen often.

 
The quilt also had three different "crossed flowers" blocks in it that I thought I might take a stab at making.  Here was the first....
 
 
And the second...

 
And the third.

 
Which block did I choose to design, based on these inspirational vintage blocks?  Take a look below and you'll see.

 
And here is the block... I've prepped it and I'm ready to start stitching away on it.  In fact, I've already started stitching one leaf.  Can you find it?

 
This month, I also finished one of the pots of flowers that I designed last month.  It has a lot of leaves on it, but they were quick and easy to make.  The original block that this is based on did not have the woven red pieces in it.  I decided to add that touch because sometimes a block is just "too" simple.  that was the case on this one; it's tough, without a fabric that carries the vase, to have such a large area that is plain.  The woven insert was my solution.  It could just have easily been an appliqued flower atop the vase.  I use whatever strikes me at the time I'm drawing out the block.

 
Another block in the old quilt, above, had four pots of flowers.  I haven't prepped my block of four pots yet - but I've got it designed.  Here it is.

 
And my second two-flower block is now fully appliqued; it just needs to be pressed and trimmed to 15-1/2 inches square.  Bit by bit, I'm making progress on my four quilts.  You'll note that I'm doing them all at once - not one at a time.  I'm afraid if I did them one at a time, I'd never finish any of them.  Sometimes, doing many things at once is both more interesting and more challenging - and I'm always up for a challenge!

 
I have enough blocks for my quilt now, but I thought I'd show you another old quilt - this one is known as the 1847 "Reverend Nadal Quilt."  You can find pictures of it on the www.americanhistory.si.edu website.  Are there any blocks in this quilt that you think would be excellent candidates for adapting and putting into one of today's album quilts?

 
There is one that stuck out for me - this open wreath.  There are lots of different cherry wreaths in old album quilts, but this one is quite unique.  I like the multitude of leaves and the "pointed" cherries, though they are a bit of a mystery to me.  Nonetheless, you might see a block like this in one of my quilts, someday.

 
That's what I've been working on lately.  I wish I could say that I have more done, but I've been on travel half of the past month.  Maybe next month I can show you more progress.

In the meantime, Patricia Cevoli sent me a picture, below.  She had just gotten her Stars for a New Day (my pattern's name - her quilt is surely named something different!) back from her quilter and was in love with it.  In her words, "Your pattern was so easy to follow and it was spot on accurate.  Thank you very much for taking all the figuring out of my life!  Seriously!"  That made me laugh a little, but I know exactly what she means, since I do have to do a lot of math to put a pattern together!

 
Here's a close-up of her quilt.  I love the colors she chose - sort of a dusty Fall set of colors.  Patricia said the quilt was a blast to make and took about three months with 5 hours per day.  She said she didn't know what to do with herself when she was finished... so she's started a feathered star quilt.  She's a glutton for heavy-duty piecing!

 
And here are some close-ups of the quilting in Patricia's quilt.  It's wonderful!


Thanks, Patricia, for the pictures.  All of you - I love when you send me pictures!

Below are a few pictures I took at the Ozark Piecemakers Quilt Guild, where I went and spoke and taught this June.  For me, nearly every guild I visit is unique - some more so than others.  This guild was unique in that they rent a very large space in a strip center for their meetings, bees, and other gatherings.  That's quite an expensive proposition, but they have the processes in place to make it work - and work well!  The guild was very friendly and warm - and I had a great time despite late planes and lost luggage.

 
Here, the room starts filling up - they have two meetings on guild day, one in the morning and one in the evening, for their 350 members.

 
When a guild has its own space, like OPQG does, they can put things on the walls and expect them to stay there.  The guild has photos of all of its members.  It must be wonderful to recognize all the people in your guild!

 
They don't have to haul their library back and forth every month - it stays in place (you can only see a portion of their extensive book collection).

 
The storage rooms they have in the back are enormous - this one is dedicated to their bazaars, which helps fund the facility rent.

 
And this room held an even more extensive collection of fabric for community quilts, soldier quilts, baby quilts, and more.  It was all organized my color and type, with much of it kitted and ready for members to take with them to finish a quilt.  This guild has not let its large facility costs distort their mission of educating their members, providing quilts to the community, and sharing their love of quilting with the public.  It is an AWESOME guild!


That's all I have to share this month -- it's a short post, but like I said:  I've been traveling a lot lately and I'm even posting this (July) post early since I'm leaving town again soon.  The next couple of months, my posts will likely be similarly short, as I'm going to be running at full speed in order to get ready for the Baltimore on the Prairie workshop in September.  Time is flying!

I hope the summer is treating you well - and that you have plenty of time to quilt!

Happy stitching -

Sue
(c)2014 Susan H. Garman


Tuesday, January 28, 2014

Pat Sloan, the Quilt Guild of Greater Houston, and more!

 
January 2014 is just about history... and my area south of Houston is experiencing some very inclement weather.  It's not often that we hit 24 to 28 degrees!   Schools are closed, businesses are closed, and roads are closed.  To me, this sounds like the PERFECT day to hide out in the sewing room!  First of all, I want to do a big shout-out to Pat Sloan, one of my favorite people.  At the end of this blog (because if I give you a link now, you may not get back here to finish reading it!), I'll share a link where you can go and listen to Pat interviewing me on her online "radio" show.  She interviews lots and lots of quilters - you may find yourself sewing while listening to the stories of a whole lot of them.
 

If you read my December 31 post, it started off with a picture of the quilt that my youngest grand daughter had quilted.  Daisy has not lost her enthusiasm for learning about quilting.  Daisy calls me GiGi (the acronym for Grandma Garman) in the "story card" below that she gave me, telling about my trip to Tampa last year to teach several workshops.  Of note:  the bottom square has Daisy's polka dot quilt!  We should all be working to inspire the youngest generation, so that they can experience the same joys that we do as they grow. 


I want to show you a nifty little trick that you all may want to use in the future.  My friend, Jerrianne, had finished making her modified Mary Mannakee quilt, which will have nine blocks and a border of flowers and vines.  When she finished assembling the blocks, she started working on the borders... and read my last blog post.  Here was her quilt, at that point, when she showed it to one of the bees we go to:


And here was a picture of the quilt, shown in my last blog post:


And what did she see when she saw that blog?  She saw that the top right and center right blocks fought for attention with the similar cheddar flowers.  Hmmm... she hadn't seen that until she saw a photo.  We might all learn from that:  if we take photos of our quilts and look at them, we might notice something that we want to change.  Jerrianne printed out the picture from the blog...


And she cut the photo apart and rearranged the blocks, as shown below.


Then she "made" a new photo of the rearranged blocks and was much more pleased with the results.  She only had to undo a few seams, but it saved her from being disappointed if she had not noticed those blocks together until after the quilt was completely finished.  I think I may start taking more pictures of blocks, laid out, to see how they look.  I don't generally use a design wall when I make my quilts; my walls are all full of paintings and windows and furniture!  So here's the "rearranged" photo.  Can you see how the orange flowers are more balanced with this arrangement?  It's a great way to test the layout of an assortment of blocks.


The next bunch of photos are all quilts that hung in the 2013 Quilt Guild of Greater Houston.  I had the pleasure of judging this show and the quilts were fabulous; I showed some of them last year, but here's some more of the quilts.  In preparing these photos for the blog, that happiness that comes when you see a bunch of pretty quilts... came rolling back!  The QG of Greater Houston is 500 members strong, so they have a wonderful base of quilters who submitted quilts for their shows.

This quilt, Pineapple Madness (102 by 102 inches) was made by Karen King and quilted by Hannah Lee.  The design was based on Gyleen Fitzgerald's Trash to Treasure ruler.  The quilt took many hours and careful planning -- and surely Karen's sister, who was gifted with the quilt, can appreciate how much Karen cares about her.  It has such wonderfully vibrant colors in it!


In this close-up picture, you can see the quilt has wonderfully vibrant colors in it!  This was among my favorite quilts in the show.


Cabin in Blue Light (76 by 76 inches) was made by Barbara Jensen and quilted by Kathy Colvin.  It was Barbara's first large quilt, and was based on a quilt she saw on the cover of a Quilter's Newsletter magazine.  With no pattern, Barbara had to do some math to make her version.


Barbara's use of a central blue square in each log cabin is perfect, to me; the traditional red square would have been lost in all of these fall colors.  Barbara gives Kathy credit for making this quilt "shine."  The quilting certainly adds a wonderful softness to the hard lines of the cabin logs.


In another "blue" titled quilt, Blues in the Night (84 x 108 inches), geometric shapes reign!  Tim Nash made and quilted this, his fourth quilt.  His three previous quilts were all charm pack quilts, so he said he was getting bored with squares.  In his own words, "Yikes!  Was I in for a surprise."  His piecing is wonderful - as is the use of different fabrics in each block.  I love scrappy quilts with many different fabrics, and this quilt had a challenge:  it is often difficult to make blues "cooperate."  It is often said that all reds go together, but it's not so with the blues... unless you are Tim, who mastered them in this quilt.


Doris Fleming made Rose Garden for Wendy (82 by 104 inches) for her grand daughter as a gift and tribute recognizing her accomplishments and high school graduation.  I love when quilts have personal meaning to them; it makes them extra special and I'm sure Wendy will more than love this quilt.  The design is from Marti Mitchell's American Beauty; the quilt was quilted by Cathy King.


The soft colors of the fabrics used in this quilt are given life with the addition of a rich pink and a sweet green fabric.  When Doris made this quilt, she liked the fact that each block was different, making it more interesting.  Look at the close-up of two of the blocks.


Pineapple Swirl (63 by 63 inches) was made by Pam Tedeschi, Teresa Darr, and Connie Brown.  Teresa quilted it.  The design is a pattern from a Trash to Treasure workshop by Gyleen Fitzgerald.  The three gals shared fabric scraps in the workshop, creating one quilt.  This is an unusual setting for pineapple/log cabin blocks; it's really nice.


Betty Rivers made and quilted Right Direction (50 by 50 inches).  The design came from a Judy Mathieson class at the International Quilters Association show in Houston each Fall, and from some "rejected" Snail's Trail Scrapaholic Trade blocks.  Together, the blocks seemed to, "point in the Right Direction," according to Betty.  I believe that the genius in this quilt is combining those blocks.  It certainly is not an intuitive combination (to me), but it works so well, as does the choice of colors. 


Teresa Darr's Perspective - No Glasses Required (24 by 24 inches) is small... but the choice of such boldly contrasting solid fabrics made a big, dramatic statement.  The piecing on this quilt was perfection-plus.  Teresa's design was inspired by a wallpaper design.  She experimented in creating "the illusion of depth with a minimum of color and shape." 


Teresa quilted the quilt herself - and the back of the quilt is a treat with its knife-edged facing that includes mitered corners - all in the same contrasting colors used in the face of the quilt. 


Oh my - there were so many favorites in this quilt show!  Here as another one, Cherry Pie (51 by 56 inches), made and quilted by Jackie Hillman.  I had a delightful conversation with Jackie about her quilt.  She developed a unique method for making flying geese -- and then discovered that she could make pies with this "split flying geese technique."  She found a cherry pie panel that she used in this quilt..... and then knew that she had to make this cherry pie quilt.


The "1950s" shade of red and green together made this quilt so pretty.  Here are some close-ups of various parts of this quilt; it was one of those quilts that simply put a smile on everyone's face.  Look at Jackie's use of rick-rack for the top of the pie crust.  That was absolutely a genius touch!


In fact, the whole quilt was genius - from designing the pies to stacking an assortment of pies, to the fabrics chosen for all of the pieces, .  Check out the border in this photo; Jackie's husband helped her design them.


But there was yet more to see - this is a quilt that "kept on giving."  Once me and my friends started studying the quilt, we noticed much more.  Here, you can see that the quilt has a knife-edge binding.  Those are not always the easiest bindings to put on a quilt, and this one was very well done. 

 
But wait! Wait!  There's more!  When we flipped the top back to see what other surprises there might be, we found...  more surprises!  Jackie used her scraps and leftover blocks in the quilt backing.  This quilt was just a beautiful experience to see.


Gerry Bosworth both made and quilted Fractalled Pinwheels (48 by 48 inches), below -- as well as designed it.  This was the fifth quilt Gerry ever made; I'd say she deserves applause for everything about it:  the design, the fabric choices, the piecing... it was a fun quilt to see.  Gerry made the quilt with her old Kenmore sewing machine, which has since been retired.  She says she will eventually come back to this theme.  I like the idea!


Betty Rivers created Circles of Life  (55 by 56 inches) using the Heartland Wedding Ring Templates.  The center blocks were from some old class samples made in 1997.  With a knack for creativity, Betty finished this old UFO by adding new rings with less contrast and fewer parts - and she then added interesting and complex textures to the space left: the open areas are all quilted with different quilting patterns.  It's a quilt that requires a second look; that's the kind of quilt I enjoy seeing; it's as if a quiet surprise sneaks up on you as you look at it.  To top it off, Betty used a neutral plaid for the binding, that served to add to the overall look of the quilt.


Paisley Pinwheels (23 by 23 inches) was made and quilted by Debbie Ingram.  The design came from the Jo Morton Little Women Club.  Would you believe that there are 38 different fabrics in this quilt?  The pinwheel stars are each made of a scrappy assortment of different reds and tans.  When Debbie got to the border of this quilt, she had barely enough for it.  Luckily, she had just enough!


Do you remember the old granny square afghans that were made back in the 50s and 60s?  I do - and this quilt, Modern Granny Square (68.5 by 68.5 inches), reminds me of them.  Susanne Purvis made it as a "quilt along project" led by Jennifer Jenkinson.  The oversized Granny Square quilt has a modern feel to it, per Susanne.  Linda Beiswanter added to that feel by machine quilting oversized flowers in the blocks, and a large feathered vine in the border.


Sharing Squares (30.5 by 30.5 inches) was made by Susan Penny and Barbara Barrett, and quilted by Susan.  The design came from a simple block exchange between friends.  I love the bright vibrancy of this quilt!


Martha Matiuk created First Stop Paris! (60 by 60 inches) using a Trip Around the World design.  The quilt was part of a challenge issued by her bee:  make a black and white quilt... and you can add only one other color.  Obviously, Martha chose red as her additional color - and it works well in this quilt.


In this close-up, you can see that there are, indeed, a wide variety of fabrics that went into making this quilt.  Her choices were grand.


Pam Tedeschi made Love, Love Red (38 by 38 inches), using the book Simple Contemporary Quilts by Valerie VanArsdale Schrader.  I love the wonky look of this quilt.  Doesn't it make you want to do something fun?!

Marsha Hennigan made Fiesta Lone Star (47.5 by 47.5 inches) and quilted it herself.  This quilt was started during a class with Jan Krentz.  The colors she used were chosen to celebrate her time in the Texas Hill Country. 


The name of this quilt was a surprise to me:  The English Garden (56 by 56 inches).  Paper pieced by Alice Sadeghpour and quilted by Cathy King, the Judy Niemeyer design was given an entirely different look when Alice jumped at the opportunity to use Kaffe Fassett fabrics.  Alice's choice of fabrics and their placement is very well done.  Congrats to her on making this gorgeous quilt!


This quilt, unfortunately, did not photograph well - sometimes my little camera fails me because the quilt is too large or too far away or doesn't have enough light or has too much light.  In any case, the picture is still worth showing to you.  Yellowstone Revisited (85 by 76 inches) was made by Debbie Wolf and quilted by Debbie Kendall.  The applique designs are from Quilting the Great Outdoors by Debbie Field.  What I loved about this quilt was that the centers of the log cabins are all printed photos on fabric that were purchased on Debbie's trip to Yellowstone.  Debbie says, "The Log cabins were very busy and needed applique to tone them down."  I would say that Debbie made some great choices.  The use of photos in the log cabins was not something I'd seen before, and I love surprises like that!


Here's a close-up of one of the log cabin centers.  Think how many memories this quilt contains!


I would think that Janice Schindeler had a lot of fun making and quilting My Friend Ann Loves Cats and Tea (70 by 78 inches).  The inspiration for this quilt was a "hootchy story quilt class" taught by Mary Lou Weidman.  Every year, Janice's friend, Ann, visits and they take a quilt class.  This quilt was started in one of those classes to keep Janice company between visits with her friend.  Look how FUN this quilt is!!!


Speaking of friends and quilting... The Quilt Show, Alex Anderson and Ricky Tims' online quilt community, helped when Debbie Wolf decided to host an international exchange of half-square triangles.  With help from a lot of others, she managed, recorded, and redistributed over 250 thousand half-square triangles that 600 quilters mailed to her.  Phew - I'm worn out just thinking about how much time and effort went into that project!!  But look what Debbie did with her share of the half-square triangles; she made Oh, The Places They've Been! (80 by 100 inches) and had Jane Plisga quilt it for her.  The design was based on patterns by Mountain Top and Sweet Sixteen by Laundry Basket Quilts.


Rhonda Dort made and quilted Christmas Stars (60 by 74 inches).  The top was made in 2010... and quilted just a few days before the quilt show opened.  How is that for "in the nick of time" or finishing a UFO, finally?!  The quilt is an adaptation of the 54-40 or Fight block.  It's a favorite of mine and Rhonda did a beautiful job making the quilt - and quilting it.  She quilted the border with some wonderful swags, making them almost look like trapunto had been used.  The border print used between the center and the outer border was a great choice.


Timothy was made and quilted by Jane Plisga using a Wheel of Mystery kit from John Flynn.  She made it to honor her brother - and had fun doing curved piecing.  Not many would agree that curved piecing is fun - but once you master a couple of blocks, it gets so much easier!  I have always loved this block and scrappy quilts, so this quilt caught my eye.  The use of feathered vines and cables in the border was a nice touch - along with the tiny piping at the quilt's edge.


Here, you can see a close-up of some of the blocks in the quilt.  It's amazing, isn't it?!


Here is another quilt that was dramatic because of the color choices:  black, white, red, and gold.  Made and quilted by Teresa Darr, Cat's Game (48 by 48 inches) shows a game of Tic Tac Toe where nobody wins - a "cat's game."  There is no outer border on this quilt, by the way - that's just the black background I put behind photos so that the quilt stands out.  This quilt was very striking!


Texas Bluebonnets (26 by 26.5 inches) was made and quilted by Cheryl Moncrief.  She used a Melinda Bula pattern, and fused and thread painted the flowers onto a pieced background design.  To finish the quilt, Cheryl machine quilted the quilt with silk thread.  Silk is a very fine thread and seats itself quietly into the fabric when used to quilt a quilt.  Melinda is one of my favorite quilt designers - I keep trying to take a class from her at the Houston quilt festival, but they seem to fill instantly when registration begins.


Barb Paliatsos made this quilt because she wanted to piece some complex blocks.  The blocks in My 30's Sampler (69 by 85 inches) have between 53 and 152 pieces.  Barb designed the setting and borders to complete the theme - and Jodi Canter quilted the quilt.  I like these blocks - they are each basically a set of four blocks set inside of a bear paw block that is sashed.


Here's a close-up of the block - you can see the bear pay block here, along with the four mini-blocks in the "paw" portion of the block.  The edge-to-edge quilting was a nice choice for this quilt.


This quilt, entitled happiness (73-3/4 by 95-1/4 inches) is appropriately named!  Made by Susanne Purvis and quilted by Linda Beiswanger, the quilt was based on a design in Kaffe Fassett's Kaffe Quilts Again book.  The bright colors in the "S" block are definitely happy ones!


Zinnia (26.5 by 24 inches) was made and quilted by Kelley Bennett, in a class taught by Melinda Bula at the Houston quilt show.  The zinnia is raw-edge fused with lots of beautiful thread-painting to make it come alive.  Someday, I'll get into Melinda's class and then I'll be posting my own Zinnia!


Last but not least, here is a photo of one of the information pieces that the Greater Houston Quilt Guild had laid out for viewers to see, along with plenty of information and samples of their comforter or community service quilts.  I thought I would share it here because buried in the write-up are some good ideas that I might pass along to my own guild -- like tying some quilts instead of machine quilting all of them.  We are shy a few machine quilters when it comes to keeping up with the quilt tops that have been prepared in our guild - and some of the quilts would look quite nice, tied.  Also, I like the idea of suggesting that guild members donate a quilt in their own birth month.  After all, we each have much to be thankful for... and paying it forward is an honorable act.


Well... we're at the end of this month's post.  I didn't share anything about the projects that I've been working on, but I promise you:  I've been stitching like crazy, learning new techniques, designing new quilts, and more!  I'll have plenty to show you when I have TIME to show you!!!  so, before I close, two more things are in order.

First... do you remember that this blog post started with a reference to Pat Sloan and her "American Patchwork & Quilting Radio" show? 


Well, here's a link where you can click and go to her web page... look for our discussion on January 20, 2014.  Pat is a hoot and so much fun, as you'll see - she makes me laugh!
http://www.creativetalknetwork.com/
Once you're there, ignore the fact that my name is spelled wrong (it is Garman, not Garmen), scroll down to where you see me holding one of my granddaughters and click... and listen.  You can listen on your computer, subscribe by iTunes (search American Patchwork & Quilting), or download to a player.  Also, ignore the ads that show some of my patterns available from Quakertown through Amazon.com -- neither of them carry my patterns so don't waste your time or money there!

Second, and finally... thank you all so much for your kind words and support.  I work hard to design quilts, make patterns, inspire and educate quilt makers everywhere, and make all of you love quilting as much as I do.  I really appreciate each of you - those who read my blog, who buy my patterns, who send simple little notes of thanks... you're the best!

Until next month.... happy quilting!

Sue
 
 
(c)2014 Susan H. Garman