Monday, April 2, 2012

Working Away....

Yes, I've been working away this month, trying to finish a new quilt... and finish some old ones... and finish some blocks... and help a couple friends finish their work... phew!   I'm almost out of breath! Except I'm not... because I relaxed at a guild retreat this past weekend, which explains why I'm late (again) posting on the first of the month.  So here goes... a lot of different things, but I hope you enjoy them and learn at least one new thing.  Let's get started!

I co-chaired my guild's retreat (www.lakeviewquiltersguild.org) this past weekend and we had a great time working on projects and sharing friendship.  Members of other guilds sometimes attend - and members of the Island Quilters Guild were working on their new raffle quilt.  It was a beautiful Judy Niemeyer quilt, with phenomenal machine quilting done by Marcia Henry.  It was a quilt that simply glowed as we oohed and aahed over it!  And it is the perfect raffle quilt -- it will draw people to it, ready to open their wallets and buy some tickets. 

And here's a close-up of Marcia's wonderful quilting. 


Last Fall, I participated in a Secret Sister exchange, and gave my secret sister blocks each month for 3 months.  At the retreat, she put them all together; take a look at JoAnn's quilt.  Now, I want to make more of those blocks and put together a quilt for myself.  I love how JoAnn set the blocks on point -- it's not a setting that most of us intuitively choose to use, and even if we do, we don't always use print fabrics in the setting triangles.  Good job, JoAnn!


One of the things that happens at retreats is you get to see others working on their projects - and they inspire everyone.  Here's a quilt with baskets -- you can probably see how simple they were to assemble -- I love blocks like this!  What is not obvious is that the basket handles were made of bias strips that were machine appliqued in place, making assembly even easier!  My friend Mary Jo was working on this quilt....


...while her friend was working on this set of pink baskets.  I love the border print she plans to use:


In the meantime, my friend Cynthia was assembling her triple four-patch blocks into a large bed-sized quilt.  She had several leftover blocks, and a bunch of leftover four-patch squares.  She gave them to me... and after I came home on Sunday, I started making blocks from the 4-patch squares and adding them to the set of finished blocks.  I still have more 4-patches to assemble into blocks; when I'm done, all of these blocks will go into my guild's annual auction.  I'm chairing it this year, so I'm always on the lookout for items to add to the auction, which funds many of our guild's monthly programs.


While putting those blocks together, I also worked on my Block-of-the-Week blocks (but I'm making 7 of each block pattern, so it's really a block-of-the-day!).  Here are four of the latest... and a stack of the remaining units.  I like paper piecing, so I generally take every pieced block and draw up a paper foundation for it... you can see my stack has the pre-cut fabric and foundations, ready to sew together.  I have all the remaining block-of-the-week blocks ready to sew, and just need to find the time to get them done.  Don't you love how the same block can look so different based on fabric choices?  Part of what I love about making all these blocks is the fact that they are chewing through my scrap pile!


My guild's quilt show is coming up in May, so a lot of us are getting quilts finished or ready to be quilted.  One of my friends travels a lot and knew she would not have time to quilt her quilt.  I volunteered to quilt her quilt, as she's done plenty of favors for me.  Here is Cynthia's round robin quilt -- I loved quilting this quilt, even though there wasn't a lot of opportunity to do anything fancy in the open areas, as there weren't any!  I love this quilt -- how can 6 women, independently, do such wonderful designs and make such a gorgeous quilt?  It happens!


Here's a close-up of the quilt so you can see some of the quilting.  I did diagonal cross-hatching in the area outside of the swag border, and straight-line quilting inside of the swag border.  I love how that looks on the outside border of a quilt. 


I also finished quilting my own round robin quilt.  What a lucky gal I am, to have such talented friends!  Actually, they are talented, but mostly, I think that round robins inspire all of us to stretch ourselves to come up with exceptional additions.


In this quilt, I did 1/2-inch diagonal cross-hatching in the interior border -- I love how "neat" it looks in a quilt!


And here's a close-up of the outer border -- again, I used straight line quilting inside the swag border and 1-inch diagonal cross-hatching outside the swags. 


In a couple of months, I will post pictures of all of the finished quilts that were involved in this round robin series -- they will be in my guild's quilt show in May. 

Okay -- here's a picture of an antique quilt -- a Princess Feather quilt.  When I first saw it, I knew I had to make one.  It was just so bright and colorful!


I started making this quilt about 7 years ago.  It was always my "take-along" applique project until I finally finished the applique on it.  Then it sat around for two years while I debated what borders or sashing to put on the quilt.  I opted for no sashing and several plain border stripes, as I wanted a space where I could insert a wonderful quilted border design.  The photo doesn't do the quilt justice -- you can see all the wrinkles and miss the dynamic look of the quilt in the photo, but all of this will look great once the quilt is quilted.  I'll work on quilting this quilt sometime in the next month.  Or two.  No sense pushing myself too hard, right?!


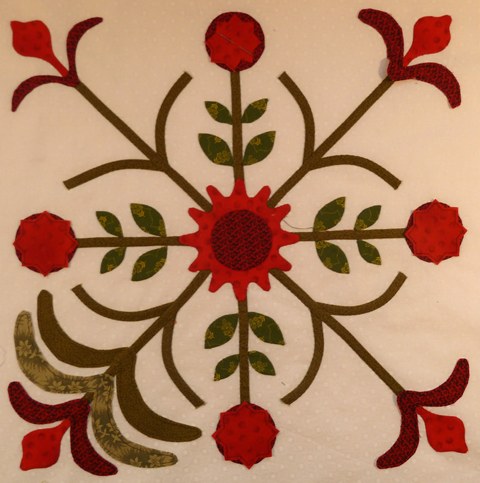
And here is the new block-of-the-month that I have been working on.  I changed the design once I finished piecing four of a planned five feathered star blocks; after laying the quilt out on the floor with all of those pieced and applique blocks, it just looked way, way too busy.  So... I removed the feathered star blocks and when I assemble this quilt, I will put some nifty quilting in the empty block areas below.  I had to rearrange the blocks after I removed the feathered stars, which meant that I needed a ninth applique block -- that's it in the lower left corner.  I still have a lot of applique left to do in the setting triangles.  This quilt is going to be called Bed of Roses.


Here's a close-up of what the setting triangles will look like -- this is the only one that I have finished appliquing, out of all of them.  Sigh... so much to sew, so little time...


Okay, now for a little departure and example of the process I use for designing and making quilts.  Below is a picture of a quilt made by Serena Tucker in 1853, for her own marriage.  The photo was in the book Quilts in Community:  Ohio's Traditions -- 19th and 20th Century Quilts, Quiltmakers, and Traditions by Ricky Clark, George Kneper, and Ellice Ronsheim.  In one of my bees, we decided to give ourselves a little challenge:  take the tulip vase block in this quilt and reproduce it... in whatever format each person wanted:  make it bigger, smaller, different colors, or whatever other modification came to mind.  I love these kinds of challenges because I know I will see so many different thought processes at work. 


So what is my thought process?  I thought you'd never ask!  First, I drew a pattern of the block for the participating bee members.  Take a look; it's a pretty simple 12-inch block.

But then... I had to figure out what I wanted to do with my own version of this block.  The first thing I did was to try out various combinations of colors, using Adobe Photoshop.  Here's  design using greens and reds and golds....


And here's another one, using a gradation of pink to red shades for the flowers....  I was drawn to this version because I felt like it was quite unique and with the right combination of fabrics for the vases, there would almost be a "glow" to the quilt when it was done.


But I realized that with sixteen 12-inch blocks, I would have to do a LOT of applique and I would end up with just a 48-inch square quilt.  Hmmm.  You know I love applique but this might be a little bit of overkill!  So I put my thinking cap on and decided that maybe I only wanted to make a four-block quilt -- less applique, right?  And then I decided that I should consider fabric I had always wanted to use:  cheddar and teal -- it was used often in quilts in the 1800s.  So I made a mock-up of that fantasized version....


But... really, with only four 12-inch blocks, will I really be happy with a finished 24-inch square quilt?  I like bed-sized quilts.  Or at least large lap quilts.  So I thought... hmmm...   why not enlarge the pattern and make the blocks 36 inches square?  Yes!  That's the ticket!  I put that little 12-inch pattern on my printer and enlarged it, bit by bit, in 16 different sections... so here's the 36-inch pattern, all taped together from the enlarged sections.  Yeah - four of THESE babies will make a NICE sized quilt, once some outer borders are added!


And hence... the birth of what I'm calling "Tucker's Tulips."  It's 86 inches square - now we're talking!


I hope you learned something by watching how my thought process worked.  It always involves just a little bit of experimenting, tweaking, imagining, and trial-and-error before the final design pops out of nothingness!  We had about ten gals each make their own version of the Serena Tucker blocks -- and I cannot wait to show you the results.  The quilts will hang in my guild's quilt show in May - I'll post photos after that, and you won't believe the variety!

Next month I hope to show you the finished Bed of Roses quilt... my fingers are crossed!  And maybe something else will be finished by then, too.  I never know what will sneaky little project will crawl out of my UFO trunk, calling my name and begging to be finished!

See you in May -- until then, happy quilting, everyone!
Sue
(c)2012 Susan H. Garman

Thursday, March 1, 2012

Yee Haw!!! It's Rodeo Time!!!!


Houston really starts to rally when the Houston Livestock Show and Rodeo comes to town -- it brings millions of dollars to scholars - plus it's just a LOT of fun! And rodeo time... reminds me it's time to have fun, which means it's time to sew. Over the past two months, I've tried hard to focus on sewing... and relaxing... and sewing some more... and so finally, I have a few things to show you. First of all, I've always wanted to make a crazy quilt and I've been saving fabric and ideas for ten years. Finally, I figured out that instead of waiting for the perfect set of ideas to materialize in my head (no pun intended!), I should just make a ton of fans and put a different stich down each fan blade and embroider some sort of motif in the area outside of the fan. Below is my first one... with half of a fuschia blossom done. I think I bit off more than I can chew with this project -- embroidery is not for the faint of heart... it reminded me of why I gave up counted cross stitch. For the amount of time it takes me to finish a 12" block, I could make a whole quilt! Nonetheless, all of my fans are done, so working on the stitching of the fan blades... over many, many months, one stitch at a time, will ultimately give me my long-sought-after crazy quilt!


The next picture is another very simple sawtooth star - I gave instructions for it in my November 30, 2011 post.  These stars are simple and fun to do - and they are great for using up scraps.  You can see one finished star below - along with a stack of pre-cut units for making a little over a dozen more stars.  I cut up my scraps as I go, so that I always have some stars ready to sew.  What am I going to do with all these stars?  I don't know yet, but I better hurry and figure it out...


Because I have a stack of 50 FINISHED star blocks to go with the unfinished ones.  Somehow, I don't think using them is going to be a problem!


I also found time this past month to resume working on my Block of the Week blocks -- making one block a week for a whole year gives me 52 blocks.  Somewhere around block 39, though, I fell off the wagon and stopped sewing these blocks.  And to make matters worse, I have not been making one block a week... I've been making one block a DAY... so at the end of the year, if all had gone well, I would have over 350 finished blocks!  Back to block 39... I finished that set of 7 and started on the next set.  Here's the first one... I am terrible at precision piecing except I know how to turn any block into a paper-pieced block which is what I did with all of the blocks.  So here's the first one....


and here's the other six that I made using the same pattern.  It's pretty nifty to see how one pattern can look so different depending on color, pattern, value... it's an interesting combination to see what I end up with when I'm fnished!

 Here's another one of the blocks....


And here are its six siblings in different fabrics.  This is where you can really start to see some differences in the background fabric and the star prints!


And here are another six blocks; the seventh is a duplicate of one of them, so I didn't squeeze it into this set of pictures.


But below are the almost 300 blocks I've finished so far...  I'll use some in a scrappy quilt; some will
become borders in quilts, some will go into my guild's auction... and who knows where the rest will go?!


So what else have I been working on?  I've got a new quilt in the works.  See it below?  You can see how I tape little fabric swatches onto each pattern so I can keep straight which fabrics go with which block.  This will be a scrappy red and green quilt -- half applique and half pieced. 


Once I have the fabrics chosen, I like to batch them together so I don't lose track of what they are for.  You can see below that I've got all the fabric batched together for five different 15-inch star blocks -- I'm ready to roll at this point!


I really got rolling on the applique blocks over the past two months - there will be 8 applique blocks, 5 pieced blcoks, and a dozen corner/side setting triangles.  Here's the only block I've finished so far.


This one is finished except for sewing down all those circles.  If you look closely, you can see all the "tail threads" which I'll use to sew the circles on with. 


Here is the third block; it too has a lot of tail tyhreads that I'll be using to sew down the pomegranate circles.  I also have e of the gold flowers left to applique in place -- you can see here that I prepare all of my units, baste them in place, and then go back and needle-turn applique them onto the background fabric.

And this poor fifth block -- it's just covered in wooly tail threads, with all those berries based in place and ready to stitch down! 


This block is not as done as it might look - you can see that the green "spikes" are sewn down on the left side flower and the lower left corner....and the circles are ready to stitch in place on the center flowers, once they are sewn in place.


These next three blocks have a lot of stitching left to do on them - this one needs berries packed onto all of those empty stems.


And this one needs a ton of berries, too -- at least these are sewn and ready to stitch down, though!


This last block has a lot of work left to do -- only one corner is basted and ready to sew - the others still have work ahead, as do all the red side flowers.  Andonce the spikey leaves and flowers are in place, there are a ton of flowers that need to be finished.  Sigh.... 


I get a lot of my sewing done by putting zip-lock bags together with berries ready to stitch... these go with me on doctor appointments, bee meetings, or just about any other trip out of the house.  Note that my bags have more than needle, thread, scissors, and berries...  I have my note card with a list of things to do... a magnetic "Needle Nest" to keep my needles from slipping around in the baggies and poking me, and somewhere in that bag is an extra pack of needles.  You can see that I organize things so that I rarely miss a beat:  I can always make a teeny bit of progress even on a very busy day!


My 13 blocks will all be set on point, requiring setting triangles to be placed along the side and corners of the quilt center.  The quilt will be called Bed of Roses.  Here is the on-point applique design... 


and here is the first half-started setting tirangles...  I think I'm really going to like how these look around the quilt's edge!
 
You might ask... but what is she doing for the pieced blocks?  I'm making my own version of a feathered star.  With some clever twisting of triangles, the star will look almost like it has a halo of traingles in its center.  The paper piecing foundations are ready to go... I just need time, time, and more time.  Leap Year day gives me an extra 24 hours... I suppose I should be thankful for it, but it just made me want ANOTHER extra day this year!  Okay, so I lied.  I want an extra day every week....


I can't show you the project I spent most of the last half of December working on, along with the first half of January... but here's a teeny tiny hint...  Maybe I'll give you another little hint before the cover is pulled off the entire project; this is a quilt that will be shown in the June issue of Quiltmaker magazine!


The above hint is obviously part of a papercut block... which brings me back to Sarah's Revival, the papercut quilt I recently finished.  I'm in the process of hand-quilting it and just finished quiltng the first block using 3/4" cross-hatching.  Hand-quilting is SO relaxing for me - I love it! 

Here's the border - I love how quilting really does make a quilt come alive!  I generally buy 2-3 quilt stencils at every major quilt show I go to, so I have quite a collection of stencils to choose from when I decide which motifs I want to include in a quilt.  The important thing to remember about using stencils is you do not have to use the WHOLE stencil each time you use it -- in the quilt below, the scalloped shell between the swags is part of a much larger stencil - but I only used the scallop portion of the stencil.


Below you can see the quilting in the corner of the quilt.  I love how it looks!


Remember back in November when I showed you a tulip challenge quilt?  Several members of a bee I'm in decided to use a late 1800s twleve-inch red and green tulip block, and remake it however we wished.  I've seen MANY combinations of enlarging, shrinking, re-coloring, etc. of this tulip vase block.  For my own quilt, I enlarged the 12-inch block and turned it into a 36-inch block... and then made four of them using teal blue, red, gold and cheddar!  By the time I was done, I was not a happy camper - the block was too twirpy  - read: ugly - for my tastes.  I decided that I needed to take the primitiveness of the block (which is what happens when you supersize them!) and lift it out of the gutter by adding a very formal, structured, elegant background of quilting.  Here is the pre-quilted quilt top....

And here is the quilt, complete with 1-inch and 1/2-inch cross hatch quilting.  Doesn't it make a difference in the look of the quilt?!!
 

Here's another view..... 


And here is the whole quilt...  The quilting really made a difference by adding a formal texture to an informal applique pattern.  I was quite surprised at the difference and now I'm ready to start another quilting project like this!  The key to quilting with a longarm (for me) is to quilt it like you would like to see it hand-quilted.  Don't take shortcuts and give it a fast whirl... add what you would have added if you'd quilted it by hand!
 

And now... we're at the end of the trail for this month.  A hundred Salt Grass Trail Riders came clippety-clopping down the road where I live last week, so I know the rodeo is in town  and it's time to keep on sewing! 
Best wishes and happy sewing to all--
Sue Garman
(c)2012 Susan H. Garman